WarpParse 0.20 版本发布:数据集成能力再升级!
亲爱的用户们,
我们很高兴地宣布 WarpParse 0.20-beta 版本发布!本次更新主要聚焦于 数据集成能力的全面增强,引入了多项全新的 Sink 连接器,旨在为您提供更灵活、更高效的数据处理体验。无论您是需要将数据写入 ElasticSearch 进行实时分析,还是导入 Doris、ClickHouse 进行大数据处理,亦或是通过 HTTP/HTTPS 与各类服务进行集成,0.20 版本都能满足您的需求。
本次更新亮点
新增多款高性能数据 Sink
为了更好地支持多样化的数据存储和分析场景,0.20 版本新增了以下强大的数据 Sink:
- ElasticSearch Sink:现在,您可以轻松地将解析后的数据批量写入 ElasticSearch 的
_bulk接口。我们支持 HTTP/HTTPS 协议,并提供了超时、重试以及密码认证等配置选项,确保数据传输的稳定性和安全性。这对于需要实时数据索引和搜索的应用场景至关重要。 示例:
[connectors.params]
protocol = "http"      # 连接协议,按需改为 https
host = "localhost"     # Elasticsearch 服务地址
port = "9200"          # Elasticsearch 服务端口
index = "wp_nginx"     # 写入的目标索引名
username = "${SEC_USERNAME}"   # 用户名
password = "${SEC_PASSWORD}"   # 密码
batch_size = 1_0000    # 单批次写入记录数
-
Postgres Sink:新增对 PostgreSQL 数据库的写入支持,为您的关系型数据库集成提供了便捷途径。
-
Doris Sink:通过 Stream Load API,您可以将数据高效地批量写入 Apache Doris。我们支持自定义 Stream Load headers、超时、重试和密码认证,让您在处理大规模数据时更加得心应手。
-
ClickHouse Sink:现在支持通过 HTTP 传输的 RowBinary 格式将数据写入 ClickHouse,同样提供了超时、重试和密码认证配置,助力您进行高速分析。
-
HTTP Sink:这是一个功能强大的通用 Sink,支持将解析后的记录发送到任何 HTTP/HTTPS 端点。它非常适用于 webhook、API 集成和自定义数据管道。您可以选择
json、ndjson、csv、kv、raw、proto-text等多种输出格式,并支持 Basic Auth 认证、自定义请求头和 gzip 压缩,以及超时、重试配置。
具体使用,可以查看 配置文档
优化与修复
- 依赖升级:我们将
wp-connector-api升级到 0.8 版本,有效减少了不必要的依赖。 - Event ID 修复:同步了上游
wp-motor的修复,统一了wp_event_id的生成逻辑,并成功避免了运行时重启后回退到进程内种子导致的重复 ID 问题.
立即体验新版本!
我们建议所有用户升级到 0.20 版本,以体验这些新功能和。您可以通过以下链接获取更多详细信息和升级指南:
curl -sSf https://get.warpparse.ai/beta_setup.sh | bash
感谢您一直以来对 WarpParse 的支持!我们将持续努力,为您带来更多创新和实用的功能。
WarpParse 团队
2026年3月20日
使用指南
WPL 学习目标与练习
实战教程 (T1-T4)
CLI 工具集
本文档集合介绍 WarpParse提供的完整命令行工具集,包括数据解析、生成、项目管理等功能。
工具总览
核心工具
| 工具 | 功能描述 | 主要用途 |
|---|---|---|
| wparse | 数据解析引擎 | 实时数据流处理、批处理分析 |
| wpgen | 数据生成器 | 基于规则或样本生成测试数据 |
| wproj | 项目管理工具 | 项目初始化、配置管理、数据统计 |
| wprescue | 数据恢复工具 | 从救援目录恢复处理失败的数据 |
快速参考
wparse - 数据解析引擎
# 守护进程模式(持续运行)
wparse daemon --work-root ./myproject --stat-print

# 批处理模式
wparse batch --work-root ./myproject --max-line 10000 --stat 5
wpgen - 数据生成器
# 基于规则生成数据
wpgen rule --work-root ./myproject --print-stat --line-cnt 10000

# 基于样本生成数据
wpgen sample --work-root ./myproject --line-cnt 5000

# 配置管理
wpgen conf init
wpgen conf check
wpgen conf clean

# 数据管理
wpgen data clean
wpgen data check
wproj - 项目管理工具
# 项目初始化
wproj init --mode full

# 项目检查
wproj check

# 数据清理
wproj data clean

# 统计功能
wproj stat file
wproj stat file --output json

# 模型管理
wproj model list
wproj model validate

# 规则工具
wproj rule parse --rule-id myrule
wproj rule test --input sample.log

# 配置管理
wproj sinks list
wproj sinks validate
wproj sinks route
wprescue - 数据恢复工具
# 批处理模式恢复数据
wprescue batch --work-root ./myproject
工具关系图
graph TD
    A[wproj] --> B[初始化项目]
    A --> C[检查配置]
    A --> D[统计数据]

    B --> E[生成配置文件]
    B --> F[创建目录结构]

    C --> G[验证配置有效性]

    D --> H[源数据统计]
    D --> I[输出数据统计]

    J[wpgen] --> K[生成测试数据]
    J --> L[管理生成器配置]
    J --> M[管理输出数据]

    N[wparse] --> O[实时流处理]
    N --> P[批处理分析]
    N --> Q[性能调优]

    R[wprescue] --> S[数据恢复]
    R --> T[故障恢复]
学习路径
- 初学者:从 快速入门指南 开始,了解完整的配置和使用流程
- 进阶用户:深入学习 wparse 运行模式,理解两种运行模式的区别和适用场景
- 数据工程师:掌握 wpgen 使用指南,能够生成各种测试数据
- 运维人员:使用 wproj 项目管理 进行日常的项目管理和监控
- 故障处理:参考 wprescue 数据恢复 处理异常情况
常见使用场景
实时流处理
# 启动守护进程,持续处理数据流
wparse daemon \
  --work-root ./myproject \
  --stat-print \
  --robust online
批量数据分析
# 批处理分析历史数据
wparse batch \
  --work-root ./myproject \
  --max-line 100000 \
  --check-continue 1000 \
  --stat 10
开发测试
# 开发模式,详细日志
wparse batch \
  --work-root ./myproject \
  --log-profile dev \
  --max-line 100 \
  --stat 1
数据生成测试
# 生成特定场景的测试数据
wpgen rule \
  --work-root ./myproject \
  --conf-name test.toml \
  --line-cnt 10000 \
  --gen-speed 1000
故障排除
常见问题
-
配置文件找不到
- 确保在正确的工作目录下运行命令
- 使用
--work-root参数指定工作目录
-
权限错误
- 检查工作目录和日志目录的写权限
- 确保有足够的磁盘空间
-
内存不足
- 减少
--max-line或--parse-workers参数值 - 使用
--robust参数设置合适的鲁棒模式
- 减少
-
数据源连接失败
- 检查
connectors/source.d/目录下的连接器配置 - 验证网络连接和认证信息
- 检查
日志分析
# 查看实时日志
tail -f logs/wparse.log

# 搜索错误日志
grep -i error logs/*.log

# 使用 wproj 进行项目检查
wproj check --work-root ./myproject
版本信息
查看工具版本:
wparse --version
wpgen --version
wproj --version
wprescue --version
环境变量
| 变量名 | 描述 |
|---|---|
WP_PARSE_ROBUST | 设置全局鲁棒模式 |
WP_PARSE_LOG_LEVEL | 覆盖日志级别 |
RUST_LOG | Rust 日志级别(调试用) |
退出码
| 退出码 | 含义 |
|---|---|
| 0 | 成功 |
| 1 | 通用错误 |
| 2 | 配置错误 |
| 3 | 数据错误 |
| 4 | 网络错误 |
| 5 | 权限错误 |
技术架构
CLI 工具采用 Rust 编写,使用 clap 框架处理命令行参数,tokio 异步运行时。核心功能通过 wp-engine 库的 facade 模式对外暴露,确保 API 稳定性和向后兼容性。
项目结构
warp-parse/
├── src/
│   ├── wparse/          # 数据解析引擎
│   │   └── main.rs
│   ├── wpgen/            # 数据生成器
│   │   ├── main.rs
│   │   ├── cli.rs       # CLI 定义
│   │   ├── rule.rs      # 规则生成逻辑
│   │   ├── sample.rs    # 样本生成逻辑
│   │   ├── conf.rs      # 配置管理
│   │   └── data.rs      # 数据管理
│   ├── wproj/            # 项目管理
│   │   └── main.rs
│   └── wprescue/         # 数据恢复
│       └── main.rs
└── wp-engine/            # 核心引擎库
    └── facade/args.rs    # 参数定义
这种设计确保了:
- 模块化:每个工具职责单一,易于维护
- 复用性:核心功能通过库共享
- 可扩展性:便于添加新的 CLI 工具
相关链接
WarpParse 核心概念速查
本文档帮助零基础用户快速理解 WarpParse 的核心概念和术语。
什么是 ETL?
ETL 是 Extract(提取)、Transform(转换)、Load(加载)的缩写。简单来说:
- Extract(提取):从日志文件、数据库、消息队列等地方读取原始数据
- Transform(转换):把非结构化的文本转换成结构化的数据(如 JSON)
- Load(加载):把处理好的数据存储到目标位置(文件、数据库、ES 等)
类比理解
就像一个智能快递分拣系统:
- Extract = 收件(从各个地方收集包裹)
- Transform = 分类(按地址、类型分类打标签)
- Load = 派送(送到对应的目的地)
WarpParse 核心术语
| 术语 | 英文 | 通俗解释 | 类比 |
|---|---|---|---|
| 输入源 | Source | 数据从哪里来 | 水源(文件、TCP、Kafka) |
| 输出源 | Sink | 数据到哪里去 | 水池(文件、数据库、ES) |
| 连接器 | Connector | 如何连接数据源/目标 | 水管接头(配置连接参数) |
| WPL | Warp Processing Language | 数据提取规则语言 | 筛子(定义如何从文本中提取字段) |
| OML | Object Modeling Language | 数据组装规则语言 | 模具(定义如何组装成目标格式) |
| 规则 | Rule | 一条解析规则 | 一个筛子的设计图纸 |
| 字段 | Field | 要提取的数据项 | 筛子上的一个孔 |
| 管道 | Pipe | 数据处理流程 | 水管(数据流动的路径) |
数据流转过程
原始日志 → [Source 读取] → [WPL 解析] → [OML 转换] → [Sink 输出] → 目标存储
   ↓              ↓              ↓              ↓              ↓
文件/TCP      connectors     提取字段       组装对象      文件/DB/ES
详细说明
-
Source 读取:从配置的数据源读取原始数据
- 文件:读取日志文件
- TCP:监听网络端口接收数据
- Kafka:从消息队列消费数据
-
WPL 解析:使用 WPL 规则从原始文本中提取字段
- 识别 IP 地址、时间、数字等类型
- 解析 JSON、KV 等结构化数据
- 验证和过滤字段
-
OML 转换:使用 OML 规则组装输出格式
- 字段重命名和映射
- 类型转换(字符串→数字→时间)
- 条件判断和计算
-
Sink 输出:将处理后的数据写入目标
- 文件:保存为 JSON/CSV 等格式
- 数据库:写入 MySQL/PostgreSQL
- 搜索引擎:写入 Elasticsearch
快速入门路径
阶段一:
1、跑通 Getting Started,看到数据流转起来
2、学习 WPL 基础类型(ip、digit、time、chars)
3、学习 OML 数据组装
4、在 editor 学习了解 demo 样例
阶段二:
1、在 editor 上开始完成 T1 题目
2、在自己空间下创建 wpl和oml
3、配置 Source 和 Sink
4、使用 wpgen 生成样例数据,wparse 进行执行查看输出
项目目录结构
工作目录/
├── conf/              # 配置文件
│   ├── wparse.toml   # 解析引擎配置
│   └── wpgen.toml    # 数据生成器配置
│
├── connectors/        # 连接器定义
│   ├── sink.d/       # 输出连接器(数据去哪里)
│   └── source.d/     # 输入连接器(数据从哪来)
│
├── data/              # 数据目录
│   ├── in_dat/       # 输入数据(原始日志)
│   │   └── gen.dat  # 生成的测试数据
│   ├── out_dat/      # 输出数据(解析结果)
│   │   ├── demo.json       # 所有成功解析的记录
│   │   ├── default.dat     # 命中wpl未命中oml异常数据
│   │   ├── error.dat       # 异常数据
│   │   ├── miss.dat        # 未命中wpl异常数据
│   │   ├── monitor.dat     # 监控数据
│   │   └── residue.dat     # 残留数据(部分解析成功)
│   ├── logs/         # 运行日志
│   └── rescue/       # 失败数据(用于排查问题)
│
├── models/            # 模型定义
│   ├── wpl/          # WPL 解析规则
│   │   └── wp-space/
│   │       ├── parse.wpl    # 解析规则文件
│   │       └── sample.dat   # 规则测试样本
│   ├── oml/          # OML 转换规则
│   │   └── wp-space/
│   │       └── adm.oml      # 对象映射规则
│   └── knowledge/    # 知识库(SQL 查询等)
│
└── topology/          # 拓扑配置
    ├── sources/      # 数据源配置
    └── sinks/        # 数据目标配置
目录说明
- conf/:全局配置,如日志级别、性能参数
- connectors/:定义如何连接数据源和目标
- data/:所有数据文件的存放位置
- in_dat/:存放原始输入数据
gen.dat:wpgen 生成的测试数据
- out_dat/:存放解析后的输出数据
all.json:所有成功解析的记录(JSON 格式)default.dat:默认输出文件error.dat:解析过程中出错的记录ignore.dat:根据规则被忽略的记录miss.dat:缺失必需字段的记录monitor.dat:监控和统计数据residue.dat:部分字段解析成功的残留数据
- logs/:运行时日志,用于调试和排查问题
- rescue/:解析失败的原始数据,用于重新处理
- in_dat/:存放原始输入数据
- models/:核心业务逻辑(WPL 规则和 OML 规则)
- wpl/:WPL 解析规则,按命名空间组织
wp-space/parse.wpl:具体的解析规则文件wp-space/sample.dat:规则对应的测试样本
- oml/:OML 转换规则,按命名空间组织
wp-space/adm.oml:对象映射和转换规则
- knowledge/:知识库,如 SQL 查询、IP 库等
- wpl/:WPL 解析规则,按命名空间组织
- topology/:数据流拓扑配置
常用命令速查
| 命令 | 功能 | 示例 |
|---|---|---|
wproj init | 初始化项目 | wproj init --mode full |
wproj check | 检查配置 | wproj check |
wproj data stat | 统计数据 | wproj data stat |
wpgen sample | 生成测试数据 | wpgen sample -n 3000 |
wparse batch | 批处理模式 | wparse batch --stat 3 -p |
wparse daemon | 守护进程模式 | wparse daemon --stat-print |
wprescue batch | 恢复失败数据 | wprescue batch |
下一步
阅读完本文档后,建议按以下顺序学习:
相关文档
GettingStarted
前置准备
- 下载 wparse
- copy到可执行路径下。如 /usr/local/bin 或 /${HOME}/bin
一、初始化工作目录
- 清理并初始化配置与模板
wproj init --mode full
wproj check
执行完成后,工作目录将包含:
├── conf
│   ├── wparse.toml
│   └── wpgen.toml
├── connectors
│   ├── sink.d
│   └── source.d
├── data
│   ├── in_dat
│   ├── logs
│   ├── out_dat
│   └── rescue
├── models
│   ├── knowledge
│   ├── oml
│   └── wpl
└── topology
    ├── sinks
    └── sources
二、生成数据与清理
wproj data clean
wpgen data clean

# 生成样本(示例 3000 行,3 秒统计间隔)
wpgen sample -n 3000 --stat 3
三、运行解析
# 批处理(-n 指定条数,-p 打印统计;失败时查看 ./logs/ 下日志)
wparse batch --stat 3 -p
四、统计与校验
# 同时统计源与文件型 sink
wproj  data stat
Wproj
wproj 是 Warp Parse 项目管理工具,提供完整的项目生命周期管理功能,包括项目初始化和配置管理、数据源的检查和统计、模型管理和知识库创建维护。
命令概览
wproj <COMMAND>

Commands:
  rule   规则工具:解析规则的管理和调试 | Rule tools: management and debugging of parsing rules
  init   一键初始化完整工程骨架 | Initialize complete project skeleton
  check  批量检查项目配置和文件完整性 | Batch check project configuration and file integrity
  data   数据管理工具:清理、统计、验证 | Data management tools: cleanup, statistics, validation
  model  模型管理工具:规则、源、汇、知识库 | Model management tools: rules, sources, sinks, knowledge base
init - 项目初始化
一键创建项目目录结构和默认配置。
wproj init [OPTIONS]
| 参数 | 短选项 | 长选项 | 默认值 | 说明 |
|---|---|---|---|---|
| mode | -m | --mode | conf | 初始化模式 |
初始化模式:
| 模式 | 说明 |
|---|---|
full | 完整项目(配置+模型+数据+示例+链接器) |
normal | 完整项目(配置+模型+数据+示例) |
model | 仅模型文件 |
conf | 仅配置文件 |
data | 仅数据目录 |
示例:
# 初始化配置(默认)
wproj init -w /project

# 初始化完整项目
wproj init -w /project --mode full
check - 项目检查
批量检查项目配置和文件完整性。
wproj check [OPTIONS]
| 参数 | 短选项 | 长选项 | 默认值 | 说明 |
|---|---|---|---|---|
| work_root | -w | --work-root | . | 根目录 |
| what | - | --what | all | 检查项 |
| console | - | --console | false | 控制台日志输出 |
| fail_fast | - | --fail-fast | false | 首次失败即退出 |
| json | - | --json | false | JSON 格式输出 |
| only_fail | - | --only-fail | false | 仅输出失败项 |
检查项(–what):
| 值 | 说明 |
|---|---|
conf | 主配置文件 |
connectors | 连接器配置 |
sources | 数据源配置 |
sinks | 数据汇配置 |
wpl | WPL 规则语法 |
oml | OML 模型语法 |
all | 全部检查(默认) |
示例:
# 全面检查
wproj check -w /project --what all

# 仅检查配置和规则,首次失败即退出
wproj check -w /project --what conf,wpl --fail-fast

# JSON 输出,仅显示失败项
wproj check -w /project --json --only-fail
data - 数据管理
wproj data <SUBCOMMAND>

Subcommands:
  clean     清理本地输出文件
  check     检查数据源连通性
  stat      统计数据量和性能
  validate  验证数据分布和比例
data clean
清理项目输出数据。
wproj data clean
data stat
统计数据量。
wproj data stat
data validate
验证数据分布和比例。
wproj data validate [OPTIONS]
| 参数 | 短选项 | 长选项 | 默认值 | 说明 |
|---|---|---|---|---|
| input_cnt | - | --input-cnt | - | 输入总数(分母) |
示例:
# 清理输出数据
wproj data clean

# 统计源+SINK文件行数
wproj data stat

# 验证数据分布
wproj data validate
model - 模型管理
TODO!
rule - 规则工具
离线解析测试,验证 WPL 规则。
wproj rule parse [OPTIONS]
示例:
# 使用规则执行离线解析测试
wproj rule parse
Wparse
运行模式
- 两种运行模式:
wparse daemon(常驻服务)和wparse batch(批处理) - 批处理模式读完文件后自动退出,daemon 模式需信号触发退出
命令行参数
wparse <COMMAND>

Commands:
  daemon  守护进程模式(常驻服务)
  batch   批处理模式(读完即退)
通用参数
| 参数 | 短选项 | 长选项 | 默认值 | 说明 |
|---|---|---|---|---|
| parse_workers | -w | --parse-workers | - | 解析线程数 |
| stat_sec | - | --stat | - | 统计输出间隔(秒) |
| stat_print | -p | --print_stat | false | 周期打印统计信息 |
| wpl_dir | - | --wpl | - | WPL 规则目录覆盖 |
使用示例
# 批处理模式:处理 3000 条后退出,每 2 秒输出统计
wparse batch -n 3000 --stat 2 -p

# 批处理模式:指定工作目录和多线程
wparse batch  -w 4 --parse-workers 4

# 守护进程模式:常驻服务,每 5 秒输出统计
wparse daemon --stat 5 -p

# 自定义日志和规则目录
wparse daemon --log-profile custom.toml --wpl /custom/rules
退出策略
批处理模式(batch)
单源(picker)结束条件(任一满足):
- 上游 EOF(文件读取完毕)
- 收到 Stop 指令
- 致命错误(触发全局停机)
进程退出流程:
- 所有数据源的 picker 结束
- 主组完成
- sink/infra 组依序下线
- 进程退出
关键日志:
- 每个源结束:
数据源 '...' picker 正常结束 - 全局收尾:
all routine group await end!
守护进程模式(daemon)
- 启动 acceptor(网络监听等)
- 进程保持常驻运行
- 退出触发方式:
- SIGTERM/SIGINT/SIGQUIT 信号
- 控制总线 Stop 指令(企业版)
错误与重试策略
| 错误类型 | 策略 | 说明 |
|---|---|---|
| EOF | Terminate | 优雅结束当前源 |
| 断线/可重试 | FixRetry | 指数退避后继续 |
| 数据/业务可容忍 | Tolerant | 记录后继续 |
| 致命错误 | Throw | 触发全局停机 |
常见问题
Q:为什么 batch 下不启动 acceptor?
A:acceptor 是常驻组件(监听网络),会阻塞主组完成。batch 目标是“源结束 → 主组完成 → 进程退出“。
Wpgen
wpgen 是 WarpParse 数据生成器,用于基于WPL规则或样本文件生成测试数据。
命令概览
wpgen <COMMAND>

Commands:
  rule    Generate data by rule/基于规则生成数据
  sample  Generate data from sample files/基于样本文件生成数据
  conf    Configuration commands/配置相关命令
  data    Data management commands/数据管理相关命令
子命令详解
rule - 基于规则生成
基于 WPL 规则生成测试数据,支持规则验证和性能分析。
wpgen rule [OPTIONS]
| 参数 | 短选项 | 长选项 | 默认值 | 说明 |
|---|---|---|---|---|
| wpl_dir | - | --wpl | - | WPL 规则目录覆盖 |
| conf_name | -c | --conf | wpgen.toml | 配置文件名 |
| stat_print | -p | --print_stat | false | 周期打印统计信息 |
| line_cnt | -n | - | - | 总行数覆盖 |
| speed | -s | - | - | 生成速度(行/秒)覆盖 |
| stat_sec | - | --stat | 1 | 统计输出间隔(秒) |
sample - 基于样本生成
基于样本文件(sample.dat)生成测试数据。
wpgen sample [OPTIONS]
conf - 配置管理
wpgen conf <SUBCOMMAND>

Subcommands:
  init   初始化生成器配置(conf/wpgen.toml)
  clean  清理生成器配置
  check  检查配置有效性
data - 数据管理
wpgen data <SUBCOMMAND>

Subcommands:
  clean  Clean generated output data according to wpgen config/根据 wpgen 配置清理已生成输出数据
  check  Not supported; reserved for future/暂不支持;保留供未来使用
| 参数 | 短选项 | 长选项 | 默认值 | 说明 |
|---|---|---|---|---|
| conf_name | -c | --conf | wpgen.toml | 配置文件名 |
运行语义
count(总产出条数)
启动时按 parallel 精确均分到每个 worker,余数前置分配。各 worker 跑完本地任务量即退出,总量严格等于 count。
speed(全局速率)
speed = 0:无限制(不等待)speed > 0:每 worker 速率为floor(speed / parallel)
parallel(并行数)
生成 worker 的并行数。对 blackhole_sink 消费端也会并行,其它 sink 默认单消费者。
使用示例
# 配置初始化
wpgen conf init -w .
wpgen conf check -w .

# 基于规则生成 10000 条数据
wpgen sample -n 10000 -p

# 自定义规则目录和生成速度
wpgen rule
    --wpl nginx \
    -c custom.toml \
    -s 1000 \
    --stat 2 \
    -p

# 基于样本文件生成
wpgen sample  -n 50000 -s 5000 --stat 5 -p

# 清理生成的数据
wpgen data clean -c wpgen.toml --local
常见问题
Q:产出不足预期?
A:count 被精确分配给每个 worker。检查日志中 limit : … 是否符合预期。
配置文件
默认配置文件路径:conf/wpgen.toml
主要配置项:
[generator]
count = 10000      # 总生成条数
speed = 1000       # 生成速度(行/秒),0 表示无限制
parallel = 4       # 并行 worker 数

[output]
# 输出配置...
生成文件通常位于 ./data/in_dat/,可在配置中调整目标路径。
wprescue
wprescue 是数据恢复工具,用于从救援目录中恢复数据并按照项目配置的 Sink 路由输出到目标。
命令概览
wprescue
重要: wprescue 仅支持 batch 模式。
命令行参数
wprescue [OPTIONS]
工作原理
- 读取救援目录(
./data/rescue)中的数据 - 按照项目配置的 Sink 路由进行处理
- 输出到目标位置
- 处理完成后自动退出
配置指南
本文聚焦 wparse 运行所依赖的配置。建议从“运行主配置(wparse.toml)”开始,随后按需阅读源/汇与连接器章节。
推荐阅读顺序
- Wparse 运行配置(主配置):wparse.toml(本目录)
- 配置变量与安全字典
- 源(Sources)与连接器
- 源配置总览(sources)
- 连接器(source.d)见“源配置总览”内的查找规则与示例
- 汇(Sinks)与连接器
- Sink 配置
- 连接器(sink.d)与 route 细节见“设计与配置”
- Wpgen 生成配置
相关参考
- 参考参数与规格:docs/80-reference 下各 Source/Sink/Spec 文档
- CLI:docs/cli/wparse.md(快速查看常用选项)
提示
- 使用
wproj conf init --work-root .可初始化标准目录与模板(conf/、connectors/ 与部分 models 目录)。若需要知识库(KnowDB)模板,请另行执行wproj knowdb init。 - 修改场景流程后,建议运行
usecase/core/getting_started/case_verify.sh验证端到端产出。 - 涉及账号、密码、Token、DSN 等敏感值时,建议统一通过外部变量或安全字典注入,不要把明文直接写入 route / connector 配置。
Wparse配置
完整示例(推荐默认)
version = "1.0"
robust  = "normal"           # debug|normal|strict

[models]
wpl     = "./models/wpl"
oml     = "./models/oml"
knowledge = "./models/knowledge"

[topology]
sources = "./topology/sources"
sinks   = "./topology/sinks"

[performance]
rate_limit_rps = 10000        # 限速(records/second)
parse_workers  = 2            # 解析并发 worker 数

[rescue]
path = "./data/rescue"

[log_conf]
output = "File"               # Console|File|Both
level  = "warn,ctrl=info"

[log_conf.file]
path = "./data/logs"          # 文件输出目录;文件名自动取可执行名(wparse.log)

[stat]

[[stat.pick]]                 # 采集阶段统计
key    = "pick_stat"
target = "*"

[[stat.parse]]                # 解析阶段统计
key    = "parse_stat"
target = "*"

[[stat.sink]]                 # 下游阶段统计
key    = "sink_stat"
target = "*"
说明:
[models].knowledge是知识配置根目录,默认值为./models/knowledgesemantic_dict.toml默认读取${models.knowledge}/semantic_dict.tomlknowdb.toml默认读取${models.knowledge}/knowdb.toml
变量化建议
wparse.toml 中的路径类字符串适合使用 ${VAR} 变量化,例如:
[models]
knowledge = "${WORK_ROOT}/models/knowledge"

[rescue]
path = "${WORK_ROOT}/data/rescue"

[log_conf.file]
path = "${WORK_ROOT}/data/logs"
涉及外部变量文件、敏感值和 sec_key.toml 约定时,参考:配置变量与安全字典(${VAR} / sec_key.toml)。
Sources配置
概览
Source(源)是 warp-parse 系统中负责数据输入的组件,支持多种数据源和协议。采用统一的连接器架构,提供灵活的数据接入能力。
定位与目录
- 配置文件:
$WORK_ROOT/topology/sources/wpsrc.toml - 连接器定义:从
$WORK_ROOT/models/sources起向上查找最近的connectors/source.d/*.toml
核心概念
- 连接器:可复用的输入连接定义,包含
id/type/params/allow_override - 参数覆写:通过白名单机制安全覆写连接器参数
- 标签系统:支持为数据源添加标签,便于路由和过滤
支持的 Source 类型
内置 Source
- file:文件输入,支持监控和轮询
- syslog:Syslog 协议输入(UDP/TCP)
- tcp:协议输入
扩展 Source
- kafka:Apache Kafka 消息队列输入
配置规则
基本规则
- 仅支持
[[sources]] + connect/params格式 - 覆写键必须 ∈ connector
allow_override白名单;超出即报错 enable字段控制是否启用(默认 true)tags字段支持添加数据源标签
配置结构
[[sources]]
key = "source_identifier"           # 源的唯一标识
connect = "connector_id"            # 引用的连接器 ID
enable = true                       # 是否启用(可选,默认 true)
tags = ["source:tag1", "type:log"]  # 标签(可选)
params = {                 # 参数覆写(可选)
    # 覆写连接器参数
}
变量化示例
[[sources]]
key = "access_${ENV}"
connect = "file_src_${ENV}"
tags = ["env:${ENV}", "team:${TEAM}"]
params = {
    base = "${WORK_ROOT}/logs",
    file = "${ACCESS_FILE}",
    encode = "text"
}
说明:
key、connect、tags以及params中的字符串字段,都适合做${VAR}变量化- 若值属于密码、Token、连接串等敏感信息,建议放入
SEC_变量,而不是直接写明文 - 变量来源与
sec_key.toml约定见:配置变量与安全字典(${VAR}/sec_key.toml)
配置示例
最小示例
[[sources]]
key = "file_1"
connect = "file_src"
params = { base = "data/in_dat", file = "gen.dat" }
文件输入示例
# models/sources/wpsrc.toml
[[sources]]
key = "access_log"
connect = "file_src"
params = {
    base = "./logs",
    file = "access.log",
    encode = "text"
}
tags = ["type:access", "env:prod"]
Syslog 输入示例
# models/sources/wpsrc.toml
[[sources]]
key = "syslog_udp"
connect = "syslog_udp_src"
params = {
    port = 1514,
    header_mode = "parse",
    prefer_newline = true
}
tags = ["protocol:syslog", "transport:udp"]
TCP 输入示例(通用 TCP 行/长度分帧)
# models/sources/wpsrc.toml
[[sources]]
key = "tcp_in"
connect = "tcp_src"
enable = true
params= {
  port = 19000,
  framing = "auto",
  prefer_newline = true
}
Sink 配置
目录与文件组织
-
sink_root:用例内通常为
<case>/sink- business.d/**/*.toml:业务组路由(场景输出,支持子目录)
- infra.d/**/*.toml:基础组路由(default/miss/residue/intercept/error/monitor,支持子目录)
- defaults.toml:默认组级期望 [defaults.expect]
-
connectors/sink.d/*.toml:连接器定义(loader 自 sink_root 向上查找最近的该目录)
路由文件格式
- 顶层
- version(可选)
- sink_group
- name:组名(字符串)
- oml / rule:推荐扁平写法;均可为字符串或字符串数组;用于匹配模型或规则。
- expect:可选,组级期望(覆盖 defaults)
- sinks:数组,每项为单个 sink 定义
- 单个 sink 字段
- name:该 sink 的名称(组内唯一);未提供则按 [index] 回退
- connect:引用连接器 id(兼容读取
use/connector) - params:对连接器默认参数的白名单覆盖(keys 必须在连接器 allow_override 列表中)
- expect:可选,单 sink 期望(仅 ratio/tol/min/max,互斥关系:ratio/tol 与 min/max 不可混用)
- filter:可选,拦截条件文件路径;命中 true 时丢弃该 sink 并发送至 intercept
变量化示例
version = "2.0"

[sink_group]
name = "mysql_${ENV}"
oml = ["*"]

[[sink_group.sinks]]
name = "writer"
connect = "mysql_sink"
tags = ["env:${ENV}"]

[sink_group.sinks.params]
url = "${SEC_MYSQL_URL}"
table = "nginx_${ENV}"
说明:
- route 名、sink 名、tags 以及
params中的字符串都可以按${VAR}变量化 - 对账号、密码、DSN、Token 这类字段,优先使用
SEC_变量 - 变量来源与
sec_key.toml约定见:配置变量与安全字典(${VAR}/sec_key.toml)
配置示例:
基础组
version = "2.0"
[sink_group]
name = "intercept"

[[sink_group.sinks]]
name = "intercept"
connect = "file_kv_sink"
params = { base = "./out", file = "intercept.dat" }
业务组(filter)
version = "2.0"

[sink_group]
name = "/sink/filter"
oml  = ["/oml/sh*"]

[[sink_group.sinks]]
name = "all"
connect = "file_kv_sink"
params = { base = "./out/sink", file = "all.dat" }

[[sink_group.sinks]]
name = "safe"
connect = "file_kv_sink"
filter = "./sink/business.d/filter.conf"   # 命中 -> 拦截,不写 safe
params = { base = "./out/sink", file = "safe.dat" }
说明
- 标识规则
- 组名:sink_group.name(例如 /sink/example/simple)
- sink 名:name(组内唯一;未显式提供时按索引回退为 [0]/[1]/…)
- 过滤语义(filter)
- filter 是“拦截条件”:表达式求值为 true 时,该条数据不写入该 sink,而是转发到基础组 intercept(framework/intercept)
- 每个 sink 可独立设置 filter;与 expect 相互独立
校验提示
- 分母决定:
- basis = total_input:总输入
- basis = group_input:该组各 sink 行数之和(或 stats 中该组输入)
- basis = model:按模型粒度统计(目前以组内 sinks 行数之和替代)
- min_samples:当分母为 0 或小于该值时,组校验被忽略(打印提示,不 fail)
- 当 route 为非文件类写入 fmt 时,validate 会提示“fmt 由后端决定,已忽略”。
常见排错
- 连接器未找到:检查 connectors/sink.d 是否存在对应 id;
wproj sinks list可查看引用关系 - 覆盖参数不生效:检查 allow_override 白名单
- 遇到
${VAR}未替换:先检查上层程序是否已注入变量字典,再检查变量名拼写和sec_key.toml/ 环境变量内容 - filter 未生效:
- 路径解析相对当前工作目录(建议写相对 sink_root 的相对路径)
- 日志中会打印“found path/not found filter …”
- 表达式语法需通过 TCondParser;可先用简单表达式试验
Wpgen配置
wpgen 是数据生成工具,用于按照规则或样本生成测试数据。
基础配置
配置文件路径:conf/wpgen.toml
version = "1.0"

[generator]
mode = "sample"          # 生成模式:rule | sample
count = 1000             # 生成总条数(可选)
duration_secs = 60       # 生成持续时间(秒,可选,与 count 二选一)
speed = 1000             # 恒定速率(行/秒),0 为无限速
parallel = 1             # 并行度
rule_root = "./rules"    # 规则目录(mode=rule 时使用)
sample_pattern = "*.txt" # 样本文件匹配模式(mode=sample 时使用)

[output]
# 引用 connectors/sink.d 中的连接器 id
connect = "file_kv_sink"
name = "gen_out"
# 覆写连接器参数(仅 allow_override 白名单内的键)
params = { base = "./src_dat", file = "gen.dat" }

[logging]
level = "warn"
output = "file"
file_path = "./data/logs/"
变量化示例
wpgen.toml 也适合用 ${VAR} 提升环境切换效率:
version = "1.0"

[generator]
mode = "rule"
rule_root = "${WORK_ROOT}/models/wpl"

[output]
connect = "file_${ENV}"
name = "gen_${ENV}"
params = { base = "${WORK_ROOT}/data/out", file = "${OUTPUT_FILE}" }

[logging]
level = "${LOG_LEVEL}"
output = "file"
file_path = "${WORK_ROOT}/data/logs"
如果输出目标依赖账号、密码或连接串,建议改用 SEC_ 变量,并把敏感值放到 sec_key.toml 或其他受控外部变量源中。详细约定见:配置变量与安全字典(${VAR} / sec_key.toml)。
动态速度模型
除了使用 speed 字段指定恒定速率外,还可以使用 speed_profile 配置动态速度变化模型。
当 speed_profile 存在时,speed 字段将被忽略。
恒定速率 (constant)
固定速率生成数据。
[generator.speed_profile]
type = "constant"
rate = 5000              # 每秒生成行数
正弦波动 (sinusoidal)
速率按正弦曲线周期性波动,模拟周期性负载变化。
[generator.speed_profile]
type = "sinusoidal"
base = 5000              # 基准速率(行/秒)
amplitude = 2000         # 波动幅度(行/秒)
period_secs = 60.0       # 周期长度(秒)
速率范围:[base - amplitude, base + amplitude],即上例中为 3000-7000 行/秒。
阶梯变化 (stepped)
速率按预定义的阶梯序列变化,适合模拟分阶段负载测试。
[generator.speed_profile]
type = "stepped"
# 格式:[[持续时间(秒), 速率], ...]
steps = [
    [30.0, 1000],        # 前 30 秒:1000 行/秒
    [30.0, 5000],        # 接下来 30 秒:5000 行/秒
    [30.0, 2000]         # 最后 30 秒:2000 行/秒
]
loop_forever = true      # 是否循环执行(默认 false)
突发模式 (burst)
在基准速率上随机触发高速突发,模拟突发流量场景。
[generator.speed_profile]
type = "burst"
base = 1000              # 基准速率(行/秒)
burst_rate = 10000       # 突发时速率(行/秒)
burst_duration_ms = 500  # 突发持续时间(毫秒)
burst_probability = 0.05 # 每秒触发突发的概率(0.0-1.0)
渐进模式 (ramp)
速率从起始值线性变化到目标值,适合压力递增测试。
[generator.speed_profile]
type = "ramp"
start = 100              # 起始速率(行/秒)
end = 10000              # 目标速率(行/秒)
duration_secs = 300.0    # 变化持续时间(秒)
达到目标速率后将保持该速率。支持正向(递增)和反向(递减)。
随机波动 (random_walk)
速率在基准值附近随机波动,模拟不规则负载。
[generator.speed_profile]
type = "random_walk"
base = 5000              # 基准速率(行/秒)
variance = 0.3           # 波动范围(0.0-1.0),0.3 表示 ±30%
速率范围:[base * (1 - variance), base * (1 + variance)]
复合模式 (composite)
组合多个速度模型,支持多种组合方式。
[generator.speed_profile]
type = "composite"
combine_mode = "average" # 组合方式:average | max | min | sum

# 子模型列表
[[generator.speed_profile.profiles]]
type = "sinusoidal"
base = 5000
amplitude = 2000
period_secs = 60.0

[[generator.speed_profile.profiles]]
type = "random_walk"
base = 5000
variance = 0.1
组合方式说明:
average:取所有子模型速率的平均值(默认)max:取所有子模型速率的最大值min:取所有子模型速率的最小值sum:累加所有子模型速率
配置示例
示例 1:简单恒定速率
version = "1.0"

[generator]
mode = "sample"
count = 10000
speed = 5000
parallel = 2

[output]
connect = "file_json_sink"
params = { base = "./data", file = "output.dat" }

[logging]
level = "info"
output = "file"
file_path = "./logs"
示例 2:渐进压力测试
version = "1.0"

[generator]
mode = "rule"
duration_secs = 600      # 运行 10 分钟
parallel = 4
rule_root = "./rules"

[generator.speed_profile]
type = "ramp"
start = 100
end = 20000
duration_secs = 300.0    # 5 分钟内从 100 提升到 20000

[output]
connect = "kafka_sink"
params = { topic = "test-topic" }

[logging]
level = "warn"
output = "file"
file_path = "./logs"
示例 3:模拟真实业务负载
version = "1.0"

[generator]
mode = "sample"
duration_secs = 3600     # 运行 1 小时
parallel = 8

[generator.speed_profile]
type = "composite"
combine_mode = "average"

# 基础周期性波动(模拟日间/夜间流量差异)
[[generator.speed_profile.profiles]]
type = "sinusoidal"
base = 10000
amplitude = 5000
period_secs = 300.0

# 叠加随机噪声
[[generator.speed_profile.profiles]]
type = "random_walk"
base = 10000
variance = 0.15

[output]
connect = "tcp_sink"
params = { host = "127.0.0.1", port = 9000 }

[logging]
level = "info"
output = "both"
file_path = "./logs"
运行规则
-
wpgen会在加载conf/wpgen.toml时,若检测到[output].connect:- 从
ENGINE_CONF.sink_root向上查找最近的connectors/sink.d/目录 - 读取目标连接器并与
params合并(仅允许allow_override中的键)
- 从
-
当配置了
parallel > 1时,速度模型会自动按并行度分配,确保总速率符合预期 -
count和duration_secs二选一:- 设置
count时,生成指定条数后停止 - 设置
duration_secs时,运行指定秒数后停止 - 两者都未设置时,将持续运行直到手动停止
- 设置
日志配置
本文面向使用者与一线开发,给出在 Warp Parse 中开启/调整日志与进行常见问题定位的实操指南。
- 目标域(targets)见《开发者文档:Logging Targets And Levels》。
- 文件日志默认滚动:10MB/10 份,gzip 压缩。
快速上手
wparse / wprescue (conf/wparse.toml)
生产推荐(文件输出 + 低噪声):
[log_conf]
output = "File"   # Console|File|Both
level  = "warn,ctrl=info,dfx=info"
[log_conf.file]
path = "./data/logs"   # 目录会自动创建;文件名按可执行名自动命名,如 wparse.log
本地联调(同时输出到控制台):
[log_conf]
output = "Both"
level  = "debug"
[log_conf.file]
path = "./data/logs"
语义词典配置说明
概述
语义词典系统为日志解析提供语义支持,包括:
- 系统内置词典:代码内置,涵盖日志分析的常用词汇
- 外部配置支持:可选,支持添加或替换内置词典
配置文件位置:${models.knowledge}/semantic_dict.toml(知识配置目录,默认 models/knowledge/semantic_dict.toml)
系统内置词典
内置词汇类别
所有词典都内置在代码中(semantic_dict_loader.rs),包括:
-
核心词性 (
core_pos) - 硬编码,不可配置- 用于
extract_main_word函数 - 包含:名词类 (n, nr, ns…)、动词类 (v, vn…)、英文 (eng) 等
- 用于
-
停用词 (
stop_words)- 中文:的、了、在、是…
- 英文:the, a, an, is…
-
日志领域关键词 (
domain_words) - 支持任意自定义分类- 通用分类示例:
- 日志级别:error, warn, info, debug…
- 系统相关:exception, timeout, database…
- 网络相关:http, tcp, socket…
- 安全相关:attack, virus, malware…
- 自定义分类示例:
- 数据库:mysql, postgres, mongodb, redis…
- 云原生:kubernetes, docker, pod, deployment…
- 中间件:kafka, rabbitmq, elasticsearch…
- 业务领域:order, payment, product…(根据实际业务定制)
- 注意:可以使用任意分类名,系统会自动合并所有分类的词汇
- 通用分类示例:
-
状态词 (
status_words)- 英文:failed, success, timeout…
- 中文:失败、成功、超时…
-
动作词 (
action_verbs)- 英文:connect, login, process…
- 中文:连接、登录、处理…
-
实体名词 (
entity_nouns)- 英文:connection, session, transaction…
- 中文:连接、会话、事务…
外部配置(可选)
配置方式
默认读取以下路径(按顺序):
${models.knowledge}/semantic_dict.tomlknowledge/semantic_dict.toml(兼容旧布局)
无需设置环境变量。
配置模式
1. ADD 模式(默认)
将外部配置的词汇添加到系统内置词典:
version = 1
mode = "add"  # 默认值,可省略

[status_words]
english = ["aborted", "cancelled"]  # 添加到内置词典
chinese = ["中止", "取消"]
特点:
- 保留所有系统内置词汇
- 添加自定义词汇
- 适合扩展场景
2. REPLACE 模式
用外部配置的词汇完全替换系统内置词典:
version = 1
mode = "replace"

[status_words]
english = ["running", "pending"]  # 仅使用这些词汇
chinese = ["运行中", "等待中"]
特点:
- 忽略系统内置词汇
- 完全自定义
- 适合特定领域定制(如 Kubernetes、金融等)
配置文件结构
# 版本号(必须)
version = 1

# 外部词典开关(可选,默认 true)
enabled = true

# 模式(可选,默认 "add")
mode = "add"  # 或 "replace"

# 停用词(可选)
[stop_words]
chinese = ["词1", "词2"]
english = ["word1", "word2"]

# 日志领域关键词(可选)
# 注意:支持任意自定义分类名,不局限于下面的例子
[domain_words]
# 常用的通用分类
log_level = ["custom_level"]
system = ["cache", "queue"]
network = ["websocket", "grpc"]
security = ["firewall", "encryption"]

# 可以添加任意自定义分类
database = ["mysql", "postgres", "mongodb", "redis"]
cloud = ["kubernetes", "docker", "pod"]
middleware = ["kafka", "rabbitmq", "elasticsearch"]
business = ["order", "payment", "product"]
# ... 其他任意分类名

# 状态词(可选)
[status_words]
english = ["aborted", "cancelled"]
chinese = ["中止", "取消"]

# 动作词(可选)
[action_verbs]
english = ["deploy", "rollback"]
chinese = ["部署", "回滚"]

# 实体名词(可选)
[entity_nouns]
english = ["migration", "notification"]
chinese = ["迁移任务", "通知"]
配置示例
示例 1:扩展内置词典(ADD 模式)
文件:${models.knowledge}/semantic_dict.toml
version = 1
mode = "add"

# 添加业务特定的状态词
[status_words]
english = ["processing", "queued", "archived"]
chinese = ["处理中", "队列中", "已归档"]

# 添加业务特定的动作词
[action_verbs]
english = ["calculate", "aggregate", "transform"]
chinese = ["计算", "聚合", "转换"]
使用:
./wp-engine
示例 2:Kubernetes 专用词典(REPLACE 模式)
文件:k8s_semantic_dict.toml
version = 1
mode = "replace"

[stop_words]
chinese = ["的"]
english = ["the"]

# 使用 Kubernetes 专用的自定义分类
[domain_words]
# Kubernetes 核心资源
k8s_resources = ["pod", "deployment", "service", "namespace", "configmap", "daemonset", "statefulset"]

# Kubernetes 网络
k8s_network = ["ingress", "endpoint", "networkpolicy", "loadbalancer"]

# Kubernetes 安全
k8s_security = ["rbac", "serviceaccount", "secret", "rolebinding", "clusterrole"]

# Kubernetes 存储
k8s_storage = ["persistentvolume", "pvc", "storageclass"]

# 容器相关
container = ["docker", "containerd", "image", "registry"]

[status_words]
english = ["running", "pending", "failed", "succeeded", "crashloopbackoff", "imagepullbackoff", "terminating"]
chinese = []

[action_verbs]
english = ["create", "delete", "update", "scale", "rollout", "apply", "patch", "exec"]
chinese = []

[entity_nouns]
english = ["pod", "node", "cluster", "container", "volume", "controller"]
chinese = []
示例 3:仅扩展部分词典
只配置需要扩展的部分,其他使用内置:
version = 1
# mode = "add" 是默认值,可以省略

# 只扩展状态词,其他都使用内置词典
[status_words]
english = ["custom_status_1", "custom_status_2"]
chinese = ["自定义状态1"]
最佳实践
1. 选择合适的模式
-
ADD 模式:大多数情况下使用
- 在通用日志分析基础上添加业务词汇
- 保留系统内置的常用词汇
-
REPLACE 模式:特定领域使用
- Kubernetes、云原生平台
- 金融、医疗等行业专用系统
- 需要精确控制词汇范围
2. 版本控制
将配置文件纳入版本控制:
git add ${models.knowledge}/semantic_dict.toml
git commit -m "Add custom semantic dictionary for production"
3. 环境分离
为不同环境准备不同文件,在启动前拷贝到默认路径:
# 开发环境
cp ${models.knowledge}/dev_semantic_dict.toml ${models.knowledge}/semantic_dict.toml

# 生产环境
cp ${models.knowledge}/prod_semantic_dict.toml ${models.knowledge}/semantic_dict.toml
4. 配置验证
测试配置是否正确加载:
# 运行测试
cargo test -p wp-oml test_extract_main_word -- --nocapture
故障排查
配置加载失败
如果配置文件有问题,系统会输出警告并使用内置词典:
Warning: Failed to load external semantic dict config: <error message>.
常见原因:
- 配置文件不存在
- TOML 格式错误
- 版本号不匹配
解决方法:
# 检查文件是否存在
ls -l ${models.knowledge}/semantic_dict.toml

# 验证 TOML 格式
cat ${models.knowledge}/semantic_dict.toml

# 检查版本号
grep "version" ${models.knowledge}/semantic_dict.toml
词汇未生效
检查步骤:
-
确认默认路径配置存在且已启用:
${models.knowledge}/semantic_dict.toml中enabled = true -
确认模式正确:
- ADD 模式:新词汇应该添加到内置词典
- REPLACE 模式:只有配置文件中的词汇生效
-
运行测试验证:
cargo test -p wp-oml test_global_semantic_dict -- --nocapture
性能考虑
加载时机
- 配置在应用程序启动时加载一次
- 使用
Lazy实现延迟初始化 - 首次访问
SEMANTIC_DICT时触发加载
内存占用
- 所有词典使用
HashSet存储 - 查找时间复杂度:O(1)
- 典型内存占用:< 100KB
词典大小建议
| 词典类型 | 建议大小 | 说明 |
|---|---|---|
| 停用词 | 100-200 | 过多会影响关键词提取 |
| 领域词 | 200-500 | 业务核心词汇 |
| 状态词 | 50-100 | 结果相关词汇 |
| 动作词 | 100-200 | 行为相关词汇 |
| 实体名词 | 50-100 | 特殊名词 |
相关文档
技术实现
- 加载器:
crates/wp-oml/src/core/evaluator/transform/pipe/semantic_dict_loader.rs - 使用代码:
crates/wp-oml/src/core/evaluator/transform/pipe/extract_word.rs - 内置词典:在
SemanticDict::builtin()方法中定义
更新时间:2026-02-08
KnowDB 配置
本指南描述知识库(KnowDB)的目录式配置与装载规范。
适用范围
- 初始化权威库(CSV → SQLite),用于 wparse/wproj 等工具在启动时装载
核心原则
- SQL 外置:每张表的 DDL/DML 均放在对应目录下的 .sql 文件中
- 安全:运行期只允许访问配置里声明过的表名;SQL 仅支持 {table} 占位符
- 默认可用:多数字段可省略,内置默认值与自动探测能满足常见场景
目录布局(推荐,默认位于 ${models.knowledge})
${models.knowledge}/
  knowdb.toml                     # 本配置
  example/
    create.sql
    insert.sql
    data.csv                     # 单一数据文件(表目录根)
  address/
    create.sql
    insert.sql
    data.csv
顶层配置(${models.knowledge}/knowdb.toml)
version = 2

[[tables]]
name = "example"
# dir 省略时等于 name;此示例即使用目录 ${models.knowledge}/example
# data_file 省略时使用表目录下的 data.csv
columns.by_header = ["name", "pinying"]

# 如需更多表,追加 [[tables]] 段落
SQL 文件规范
- create.sql:建表语句,必须存在;可使用占位符
{table};允许包含多条语句(如CREATE INDEX) - insert.sql:插入语句,必须存在;参数位置用
?1..?N;允许{table} - clean.sql:可选;若不存在,装载前默认执行
DELETE FROM {table}
列映射(columns)
- 推荐
by_header=[..],按 CSV 表头名映射到insert.sql中的列 - 若
has_header=false,必须提供by_index=[..] - 可选增强(实现层):若未配置 columns,且
insert.sql显式了列清单,可解析 insert 的列名作为by_header
装载策略(默认可省略)
- 默认:
transaction=true、batch_size=2000、on_error="fail" - on_error:
- fail:遇到坏行(缺列/解析失败)即失败回滚
- skip:跳过坏行并计数告警
自动探测(当 data_file 未配置)
- 使用
{base_dir}/{tables.dir}/data.csv - 不存在则报错
安全约束
- 运行时(facade/query_cipher/SQL 评估)仅允许使用
[[tables]].name中声明的表名 - SQL 模板仅允许
{table}占位符;禁止其它动态拼接
最小可运行示例
- 目录
${models.knowledge}/knowdb.toml
models/knowledge/example/{create.sql, insert.sql, data.csv}
- create.sql
CREATE TABLE IF NOT EXISTS {table} (
  id      INTEGER PRIMARY KEY,
  name    TEXT NOT NULL,
  pinying TEXT NOT NULL
);
- insert.sql
INSERT INTO {table} (name, pinying) VALUES (?1, ?2);
- data.csv
name,pinying
令狐冲,linghuchong
任盈盈,renyingying
- knowdb.toml(最小化)
version = 2
base_dir = "./models/knowledge"
[[tables]]
name = "example"
dir  = "example"
columns.by_header = ["name", "pinying"]
[tables.expected_rows]
min = 1
max = 100
常见错误与排障
- 缺少 create.sql / insert.sql:启动时失败并指向缺失文件
has_header=false但未提供by_index:装载报错expected_rows.min未满足:数据不足,装载失败- 数据源未找到:既未配置
data_file,也不存在默认路径data.csv - 运行期 SQL 访问未声明的表:安全校验失败
与应用的关系
- wparse/wproj 等会在启动处加载 knowdb:创建权威库并设置 Query Provider
- 曾用于隐私模块的
query_cipher(table)(加载单列表词表)在当前版本默认不启用;如需脱敏请在业务侧实现
内置 SQL 函数(UDF)
- 运行时注册:
- 导入阶段(权威库写连接)与查询阶段(线程克隆的只读连接)均自动注册。
- 可在
INSERT/SELECT/WHERE中直接使用(DDL 不涉及)。
- 签名与语义:
ip4_int(text) -> integer:点分 IPv4 转 32 位整数;容忍空白/引号;非法返回0。ip4_between(ip_text, start_text, end_text) -> integer:是否在闭区间[start,end]内(1/0)。cidr4_min(text) -> integer:CIDR 起始地址(含),如10.0.0.0/8。cidr4_max(text) -> integer:CIDR 结束地址(含)。cidr4_contains(ip_text, cidr_text) -> integer:IP 是否落在 CIDR 段内(1/0)。ip4_text(integer|string) -> text:32 位整数转点分 IPv4(便于调试/展示)。trim_quotes(text) -> text:去除两端成对引号(’ 或 “),容忍前后空白;未成对则原样返回(去掉空白)。
- 导入示例(insert.sql):
INSERT INTO {table} (ip_start_int, ip_end_int, zone) VALUES (ip4_int(?1), ip4_int(?2), trim_quotes(?3)); - 查询示例(普通 SQL):
-- 区间命中(推荐整数比较写法,避免在 WHERE 中直接比较函数返回) SELECT zone FROM zone WHERE ip_start_int <= ip4_int(:ip) AND ip_end_int >= ip4_int(:ip) LIMIT 1; -- CIDR 命中 SELECT zone FROM zone WHERE cidr4_contains(:ip, :cidr) = 1; -- 调试回显 SELECT ip4_text(ip_start_int) AS ip_start, ip4_text(ip_end_int) AS ip_end, zone FROM zone LIMIT 5; - OML 中的 SQL 精确求值:
- OML 的
select … from … where …;语法对列段做了标识符白名单限制,不建议在列段直接写函数。 - 推荐在上游产出数值型 IP(如
src_ip_int),在 OML 的 where 中用整数比较:from_zone: chars = sql( select zone from zone where ip_start_int <= read(src_ip_int) and ip_end_int >= read(src_ip_int); )
- OML 的
- 注意事项:
- 目前非法 IPv4/CIDR 输入返回
0(或匹配失败),为提高导入韧性;如需严格行为可定制。 - SQLite 原生已提供
lower/upper/trim等字符串函数,可与上述 UDF 组合使用。
- 目前非法 IPv4/CIDR 输入返回
日志配置
本文面向使用者与一线开发,给出在 Warp Parse 中开启/调整日志与进行常见问题定位的实操指南。
- 目标域(targets)见《开发者文档:Logging Targets And Levels》。
- 文件日志默认滚动:10MB/10 份,gzip 压缩。
快速上手
wparse / wprescue (conf/wparse.toml)
生产推荐(文件输出 + 低噪声):
[log_conf]
output = "File"   # Console|File|Both
level  = "warn,ctrl=info,dfx=info"
[log_conf.file]
path = "./data/logs"   # 目录会自动创建;文件名按可执行名自动命名,如 wparse.log
本地联调(同时输出到控制台):
[log_conf]
output = "Both"
level  = "debug"
[log_conf.file]
path = "./data/logs"
安全变量与环境变量
本文面向配置使用者,说明两类变量的实际用法:
- 环境变量:用于环境名、目录、文件名、地址等非敏感值
- 安全变量:用于密码、Token、连接串等敏感值
在配置中,这两类变量都使用同一种引用方式:
${VAR_NAME}
如果变量不存在,也可以写缺省值:
${VAR_NAME:default_value}
先记结论
- 非安全变量:默认从当前 shell 环境读取
- 安全变量:默认从
sec_key.toml读取 - 配置文件中的写法统一是
${...} - 敏感值不要直接写在
wpsrc.toml、sink route、connector 配置里
环境变量怎么用
环境变量适合保存这些信息:
- 环境名,例如
dev、test、prod - 普通目录路径
- 输出文件名
- 普通地址、端口、标签后缀
先在 shell 中设置:
export ENV=prod
export WORK_ROOT=/opt/wp
export OUTPUT_FILE=out.dat
export SRC_ADDR=127.0.0.1
然后在配置中引用:
[log_conf.file]
path = "${WORK_ROOT}/data/logs"

[[sources]]
key = "tcp_${ENV}"
connect = "tcp_src"
params = { addr = "${SRC_ADDR}", port = 19000 }

[output]
name = "gen_${ENV}"
params = { file = "${OUTPUT_FILE}" }
安全变量怎么用
安全变量适合保存这些信息:
- 数据库密码
- API Token
- 完整连接串
- Access Key / Secret Key
文件位置
如果使用 warp-parse 现成 CLI,安全变量文件默认从以下位置查找:
- 当前工作目录下的
.warp_parse/sec_key.toml - 若不存在,则回退到
$HOME/.warp_parse/sec_key.toml
最常见的项目内写法是:
./.warp_parse/sec_key.toml
文件内容
sec_key.toml 使用普通 TOML 键值对,例如:
sec_mysql_url = "mysql://writer:replace-me@127.0.0.1:3306/wparse"
sec_api_token = "replace-me"
sec_db_password = "replace-me"
因此上面的三个键,在配置里要这样引用:
${SEC_MYSQL_URL}
${SEC_API_TOKEN}
${SEC_DB_PASSWORD}
配置示例
[[sink_group.sinks]]
connect = "mysql_sink"

[sink_group.sinks.params]
url = "${SEC_MYSQL_URL}"
table = "nginx_prod"
环境变量与安全变量的关系
两者可以同时使用。
例如:
[[sink_group.sinks]]
connect = "mysql_sink"

[sink_group.sinks.params]
url = "${SEC_MYSQL_URL}"
table = "nginx_${ENV}"
这里:
${SEC_MYSQL_URL}来自sec_key.toml${ENV}来自 shell 环境变量
变量不存在时会怎样
${VAR}:
- 如果变量存在,就替换
- 如果变量不存在,就保持原样
${VAR:default}:
- 如果变量存在,就使用变量值
- 如果变量不存在,就使用
default
示例:
path = "${WORK_ROOT:/tmp/wp}/data/logs"
如果没有设置 WORK_ROOT,最终会使用 /tmp/wp/data/logs。
推荐做法
- 普通值放环境变量,例如
ENV、WORK_ROOT、OUTPUT_FILE - 敏感值放
sec_key.toml - 在配置里统一通过
${...}引用 - 把
.warp_parse/sec_key.toml加入.gitignore - 控制
sec_key.toml文件权限,避免其他用户读取
不推荐做法
- 把密码、Token、连接串直接写进配置文件
- 在
sec_key.toml里写SEC_MYSQL_URL = "..."
这样会被处理成SEC_SEC_MYSQL_URL - 把敏感值放进
tags、name、id这类容易出现在日志和诊断输出的位置
常见示例
示例 1:日志目录使用环境变量
export WORK_ROOT=/srv/wp
[log_conf.file]
path = "${WORK_ROOT}/data/logs"
示例 2:MySQL 连接串使用安全变量
./.warp_parse/sec_key.toml
mysql_url = "mysql://writer:replace-me@127.0.0.1:3306/wparse"
业务 route:
[[sink_group.sinks]]
connect = "mysql_sink"

[sink_group.sinks.params]
url = "${SEC_MYSQL_URL}"
table = "nginx_prod"
示例 3:环境变量与安全变量混用
export ENV=prod
./.warp_parse/sec_key.toml
mysql_url = "mysql://writer:replace-me@127.0.0.1:3306/wparse"
配置:
[sink_group.sinks.params]
url = "${SEC_MYSQL_URL}"
table = "nginx_${ENV}"
排错建议
${ENV}没替换:- 检查当前 shell 是否已
export ENV=... - 检查是不是在同一个终端里启动程序
- 检查当前 shell 是否已
${SEC_MYSQL_URL}没替换:- 检查
./.warp_parse/sec_key.toml是否存在 - 检查当前工作目录是否正确
- 检查文件里是否写成了
SEC_MYSQL_URL = "...",这属于错误写法
- 检查
- 想确认 fallback:
- 项目目录没有
.warp_parse/sec_key.toml时,会继续尝试$HOME/.warp_parse/sec_key.toml
- 项目目录没有
WPL 规则语言
WPL (Warp Processing Language) 是 wp-lang 使用的规则语言,用于描述字段抽取、协议解析与简单判定逻辑。
📚 文档导航
按学习路径
🆕 新手入门
   ↓
01-quickstart.md ────→ 5分钟上手,复制即用
   ↓
07-complete-types-example.md ──→ 🌟 完整功能演示(强烈推荐)
   ↓
02-core-concepts.md ──→ 理解设计理念和核心概念
   ↓
03-practical-guide.md → 按任务查找解决方案
   ↓
04-language-reference.md → 查阅类型和语法
   ↓
05-functions-reference.md → 查阅函数
按用户角色
| 我是… | 推荐阅读 |
|---|---|
| WPL 新手 | 01-quickstart.md → 02-core-concepts.md |
| 日常使用者 | 03-practical-guide.md - 按任务查找 |
| 开发者/集成 | 04-language-reference.md + 05-functions-reference.md |
| 编译器开发 | 06-grammar-reference.md - EBNF 语法 |
按任务查找
| 我想… | 查看文档 |
|---|---|
| 🚀 快速上手 | 01-quickstart.md |
| 🎯 查看完整类型示例 | 07-complete-types-example.md |
| 💡 理解概念 | 02-core-concepts.md |
| 📝 解析 Nginx 日志 | 03-practical-guide.md § 1 |
| 📊 解析 JSON 数据 | 03-practical-guide.md § 2 |
| 🔑 解析 KV 键值对 | 03-practical-guide.md § 3 |
| 🔐 处理 Base64 编码 | 03-practical-guide.md § 4 |
| ✅ 验证字段 | 03-practical-guide.md § 5 |
| 🔍 查某个类型 | 04-language-reference.md § 类型系统 |
| ⚙️ 查某个函数 | 05-functions-reference.md |
| 📖 查语法规则 | 06-grammar-reference.md |
📖 文档列表
| 文档 | 内容 | 适合人群 |
|---|---|---|
| 01-quickstart.md | 5 分钟快速入门 + 3 个最常用场景 + 练习 | 所有人 |
| 07-complete-types-example.md | 完整类型系统示例 - 23 种类型速查 | 所有人 |
| 02-core-concepts.md | 设计理念 + 类型系统 + 匹配语义 + 管道系统 | 想深入理解的用户 |
| 03-practical-guide.md | 按任务组织的实战示例 + 常见问题 | 日常使用者 |
| 04-language-reference.md | 完整类型列表 + 语法元素 + 速查表 | 开发者 |
| 05-functions-reference.md | 所有函数的标准化参考 | 开发者 |
| 06-grammar-reference.md | EBNF 形式化语法定义 | 编译器开发者 |
⚡ 快速示例
Nginx 访问日志
package nginx {
  rule access_log {
    (
      ip:client_ip,
      2*_,
      time/clf:time<[,]>,
      http/request:request",
      digit:status,
      digit:bytes
    )
  }
}
JSON API 响应
package api {
  rule response {
    (json(
      chars@user,
      digit@code,
      chars@message
    ))
  }
}
华为防火墙日志(Base64)
package firewall {
  rule huawei_log {
    |decode/base64|
    (
      digit:id,
      time:timestamp,
      sn:serial,
      chars:type\:,
      kvarr
    )
  }
}
更多示例请查看:01-quickstart.md 和 03-practical-guide.md
🎯 完整类型系统示例
想快速了解 WPL 支持的所有数据类型?
👉 查看完整类型示例 - 一个示例展示 23 种主要数据类型
该文档包含:
- ✅ 完整可运行的输入数据 + WPL 规则 + 输出结果
- ✅ 23 种类型:基础、时间、网络、结构化、协议、编码
- ✅ 每种类型详解:语法、示例、使用场景
- ✅ 常见组合模式:复制即用的类型组合
适合:
- 🆕 新手快速了解 WPL 能力
- 📚 开发者作为类型速查手册
- 🔍 遇到陌生数据格式时快速查找对应类型
🎯 核心特性
- 声明式:描述“是什么“,而非“怎么做“
- 类型安全:自动验证和转换(IP、时间、JSON 等)
- 组合性:小规则组合成复杂规则
- 强大的管道:预处理(Base64/Hex 解码)+ 字段级验证
- 灵活的匹配:顺序、择一、可选、重复
- 子字段提取:JSON/KV 嵌套字段
💬 快速帮助
常见问题
Q: 从哪里开始学习? A: 从 01-quickstart.md 开始,5 分钟即可上手。
Q: 如何解析我的日志格式? A: 查看 03-practical-guide.md,找到相似的场景并调整。
Q: 某个类型/函数怎么用? A: 查看 04-language-reference.md 或 05-functions-reference.md。
Q: 解析失败怎么调试? A: 参考 01-quickstart.md § 调试技巧 或 03-practical-guide.md § 常见问题。
开始学习: 01-quickstart.md - 5分钟快速入门
WPL 快速入门
5 分钟上手 WPL,立即解析你的日志数据。
📚 快速导航
| 主题 | 内容 |
|---|---|
| 什么是 WPL | WPL 简介、核心特点、适用场景 |
| 完整类型系统 | 23 种数据类型总览 |
| 最简示例 | Nginx 日志解析 |
| 3 个最常用场景 | 空格分隔、JSON、KV 键值对 |
| 基本语法速览 | 结构、类型、匹配模式 |
| 常见模式速查 | 引号字段、可选字段、重复字段等 |
| 快速调试技巧 | 调试方法 |
| 实战练习 | 3 个练习题 |
什么是 WPL
WPL (Warp Processing Language) 是一种声明式规则语言,用于描述如何从日志、消息等文本数据中提取字段和解析结构。
核心特点
- 声明式:描述“数据是什么“,而非“如何提取“
- 类型安全:自动验证和转换(IP、时间、JSON 等 37 种类型)
- 强大灵活:支持 JSON/KV 嵌套提取、Base64 解码、字段验证等
- 易于学习:5 分钟即可上手基础用法
适用场景
- 解析 Web 服务器日志(Nginx、Apache)
- 提取 JSON/KV 结构化数据
- 处理编码数据(Base64、Hex)
- 防火墙、安全设备日志解析
- 自定义日志格式解析
📚 完整类型系统
WPL 支持 23 种主要数据类型,涵盖基础类型、时间、网络、结构化数据、协议和编码等。
👉 查看完整示例: 07-complete-types-example.md
该文档包含:
- ✅ 所有 23 种类型的完整示例代码
- ✅ 可运行的输入数据和 WPL 规则
- ✅ 每种类型的详细说明和使用建议
- ✅ 常见类型组合模式
快速预览主要类型:
- 基础:
digit、float、chars、bool - 时间:
time/clf、time_3339、time_2822、time_timestamp - 网络:
ip、ip_net、port、domain、url - 结构化:
json、kvarr、array - 协议:
http/request、http/status、http/method、http/agent - 编码:
hex、base64
最简示例:Nginx 日志
输入数据:
192.168.1.2 - - [06/Aug/2019:12:12:19 +0800] "GET /index.html HTTP/1.1" 200 1024
WPL 规则:
package nginx {
  rule access_log {
    (
      ip:client_ip,
      2*_,
      time/clf:time<[,]>,
      http/request:request",
      digit:status,
      digit:bytes
    )
  }
}
输出结果:
client_ip: 192.168.1.2
time: 2019-08-06 12:12:19
request: GET /index.html HTTP/1.1
status: 200
bytes: 1024
说明:
ip:client_ip- 提取 IP 地址,命名为 client_ip2*_- 忽略 2 个字段(两个-)time/clf<[,]>- 提取方括号包裹的 CLF 时间http/request"- 提取引号包裹的 HTTP 请求digit- 提取数字
3 个最常用场景
场景 1:空格分隔的日志
输入:
200 192.168.1.1 2023-01-01T12:00:00 login_success
WPL:
package demo {
  rule simple_log {
    (digit:code, ip:client, time:ts, chars:action)
  }
}
输出:
code: 200
client: 192.168.1.1
ts: 2023-01-01 12:00:00
action: login_success
场景 2:JSON 数据
输入:
{"user":"admin","code":200,"message":"success"}
WPL:
package api {
  rule json_response {
    (json(
      chars@user,
      digit@code,
      chars@message
    ))
  }
}
输出:
user: admin
code: 200
message: success
场景 3:KV 键值对
输入:
host=server1;port=8080;user=admin;status=online
WPL:
package config {
  rule kv_log {
    (kvarr)
  }
}
输出:
host: server1
port: 8080
user: admin
status: online
基本语法速览
结构
package 包名 {
  rule 规则名 {
    (字段列表)
  }
}
常用字段类型
| 类型 | 说明 | 示例 |
|---|---|---|
digit | 整数 | 200, 8080 |
chars | 字符串 | "hello", admin |
ip | IP 地址 | 192.168.1.1 |
time | 时间 | 2023-01-01 12:00:00 |
time/clf | CLF 时间 | [06/Aug/2019:12:12:19 +0800] |
json | JSON 对象 | {"key":"value"} |
kv | 键值对 | key=value |
http/request | HTTP 请求 | GET /path HTTP/1.1 |
http/status | HTTP 状态码 | 200 |
字段命名
type:name              # 命名字段
digit:status           # status = 数字
ip:client_ip           # client_ip = IP地址
忽略字段
_                      # 忽略 1 个字段
2*_                    # 忽略 2 个字段
5*_                    # 忽略 5 个字段
格式控制
<[,]>                  # 方括号包裹:[content]
<{,}>                  # 花括号包裹:{content}
"                      # 引号包裹:"content"
^N                     # 固定 N 个字符
重复模式
kvarr                  # 自动解析所有KV
3*ip                   # 重复 3 次
12*digit               # 重复 12 次
子字段提取
# JSON 子字段
json(chars@name, digit@age)

# KV 子字段
kvarr(chars@host, digit@port)

# 嵌套字段
json(chars@user/name, digit@user/age)
常见模式速查
解析带引号的字段
chars":url             # "http://example.com"
http/agent":ua         # "Mozilla/5.0..."
解析带特殊分隔符的数据
# 逗号分隔
(digit, ip, chars)\,

# 分号分隔
(digit, ip, chars)\;

# 字段级分隔符(优先级更高)
digit\,, ip\;, chars\s
可选分组
opt(chars:tag)         # 单字段可选分组
(digit, time), opt(chars:tag)
Base64 解码
|decode/base64|
(json(chars@data))
快速调试技巧
1. 从简单开始
# 第 1 步:最简单
(digit)

# 第 2 步:添加字段
(digit, ip)

# 第 3 步:添加命名
(digit:status, ip:client)

# 第 4 步:添加复杂类型
(digit:status, ip:client, json(chars@name))
2. 使用 opt() 定位问题
# 如果某个部分导致失败,把它拆成独立分组再用 opt 包裹
(digit), opt(ip), (time, chars)
# 如果 ip 解析失败,其他分组仍然可以继续定位问题
3. 检查分隔符
打印原始数据,确认字段间的分隔符:
数据:200,192.168.1.1,admin
分隔符:逗号
规则:(digit, ip, chars)\,
下一步
理解概念
→ 02-core-concepts.md - 理解 WPL 的设计理念
你将学到:
- 为什么 WPL 这样设计?
- 类型系统的作用
- 匹配语义(seq/alt/opt/some_of)
- 管道系统原理
- 分隔符优先级
解决实际问题
→ 03-practical-guide.md - 按任务查找解决方案
你将学到:
- 解析 Web 服务器日志(Nginx/Apache)
- 解析 JSON 数据(嵌套、反转义)
- 解析 KV 键值对(多种分隔符)
- 处理编码数据(Base64/Hex)
- 字段验证与过滤
- 复杂场景(重复模式、可选字段)
查阅参考
→ 04-language-reference.md - 完整类型和语法参考 → 05-functions-reference.md - 所有函数参考
实战练习
练习 1:解析自定义日志
数据:
[2023-01-01 12:00:00] INFO 192.168.1.1 user=admin action=login
提示:
- 时间在方括号中
- INFO 可以忽略
- 后面是 IP 和 KV
查看答案
package practice {
  rule custom_log {
    (
      time:timestamp<[,]>,
      _,
      ip:client,
      kvarr
    )
  }
}
练习 2:解析嵌套 JSON
数据:
{"user":{"name":"Alice","age":25},"status":"active"}
提示:
- 使用 @path/to/field 提取嵌套字段
查看答案
package practice {
  rule nested_json {
    (json(
      chars@user/name,
      digit@user/age,
      chars@status
    ))
  }
}
练习 3:解析 Base64 编码日志
数据(Base64):
eyJ1c2VyIjoiYWRtaW4iLCJjb2RlIjoyMDB9
解码后:
{"user":"admin","code":200}
提示:
- 使用
|decode/base64|预处理
查看答案
package practice {
  rule base64_log {
    |decode/base64|
    (json(
      chars@user,
      digit@code
    ))
  }
}
相关资源
- 核心概念:02-core-concepts.md
- 实战指南:03-practical-guide.md
- 语言参考:04-language-reference.md
- 函数参考:05-functions-reference.md
- 语法规范:06-grammar-reference.md
WPL 语言基础
本文档介绍 wp-lang 中的 WPL 规则语言基础元素与常用写法,内容与当前解析实现保持一致。
WPL 用于定义“规则(rule)”,每条规则由一个或多个“分组(group)”构成,分组内包含若干“字段(field)”抽取项。
提示:完整的形式化语法见《WPL 语法(EBNF)》:./06-grammar-reference.md。
最小示例
package net {
  rule nginx_access {
    (
      digit:status,
      time_3339:recv_time,
      ip:client_ip,
      http/request,
      http/agent"
    )
  }
}
基本结构
- package:包名作为作用域;一个包内包含多条 rule
- rule:规则名可包含路径分隔符(
/a/b), - 表达式(Express):可含“预处理管道”与一个或多个“分组”
package demo {
  # 可选:标签/复制原文注解可加在 package 或 rule 上,编译时会合并
  #[tag(sys:"ids"), copy_raw(name:"raw_payload")]
  rule /service/http {
    |decode/base64|unquote/unescape|     # 预处理(可选)
    (
      ip:src_ip,                        # 基本字段
      ip:dst_ip,
      time:occur_time,
      5*_,                               # 连续占位字段(忽略)
      http/request<[,]>,                 # 范围定界格式 <beg,end>
      http/agent"
    )
  }
}
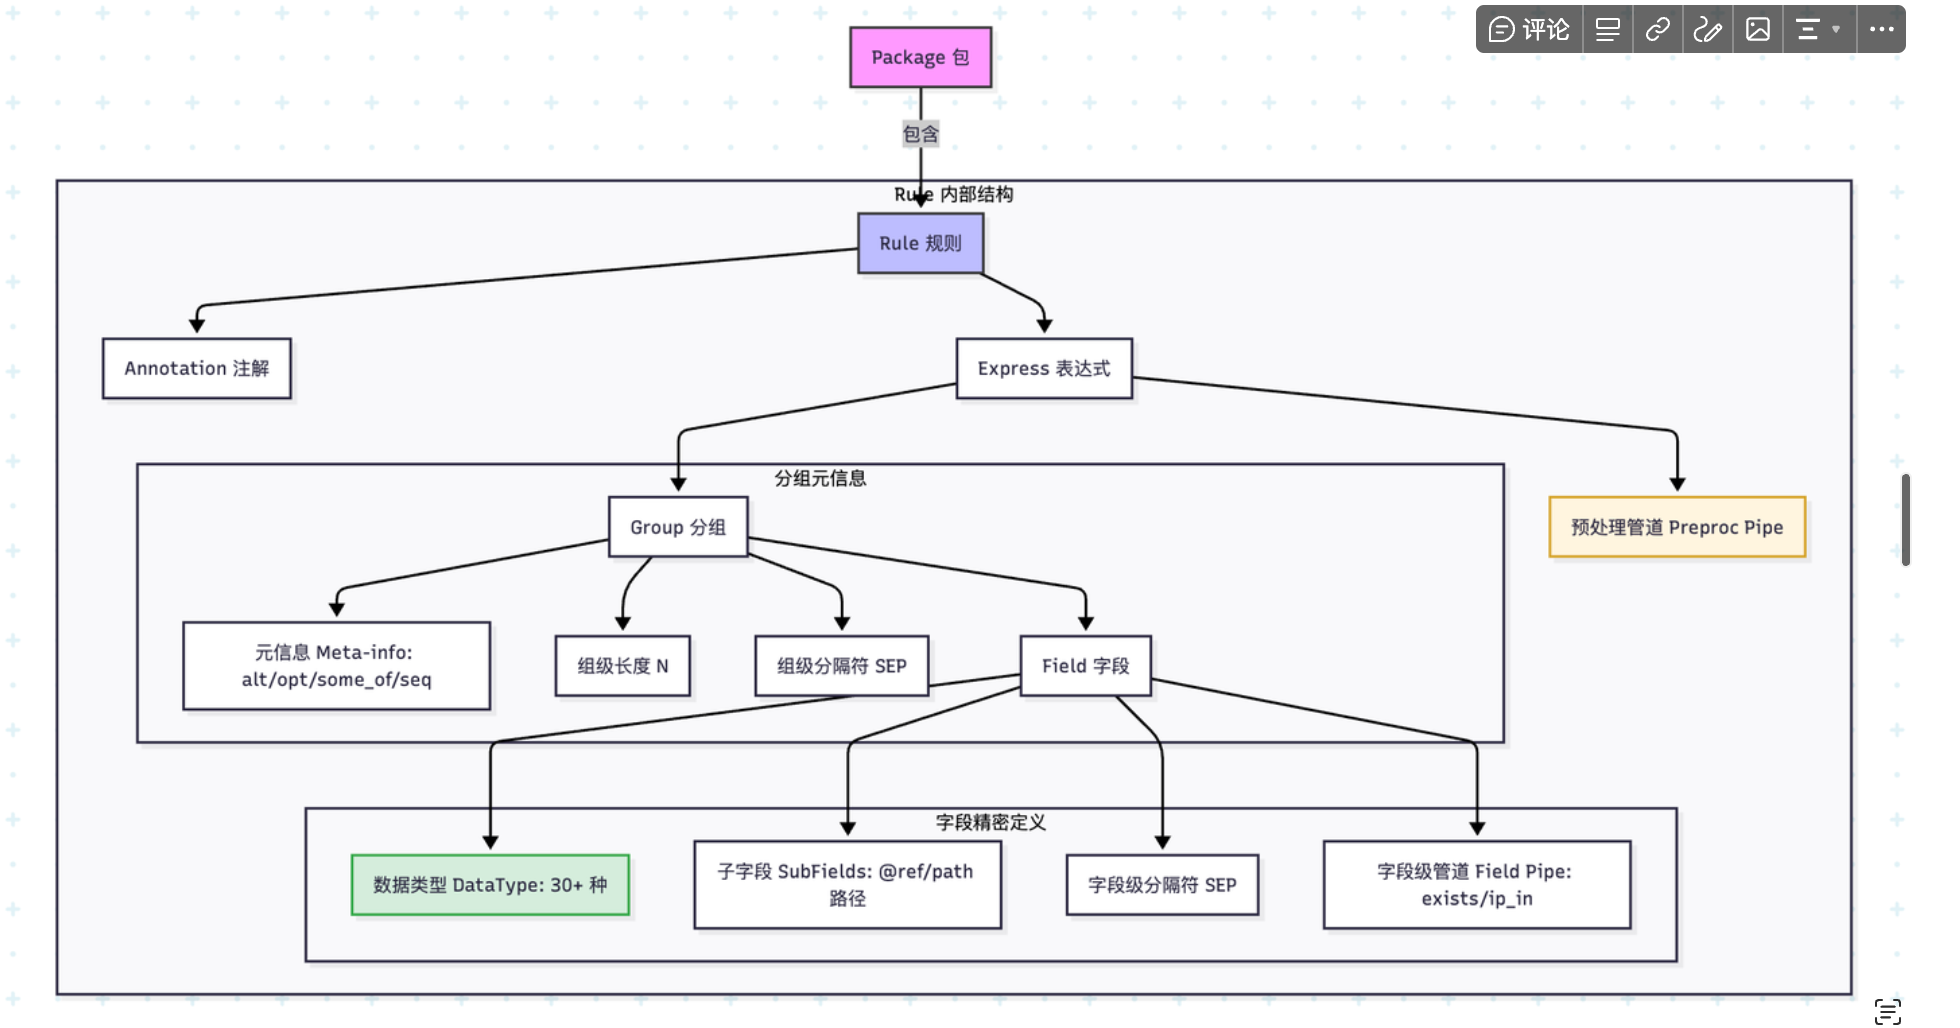
分组(Group)
- 形式:
(<fields>)[N][SEP] - 元信息(可选):
alt | opt | some_of | seq - 长度
[N]会应用到组内所有字段(等价于每个字段后[N]) - 分隔符
SEP写法为逐字符反斜杠转义:如\,表示,,\!\|表示!|
示例:
seq(ip:sip,2*_,time:recv_time<[,]>,http/request:req",http/status:status,digit:bytes,chars:referer",http/agent:ua",chars:xff")
尾随逗号规则(两者均允许):
- 分组字段列表允许尾随逗号;
- 子字段列表允许尾随逗号。
# 正确:分组允许尾随逗号
rule ok_group { (ip, digit,) }

# 正确:子字段允许尾随逗号
rule ok_subfields { (kv(ip@src, digit@port,)) }
分组元信息语义(alt/opt/some_of/seq)
- seq(默认):按声明顺序依次匹配每个字段;任一字段失败导致整个分组失败。连续字段(如
3*ip)会在该位置多次尝试直到次数耗尽或失败。 - alt(择一):按顺序尝试分组内各字段,只要有一个字段成功就停止;若全部失败则分组失败。常用于“同位不同类型”的容错匹配,如
alt(ip,digit)。 - some_of(尽可能多):在当前位置反复尝试匹配“任一字段”,每次循环最多消费一个字段;直到一次循环中所有字段都失败为止(此时停止且不报错)。常用于扫描“零散重复”的键值、片段等。
- opt(可选):仅尝试匹配分组内的第一个字段,一次机会;失败不报错,继续后续分组。建议在
opt(...)内仅写一个字段,额外字段将被忽略。
示例
# seq:全部匹配且按顺序
rule g_seq { (ip, time_3339) }

# alt:择一匹配
rule g_alt { alt(ip, digit) }

# some_of:尽可能多地匹配(每轮最多消费一个)
rule g_some_of { some_of(ip, digit) }

# opt:可选(建议仅一个字段)
rule g_opt { opt(ip) }
注意
- 分组级
[..](长度)与分隔符会注入到分组内字段(作为默认值)并结合字段自身格式解析。 some_of与alt在嵌套到kv/json等复合类型时的具体行为,依赖协议解析器实现;常见用法是在键值对中匹配“候选值之一”或“尽可能多的候选值”。
字段(Field)
通用形态(按顺序可选):
[N*] DataType [ (symbol 内容) ] [ (子字段列表) ] [:name] [ [len] ] [ 格式 ] [ 分隔符 ] { | 管道 }
- 重复计数:
*ip或3*ip表示连续匹配项(_为忽略占位) - 数据类型:与
wp-data-model::DataType对应,例如:digit/time_3339/ip/kv/json/http/request等 - symbol 内容:仅
symbol/peek_symbol可带,如symbol(boy) - 子字段:用于
kv/json/array/obj等复合类型,形如(digit@message_type, time@access_time) - 命名:
:name指定抽取后的目标字段名 - 长度:
[N]限定最大长度 - 格式:
- 范围定界:
<beg,end>,如<[,]> - 引号:
"(等价首尾均为") - 计数字段:
^N(仅对chars/_合法)
- 范围定界:
- 分隔符:使用反斜杠转义逐字符拼接,如
\\,、\\!\\| - 字段级管道:
| exists(src)或| (time,ip)(可嵌套一个分组作为管道)
示例:
(
  ip:sip,               # 命名字段
  _^2,                  # 两个忽略位(以计数方式)
  time<[,]>,            # 范围定界格式
  http/request",
  digit[10]\\,          # 含长度与分隔符
  json(chars@key | exists(src))  # 子字段 + 函数管道
)
子字段(SubFields)
- 形态:
( <sub_field> [, <sub_field>]* ) - 子字段写法与普通字段一致,额外支持
opt(DataType)标注为可选 - 子字段键:默认键为
*(通配);显式使用@ref/path指定键
示例:
kv(
  time@access_time,
  ip@sip,
  opt(digit)@dns_type
)
预处理管道(表达式级)
写在表达式起始处:|decode/base64|unquote/unescape|。与字段级 | ... 管道不同,预处理作用域为整条规则的输入原文。
用途与执行时机
- 作用域:在解析字段前,对整行原始输入进行一次或多次顺序转换;转换后的文本再进入分组/字段解析。
- 执行顺序:自左向右;每个步骤的输出作为下一个步骤的输入。
- 失败处理:任一步骤失败即报错;未知步骤名会在装配阶段报
UnSupport(<name>)。
语法与可用步骤
- 语法:
'|' ws? preproc_step { ws? '|' ws? preproc_step } ws? '|'(必须以|结尾,支持空白)。 preproc_step支持两类:- 内置步骤:与旧语法一致,token 需满足
take_key规则(字母、数字、_、/、-、.等)。 - 自定义扩展:写成
plg_pipe/<name>,解析器会在预处理注册表中按名称查找实现。
- 内置步骤:与旧语法一致,token 需满足
- 内置步骤(唯一支持的命名空间写法,实现在
eval/builtins):decode/base64:对整行进行 Base64 解码;失败报错。unquote/unescape:移除外层引号并还原文本中的反斜杠转义(常用于还原日志中的\"为")。decode/hex:按十六进制文本进行解码(如48656c6c6f→Hello)。
- 自定义
plg_pipe/<name>:通过代码调用register_wpl_pipe!("NAME", builder)注册,builder返回实现PipeProcessor的处理器。
示例
# 1) 先 Base64,再解压/还原引号(示例步骤名 zip 仅作演示,非内置)
rule r1 {
  |decode/base64|unquote/unescape|
  (json(chars@payload))
}

# 2) 仅进行十六进制解码
rule r2 {
  |decode/hex|
  (chars:raw)
}
常见问题与提示
- 预处理步骤名必须以
|收尾,否则会产生语法错误(实现强校验)。 - 仅有
plg_pipe/<name>可以挂载外部扩展,注册接口位于wpl::register_wpl_pipe!(编译期直接调用)。 - 预处理只影响“整行输入”,不会对字段子串单独生效;字段层面的转换请使用字段级
| fun(...)管道。
字段级函数(管道)
内置函数(与解析实现一致):
exists(name)exists_chars(name, path)/chars_not_exists(name, path)/exists_chars_in(name, [path,...])exists_digit(name, N)/exists_digit_in(name, [N,...])exists_ip_in(name, [1.1.1.1, 2.2.2.2])str_mode("raw mode string")
示例:
(json(chars@name, chars@code) | chars_not_exists(name, a/b/c))
注解(Annotation)
支持添加在 package 或 rule 前,编译时会合并到 rule:
#[tag(t1:"id",t2:"sn"), copy_raw(name:"raw")]
package test {
  #[tag(t3:"sub")]
  rule x { (digit,time) }
}
注解值支持通用引号字符串(可包含空格、中文与转义):
#[tag(desc:"中文 标记", note:"say \"hi\"")]
package demo { rule x { (digit) } }
也可以使用原始字符串,减少转义负担(不处理反斜杠转义):
#[tag(path:r#"C:\\Program Files\\App"#, note:r#"a\b\c \"quote\""#)]
package demo { rule x { (digit) } }
插件(Plugin)
使用“代码块内联”形式,不需要转义:
rule test_plugin {
  plg_pipe(id: dayu) {
    (json(_@_origin,_@payload/packet_data))
  }
}
常用数据类型(节选)
- 基础:
boolcharsdigitfloat_sn - 时间:
timetime_isotime_3339time_2822time_timestamp - 网络:
ipip_netdomainemailport - 文本/协议:
hexbase64kvkvarrjsonexact_jsonhttp/requesthttp/statushttp/agenthttp/methodurl - 结构:
objarray[/subtype]symbolpeek_symbol
更多产生式请参考《WPL 语法(EBNF)》:./02-wpl_grammar.md。
Array 类型
- 语法:
array[/subtype](如:array/digit、array/chars、array/array/digit);不写 subtype 时默认为auto。 - 作用:解析中括号数组文本(如
[1,2,3]),按元素展开为独立字段,路径命名为<name>/[index]。 - 元素规则:
- 分隔:逗号
,;允许尾随逗号([1,2,3,]合法)。 - 结束:右括号
];支持空数组[]。 - 字符串元素使用引号包裹,内部逗号不会被误分隔(优先按引号解析)。
- 分隔:逗号
- 示例:
rule arr { (array/digit:nums) }
# "[1,2,3,]" -> nums/[0]=1, nums/[1]=2, nums/[2]=3

rule arr2 { (array/chars:items) }
# "[\"hello\", \"_F]fe\", \"!@#$*&^\\\"123\"]" -> items/[0]="hello", items/[1]="_F]fe", items/[2]="!@#$*&^\"123"
KvArr 类型(键值对数组)
- 语法:
kvarr(subfield1, subfield2, ...) - 作用:解析
key=value或key:value格式的键值对数组,支持逗号或空格分隔。 - 支持格式:
- 逗号分隔:
a="foo", b=bar, c=123 - 空格分隔:
a="foo" b=bar c=123 - 混合分隔:
a="foo", b=bar c=123 - 键值分隔符:支持
=或:(如a=1或a:1)
- 逗号分隔:
- 值类型支持:
- 字符串:带引号或不带引号(如
"value"或value) - 数字:整数和浮点数(如
123或1.25) - 布尔值:
true或false(不区分大小写) - 自动类型推断:根据值的格式自动判断类型
- 字符串:带引号或不带引号(如
- 重复键处理:
- 当同一个键出现多次时,会自动添加数组索引
- 例如:
tag=alpha tag=beta tag=gamma→tag[0]="alpha",tag[1]="beta",tag[2]="gamma"
- 子字段配置:
- 支持在括号内定义子字段的类型和名称映射
- 支持元字段(
_@name)来忽略特定键 - 支持嵌套解析器(通过子字段配置触发)
- 示例:
# 基本用法
rule parse_kvarr { (kvarr(ip@sip, digit@cnt)) }
# 输入:"sip=192.168.1.1, cnt=42"
# 输出:sip=192.168.1.1 (ip类型), cnt=42 (digit类型)

# 空格分隔
rule parse_whitespace { (kvarr(chars@a, chars@b, digit@c)) }
# 输入:"a=\"foo\" b=bar c=1"
# 输出:a="foo", b="bar", c=1

# 重复键自动索引
rule parse_repeated { (kvarr(chars@tag)) }
# 输入:"tag=alpha tag=beta tag=gamma"
# 输出:tag[0]="alpha", tag[1]="beta", tag[2]="gamma"

# 类型自动推断
rule parse_types { (kvarr(bool@flag, float@ratio, chars@raw)) }
# 输入:"flag=true ratio=1.25 raw=value"
# 输出:flag=true (bool), ratio=1.25 (float), raw="value" (chars)

# 忽略元字段
rule parse_with_meta { (kvarr(_@note, digit@count)) }
# 输入:"note=something count=7"
# 输出:note (ignored), count=7
分隔符优先级与合并(sep)
- 来源与写法:
- 字段级:在字段末尾用反斜杠转义指定,如
digit\,、chars\!\|(优先级 3,覆盖)。 - 组级:在分组右括号后指定,如
(ip, digit)\,(优先级 2,默认)。 - 上游继承:来自外层上下文(如 kv/json/array/管道等)或默认空格(优先级 1,继承)。
- 字段级:在字段末尾用反斜杠转义指定,如
- 合并规则(combo):
- 字段级(3) 覆盖 组级(2) 覆盖 上游(1);否则继承上游。
- 特殊值:
\s表示空格;\0或0表示读到行尾。 - 打印规则:sep 标记默认会打印为反斜杠转义形式;某些“推断 sep”不会在格式化输出中重复打印(实现层“推断”)。
示例:
# 1) 组分隔符应用于组内:
rule g1 { (chars:a, chars:b)\| }
# 输入:"foo|bar"  => a = foo, b = bar

# 2) 字段分隔符高于组分隔符:
rule g2 { (chars:a, chars:b\|)\, }
# 输入:"x,y|z" => a = x(用组分隔符 ,), b = y(用字段分隔符 |)

# 3) 读到行尾(\0):
rule g3 { (kv, chars\0) }
# 第二个字段捕获到行尾;常见于最后一个字段吸收余量
WPL 核心概念
本文档帮助你理解 WPL 的设计理念和核心概念,建立正确的思维模型。
📚 文档导航
快速导航
| 主题 | 内容 |
|---|---|
| 设计理念 | 为什么需要 WPL、核心思想、声明式设计 |
| 类型系统 | 类型的作用、类型层次、类型组合 |
| 匹配语义 | seq 顺序、alt 择一、opt 可选、some_of 重复 |
| 管道系统 | 预处理管道、字段级管道、两者区别 |
| 子字段与嵌套 | JSON 子字段、KV 子字段、数组 |
| 分隔符优先级 | 优先级规则、分隔符类型、实际应用 |
| 设计原则 | 声明式、类型安全、组合性、明确性 |
| 常见误解 | WPL vs 正则、字段连续性、格式灵活性 |
WPL 设计理念
为什么需要 WPL?
问题: 如何从非结构化文本中提取结构化数据?
输入(文本):192.168.1.1 - - [06/Aug/2019:12:12:19 +0800] "GET /index.html" 200
输出(结构):
  client_ip: 192.168.1.1
  time: 2019-08-06 12:12:19
  request: GET /index.html
  status: 200
传统方法的问题:
- 正则表达式:难写、难读、难维护
- 手写解析器:代码冗长、容易出错
- 固定格式解析:不够灵活
WPL 的解决方案:
- 声明式:描述“是什么“,而非“怎么做“
- 类型安全:自动验证和转换
- 组合性:小的规则组合成复杂规则
核心思想:规则 = 模式匹配 + 字段提取
package demo {
  rule example {
    (ip:client, digit:status, time:ts)
  }
}
这个规则表达:
- 模式:数据格式是“IP 数字 时间“
- 提取:提取 3 个字段,分别命名为 client、status、ts
- 验证:自动验证 IP 格式、数字格式、时间格式
- 转换:自动转换为对应类型
类型系统
类型的作用
类型在 WPL 中有三个作用:
- 验证:确保数据符合预期格式
- 转换:自动转换为标准格式
- 语义:表达数据的含义
示例:
# 输入:06/Aug/2019:12:12:19 +0800
time/clf:access_time

# 类型 time/clf 做了 3 件事:
# 1. 验证:是否符合 CLF 时间格式
# 2. 转换:转换为标准时间格式 2019-08-06 12:12:19
# 3. 语义:表达"这是访问时间"
类型的层次
基础类型 ────→ 结构化类型 ────→ 协议类型
   ↓              ↓               ↓
 digit          json          http/request
 chars           kvarr        http/status
  ip           array          time/clf
 time           obj
基础类型:原子数据
digit- 整数chars- 字符串ip- IP 地址time- 时间
结构化类型:复合数据
json- JSON 对象(包含多个字段)kvarr- 键值对array- 数组
协议类型:领域特定格式
http/request- HTTP 请求行http/status- HTTP 状态码time/clf- CLF 时间格式
类型组合示例
# 简单组合
(digit, ip, time)

# 嵌套组合
(digit, json(chars@name, digit@age), time)

# 数组组合
array/digit              # 数字数组
array/array/chars        # 二维字符串数组
匹配语义
WPL 提供 4 种匹配语义,满足不同场景需求。
seq(顺序匹配)- 默认
语义:按顺序依次匹配每个字段
# 显式写法
seq(ip, digit, time)

# 隐式写法(默认)
(ip, digit, time)
匹配过程:
输入:192.168.1.1 200 2023-01-01
      ↓           ↓   ↓
     ip         digit time
何时使用: 字段顺序固定(90% 的场景)
alt(择一匹配)
语义:尝试多种类型,匹配其中一个
alt(ip, digit)
匹配过程:
输入:192.168.1.1
尝试:ip ✓ → 成功,返回 ip
      digit ✗ → 不尝试

输入:12345
尝试:ip ✗ → 失败
      digit ✓ → 成功,返回 digit
何时使用: 同一位置可能是不同类型
示例场景:
# 日志中 user_id 可能是数字或字符串
(time), alt(digit:user_id, chars:user_id), (chars:action)
opt(可选匹配)
语义:分组可选,失败不报错
opt(chars:tag)
匹配过程:
输入:有内容 → 尝试匹配,成功则提取
输入:无内容 → 跳过,继续下一个字段
何时使用: 某个分组可能不存在
示例场景:
# HTTP 日志中 referer 分组可能不存在
(ip, time, http/request, digit), opt(chars:referer")
some_of(尽可能多)
语义:循环匹配,尽可能多地消费字段
some_of(kvarr, ip, digit)
匹配过程:
输入:k1=v1 192.168.1.1 200 k2=v2 300

循环 1:尝试 kvarr ✓ → 提取 k1=v1
循环 2:尝试 kvarr ✗, 尝试 ip ✓ → 提取 192.168.1.1
循环 3:尝试 kvarr ✗, 尝试 ip ✗, 尝试 digit ✓ → 提取 200
循环 4:尝试 kvarr ✓ → 提取 k2=v2
循环 5:尝试 kvarr ✗, 尝试 ip ✗, 尝试 digit ✓ → 提取 300
循环 6:全部失败 → 停止
何时使用: 不确定数量和顺序的混合字段
匹配语义对比
| 语义 | 用途 | 示例 | 匹配次数 |
|---|---|---|---|
seq | 顺序固定 | (ip, digit, time) | 每个字段 1 次 |
alt | 类型不定 | alt(ip, digit) | 其中 1 个 |
opt | 可选分组 | opt(chars:tag) | 0 或 1 次 |
some_of | 混合重复 | some_of(kvarr, ip) | 尽可能多 |
管道系统
WPL 的管道系统分为两层:预处理管道(整行级)和字段级管道(字段级)。
预处理管道(整行级)
语法:
|step1|step2|
(字段列表)
作用域: 整行原始输入
执行时机: 在字段解析之前
常用场景:
# Base64 解码
|decode/base64|
(json)

# 多步处理
|decode/base64|unquote/unescape|
(json(chars@path))
为什么需要预处理管道?
- 某些日志整行都是 Base64 编码(如华为防火墙)
- 需要先解码,才能进行字段解析
- 预处理一次,所有字段都受益
字段级管道(字段级)
语法:
(fields) |function1| |function2|
作用域: 解析后的字段集合
执行时机: 在字段解析之后
常用场景:
# 验证字段
(json |f_has(status) |f_digit_in(status, [200, 201]))

# 转换字段
(json(chars@message) |take(message) |json_unescape())
为什么需要字段级管道?
- 需要验证某个字段是否存在
- 需要验证字段值是否符合条件
- 需要对特定字段进行转换
两种管道的区别
| 特性 | 预处理管道 | 字段级管道 |
|---|---|---|
| 作用域 | 整行输入 | 解析后字段 |
| 执行时机 | 解析前 | 解析后 |
| 语法 | |step| | |function()| |
| 典型用途 | 解码、反转义 | 验证、转换 |
示例对比:
# 预处理管道:整行 Base64 解码
|decode/base64|
(json(chars@user))

# 字段级管道:单字段 Base64 解码
(json(chars@payload) |take(payload) |base64_decode())
子字段与嵌套
为什么需要子字段?
问题: JSON/KV 等结构化数据包含多个字段,如何提取?
{"user":"admin","code":200,"data":{"result":"ok"}}
解决方案: 使用子字段语法
json(
  chars@user,              # 提取 user 字段
  digit@code,              # 提取 code 字段
  chars@data/result        # 提取 data.result 字段
)
JSON 子字段
基本语法:
json(type@key, type@key, ...)
示例:
# 提取指定字段
json(chars@name, digit@age)

# 嵌套路径
json(chars@user/name, digit@user/age)

# 可选字段
json(chars@name, opt(chars)@email)
输入:
{"user":{"name":"Alice","age":25},"status":"active"}
输出:
user/name: Alice
user/age: 25
status: active
KV 子字段
基本语法:
kvarr(type@key, type@key, ...)
示例:
kvarr(chars@hostname, digit@port, opt(chars)@user)
输入:
hostname=server1 port=3306 user=root
输出:
hostname: server1
port: 3306
user: root
数组
基本语法:
array[/subtype]
示例:
array/digit:nums          # [1,2,3] → nums/[0]=1, nums/[1]=2, nums/[2]=3
array/chars:items         # ["a","b"] → items/[0]="a", items/[1]="b"
array/array/digit         # [[1,2],[3,4]] → 嵌套数组
分隔符优先级
为什么需要优先级?
问题: 不同来源的分隔符可能冲突
# 字段级分隔符
digit\,

# 组级分隔符
(digit, ip)\;

# 上游分隔符(来自 json/kvarr 等)
解决方案: 定义优先级规则
优先级规则
字段级(3) > 组级(2) > 上游(1)
示例:
# 字段级覆盖组级
(digit\;, ip, chars)\,
# digit 用分号,ip 和 chars 用逗号

# 组级覆盖上游
json(...) (digit, ip)\;
# 即使 json 内部默认空格,组级分号生效
分隔符类型
| 分隔符 | 写法 | 说明 |
|---|---|---|
| 逗号 | \, | 最常用 |
| 分号 | \; | 常用于 KV |
| 空格 | \s | 默认 |
| 冒号 | \: | 键值分隔 |
| 行尾 | \0 | 读到行尾 |
实际应用
场景 1:不同字段不同分隔符
(digit\;, ip\,, chars\s)
# digit 用分号,ip 用逗号,chars 用空格
场景 2:组级统一分隔符
(digit, ip, time)\,
# 所有字段都用逗号
场景 3:最后一个字段读到行尾
(digit, ip, chars\0)
# chars 读取所有剩余内容
设计原则总结
1. 声明式优于命令式
# WPL(声明式)
(ip, digit, time)

# 命令式伪代码
ip = parse_ip(input)
digit = parse_digit(input)
time = parse_time(input)
2. 类型安全优于字符串匹配
# 带类型验证
ip:client_ip              # 自动验证 IP 格式

# 纯字符串
chars:client_ip           # 不验证格式
3. 组合优于重复
# 可组合
rule base_fields { (ip, time) }
rule extended { (ip, time, json) }   # 复用基础部分

# 不可组合
rule log1 { (ip, time, chars) }
rule log2 { (ip, time, json) }       # 重复 ip, time
4. 明确优于隐含
# 明确指定
time/clf:access_time<[,]>

# 隐含(可能失败)
time:access_time
常见误解
误解 1:WPL 是正则表达式
错误认知: WPL 和正则表达式类似
正确理解: WPL 是类型化的模式匹配语言
- 正则:字符级匹配
- WPL:类型级匹配 + 验证 + 转换
误解 2:所有字段必须连续
错误认知: 字段之间不能有空隙
正确理解: 使用 _ 跳过不需要的字段
(ip, 3*_, time) # 跳过 3 个字段
误解 3:只能解析固定格式
错误认知: WPL 只能解析固定格式的数据
正确理解: 支持可选、重复、择一等灵活模式
opt(chars:tag)            # 单字段可选分组
kvarr                     # 自动解析 KV
alt(ip:addr, digit:id)    # 择一分组
下一步
实战应用
→ 03-practical-guide.md - 按任务查找解决方案
你将学到:
- 解析各种 Web 服务器日志
- 处理 JSON 和 KV 数据
- 使用预处理管道
- 字段验证与过滤
- 复杂场景处理
深入参考
→ 04-language-reference.md - 完整类型和语法 → 05-functions-reference.md - 所有函数详解
相关资源
- 快速入门:01-quickstart.md
- 实战指南:03-practical-guide.md
- 语言参考:04-language-reference.md
WPL 解析示例
本文档整理了 WPL 语言中各种数据解析的示例,包括测试数据、解析规则和预期结果,用于学习和参考。
目录
基础类型解析
1. 数字解析
解析规则:
digit
带名称的数字解析:
digit:length
digit:id
digit:port
测试数据:
200
368
190
34616
预期结果:
length: 200
port: 8080
id: 12345
2. 字符串解析
解析规则:
chars
带名称的字符串解析:
chars:dev-name
chars:http/referer
chars:user-agent
测试数据:
nginx-server
https://www.example.com
curl/7.68.0
预期结果:
dev-name: "nginx-server"
http/referer: "https://www.example.com"
user-agent: "curl/7.68.0"
3. 分隔符解析
下划线分隔符:
_        # 单个下划线
_^2      # 重复2次
逗号分隔符:
<[,]> # 逗号分隔
引号分隔符:
" # 引号
空格分隔符:
' ' # 空格字符
示例用法:
(ip, _^2, time, chars)
时间格式解析
1. CLF (Common Log Format) 时间解析
解析规则:
time/clf
测试数据:
06/Aug/2019:12:12:19 +0800
预期结果:
2019-08-06 12:12:19 # 转换为标准时间格式
带方括号的时间:
[06/Aug/2019:12:12:19 +0800]
测试示例:
rule test {
    (time/clf)
}
2. 标准时间格式解析
解析规则:
time
测试数据示例:
2023-05-15 07:09:12
2023/5/15 15:09:12
预期结果:
time: "2023-05-15 07:09:12"
time: "2023-05-15 15:09:12"
网络数据解析
1. HTTP 请求解析
解析规则:
http/request
测试数据:
GET /nginx-logo.png HTTP/1.1
预期结果:
http/request: "GET /nginx-logo.png HTTP/1.1"
2. HTTP 状态码解析
解析规则:
http/status
测试数据:
200
预期结果:
http/status: 200
3. HTTP User-Agent 解析
解析规则:
http/agent
测试数据:
Mozilla/5.0 (Macintosh; Intel Mac OS X 10_14_5) AppleWebKit/537.36 (KHTML, like Gecko) Chrome/75.0.3770.142 Safari/537.36
预期结果:
http/agent: "Mozilla/5.0 (Macintosh; Intel Mac OS X 10_14_5) AppleWebKit/537.36 (KHTML, like Gecko) Chrome/75.0.3770.142 Safari/537.36"
4. URL 解析
解析规则:
chars:url # 或直接使用 chars
测试数据:
http://119.122.1.4/
预期结果:
url: "http://119.122.1.4/"
5. IP 地址解析
解析规则:
ip
测试数据:
192.168.1.2
预期结果:
ip: 192.168.1.2
6. Email 解析
解析规则:
email
测试数据示例:
johnjoke@example.com
user+tag@example-domain.com
first_last@example.com
foo-bar@example.co
预期结果:
email: "johnjoke@example.com"
JSON 数据解析
1. 基础 JSON 解析
解析规则:
rule test {
    (json)
}
测试数据:
{ "age": 18}
预期结果:
age: 18
2. 指定字段解析
解析规则:
rule test {
    (json(chars@path, chars@txt) |json_unescape())
}
测试数据:
{"path":"c:\\users\\fc\\file","txt":"line1\nline2"}
预期结果:
path: "c:\\users\\fc\\file"
txt: "line1\nline2"  # 包含实际换行符
3. JSON 字段存在性检查
解析规则:
rule test {
    (json |f_has(age))
}
测试数据:
{ "age": 18}
预期结果:
age: 18
失败示例:
rule test {
    (json |f_has(age1))  # 字段不存在
}
4. JSON 数值范围检查
解析规则:
rule test {
    (json |f_digit_has(age, 18))
}
测试数据:
{ "name": "china", "age": 18}
预期结果:
name: "china"
age: 18
5. JSON 数值列表检查
解析规则:
rule test {
    (json |f_digit_in(age, [18, 19]))
}
测试数据:
{ "name": "china", "age": 18}
预期结果:
name: "china"
age: 18
协议解析
1. Base64 解码
解析规则:
|decode/base64|
# 或
|base64|
完整示例:
|decode/base64|(digit:id<<,>>,time,sn,chars\:),opt(kv\;), (*kv\,)
测试数据: Base64 编码的华为防火墙日志
预期结果: 解码后的文本格式日志
2. KV 键值对解析
基础 KV 解析:
kv
带字段名的 KV 解析:
kv(@CID)
测试数据:
CID=0x814f041e;vsys=CSG_Security
预期结果:
CID: "0x814f041e"
vsys: "CSG_Security"
2.1 KvArr 键值对数组解析
kvarr 类型专门用于解析 key=value 格式的数组,支持逗号或空格分隔,并能自动处理重复键。
基础 KvArr 解析(逗号分隔):
rule parse_kvarr {
    (kvarr(ip@sip, digit@cnt))
}
测试数据:
sip="192.168.1.1", cnt=42
预期结果:
sip: 192.168.1.1 (ip类型)
cnt: 42 (digit类型)
空格分隔的 KvArr:
rule parse_whitespace {
    (kvarr(chars@a, chars@b, digit@c))
}
测试数据:
a="foo" b=bar c=1
预期结果:
a: "foo"
b: "bar"
c: 1
重复键的数组索引:
当同一个键出现多次时,kvarr 会自动为重复的键添加数组索引:
rule parse_tags {
    (kvarr(chars@tag, digit@count))
}
测试数据:
tag=alpha tag=beta count=3
预期结果:
tag[0]: "alpha"
tag[1]: "beta"
count: 3
类型自动推断:
kvarr 支持自动类型推断,可以识别布尔值、数字和字符串:
rule parse_auto_types {
    (kvarr(bool@flag, float@ratio, chars@raw))
}
测试数据:
flag=true ratio=1.25 raw=value
预期结果:
flag: true (bool)
ratio: 1.25 (float)
raw: "value" (chars)
使用元字段忽略特定键:
rule parse_with_ignore {
    (kvarr(_@note, digit@count))
}
测试数据:
note=something count=7
预期结果:
note: (忽略)
count: 7
3. 重复模式解析
重复固定次数:
12*kv    # 重复12个KV对
2*_      # 重复2个下划线
7*kv     # 重复7个KV对
任意重复:
*kv # 重复任意次数的KV
4. 可选字段解析
可选字段:
opt(kv\;) # 可选的KV对(以分号结尾)
5. 转义和引用处理
字符串解码模式:
|str_mode(decoded)|
取消引用/反转义:
|unquote/unescape|
字段管道(Field Pipes)示例
字段管道(Field Pipes)是 WPL 的强大特性,允许对解析后的字段进行进一步的处理、验证和转换。管道操作符 | 用于链接多个处理步骤。
1. 编码解码管道
Base64 解码
解析规则:
rule test {
    (|decode/base64| (digit:id, time, chars:message))
}
测试数据:
SGVsbG8gV29ybGQxMjM0NTY3OjAwOjAwOjAw
预期结果:
id: 1234567
time: "00:00:00"
message: "Hello World"
Hex 解码
解析规则:
rule test {
    (|decode/hex| (chars:data))
}
测试数据:
48656c6c6f20576f726c64
预期结果:
data: "Hello World"
2. 字符串处理管道
反转义/去引号处理
解析规则:
rule test {
    (|unquote/unescape| (json(chars@path, chars@txt)))
}
测试数据:
{"path":"c:\\users\\fc\\file","txt":"line1\nline2"}
预期结果:
path: "c:\users\fc\file"  # 反斜杠被正确处理
txt: "line1\nline2"       # 换行符被保留
字符串模式切换
解析规则:
rule test {
    (json(chars@path, chars@txt) |json_unescape())
}
测试数据:
{"path":"c:\\users\\fc\\file","txt":"line1\nline2"}
预期结果:
path: "c:\\users\\fc\\file"
txt: "line1\nline2" # 包含实际换行符
3. 字段验证管道
字段存在性检查
解析规则:
rule test {
(json |f_has(name))
}
测试数据:
{"name": "Alice", "age": 25}
预期结果:
name: "Alice"
age: 25
失败示例:
rule test {
(json |f_has(email)) # email 字段不存在
}
字符串值检查
解析规则:
rule test {
(json |f_chars_has(status, success))
}
测试数据:
{"status": "success", "message": "Operation completed"}
预期结果:
status: "success"
message: "Operation completed"
字符串不在列表检查
解析规则:
rule test {
(json |f_chars_not_has(level, error))
}
测试数据:
{"level": "info", "msg": "Normal operation"}
预期结果:
level: "info"
msg: "Normal operation"
字符串值范围检查
解析规则:
rule test {
(json |f_chars_in(priority, [high, medium]))
}
测试数据:
{"priority": "high", "task": "Backup"}
预期结果:
priority: "high"
task: "Backup"
4. 数值验证管道
数值等于检查
解析规则:
rule test {
(json |f_digit_has(age, 25))
}
测试数据:
{"name": "Bob", "age": 25}
预期结果:
name: "Bob"
age: 25
数值范围检查
解析规则:
rule test {
(json |f_digit_in(score, [80, 85, 90, 95, 100]))
}
测试数据:
{"student": "Tom", "score": 90}
预期结果:
student: "Tom"
score: 90
5. IP 地址验证管道
解析规则:
rule test {
(json |f_ip_in(client_ip, [192.168.1.100, 10.0.0.1]))
}
测试数据:
{"client_ip": "192.168.1.100", "action": "login"}
预期结果:
client_ip: "192.168.1.100"
action: "login"
6. 多步骤管道处理
解析规则:
rule test {
(|decode/base64| (json |f_digit_has(age, 25)) |json_unescape())
}
数据流程:
- Base64 解码原始数据
- 解析 JSON
- 验证 age 字段等于 25
- 应用字符串解码模式
测试数据 (Base64编码):
eyJuYW1lIjogIkFsaWNlIiwgImFnZSI6IDI1fQ==
解码后的数据:
{"name": "Alice", "age": 25}
预期结果:
name: "Alice"
age: 25
7. 管道与分组结合
解析规则:
rule test {
(|decode/base64| (digit:id, chars:name) |f_has(id) |f_chars_has(name, admin))
}
功能说明:
- 先进行 Base64 解码
- 解析数字 ID 和字符 name
- 验证 ID 字段存在且 name 等于 “admin”
8. 实际应用示例
华为防火墙日志处理
解析规则:
rule huawei_firewall {
|decode/base64|
(digit:id<<,>>, time, sn, chars\:,),
opt(kv\;),
(*kv\,)
}
处理流程:
- Base64 解码日志数据
- 解析固定格式的头部(ID、时间、序列号等)
- 解析可选的键值对
- 解析多个键值对
带验证的 JSON 解析
解析规则:
rule api_response {
(json
|f_has(status_code)
|f_digit_in(status_code, [200, 201, 202])
|f_chars_in(result_type, [success, partial])
)
}
功能说明:
- 解析 JSON 响应
- 验证 status_code 字段存在
- 验证 status_code 在成功范围内
- 验证 result_type 为成功类型
复杂组合示例
1. Nginx 访问日志解析
完整解析规则:
rule nginx_log {
(ip, _^2, time/clf<[,]>, http/request", http/status, digit:length, chars", http/agent", _")
}
测试数据:
192.168.1.2 - - [06/Aug/2019:12:12:19 +0800] "GET /nginx-logo.png HTTP/1.1" 200 368 "http://119.122.1.4/" "Mozilla/5.0 (Macintosh; Intel Mac OS X 10_14_5) AppleWebKit/537.36 (KHTML, like Gecko) Chrome/75.0.3770.142 Safari/537.36" "-"
预期结果:
ip: 192.168.1.2
time: 2019-08-06 12:12:19
http/request: "GET /nginx-logo.png HTTP/1.1"
http/status: 200
length: 368
chars: "http://119.122.1.4/"
http/agent: "Mozilla/5.0 (Macintosh; Intel Mac OS X 10_14_5) AppleWebKit/537.36 (KHTML, like Gecko) Chrome/75.0.3770.142 Safari/537.36"
2. 华为防火墙日志解析
解析规则:
|decode/base64|(digit:id<<,>>,time,sn,chars\:),opt(kv\;), (*kv\,)
数据流程:
- Base64 解码
- 解析数字 ID
- 解析时间
- 解析序列号
- 解析字符
- 解析可选的 KV 对
- 解析多个 KV 对
3. JSON 地理位置增强
解析规则:
rule geo_enhance {
(json(chars@src-ip +geo(city_name), @dst-ip +zone(zone_name), @dev-name +device(device_val)))
}
功能说明:
- 解析 JSON 中的 src-ip、dst-ip、dev-name 字段
- 对 IP 地址进行地理位置查询
- 对设备名称进行设备类型识别
4. 带管道处理的复杂解析
多步骤处理:
rule complex_parse {
(|decode/base64| (json |f_digit_has(age, 18)) |json_unescape())
}
WPL 语法要点
1. 基本语法结构
package package_name {
rule rule_name {
(解析表达式)
}
}
2. 管道操作符
|操作符| # 应用管道操作
常用操作:
|decode/base64|- Base64 解码(预处理管道)|decode/hex|- Hex 解码(预处理管道)|unquote/unescape|- 取消引用/反转义(预处理管道)|f_has(field)|- 检查字段存在|f_digit_has(field, value)|- 检查数字字段值|f_chars_has(field, value)|- 检查字符串字段值|json_unescape()|- JSON 反转义|base64_decode()|- Base64 解码
3. 字段命名
类型:字段名 # digit:length
类型@JSON路径 # json(chars@path)
类型+增强 # ip+geo(city_name)
4. 分组和分隔符
(...) # 分组
<分隔符> # 指定分隔符
"分隔符" # 字符串分隔符
_ # 下划线
^N # 重复N次
5. 可选和重复
opt(表达式) # 可选匹配
N*表达式 # 重复N次
*表达式 # 任意次数重复
6. 特殊字符转义
\; # 转义分号
\: # 转义冒号
\, # 转义逗号
\\ # 转义反斜杠
总结
WPL 提供了强大的数据解析能力,支持:
- 多种数据格式:JSON、KV、时间、网络协议等
- 灵活的语法:支持命名、管道、分组、重复等
- 数据增强:支持地理位置、设备识别等增强功能
- 组合解析:可以将多种解析器组合使用
- 编码处理:支持 Base64、转义字符等编码解码
学习建议:
- 从基础类型开始,理解数字、字符串、分隔符的解析
- 掌握时间格式和网络协议的解析方法
- 学习 JSON 解析和字段操作
- 理解管道操作和组合解析的高级用法
- 通过实际日志解析案例练习复杂场景
通过以上示例,可以快速掌握 WPL 的数据解析方法和技巧。
WPL 实战指南
本文档采用任务导向的方式,帮助你快速找到解决方案。
📚 任务导航
| 任务类型 | 跳转 |
|---|---|
| 解析 Web 服务器日志 | Nginx/Apache 访问日志、错误日志 |
| 解析 JSON 数据 | 提取 JSON 字段、嵌套 JSON |
| 解析 KV 键值对 | 基础 KV、嵌套 KV、混合格式 |
| 处理编码数据 | Base64、Hex 解码 |
| 字段验证与过滤 | 检查字段、IP 范围、端口范围 |
| 复杂场景 | 可变字段、多格式、嵌套结构 |
| 常见问题 | 调试技巧、性能优化 |
📋 快速参考
常用模式速查
| 模式 | 语法 | 说明 |
|---|---|---|
| 可选分组 | opt(chars:tag) | 某个分组可能不存在 |
| 重复候选分组 | some_of(kvarr, ip, digit) | 尽可能多匹配 |
| 跳过字段 | _ 或 n*_ | 跳过 1 个或 n 个字段 |
| JSON 提取 | json(type@path:name) | 提取 JSON 字段 |
| KV 提取 | kvarr | 解析键值对 |
| Base64 解码 | |decode/base64| | 预处理管道 |
| 字段验证 | |take(status)| digit_has(200)| | 通过字段管道验证 |
| 择一匹配 | alt(ip:addr, chars:addr) | 多个候选匹配一个 |
常用类型速查
| 类型 | 说明 | 示例 |
|---|---|---|
ip | IP 地址 | 192.168.1.1 |
digit | 整数 | 8080 |
chars | 字符串 | hello |
time/clf | Apache 时间格式 | [06/Aug/2019:12:12:19 +0800] |
http/request | HTTP 请求 | GET /index.html HTTP/1.1 |
json | JSON 数据 | {"key":"value"} |
kvarr | 键值对数组 | key1=val1;key2=val2 |
📖 如何使用本指南
根据你的任务,找到对应章节,复制规则并根据实际情况调整。
1. 解析 Web 服务器日志
任务 1.1:解析 Nginx/Apache 访问日志
场景: 标准 Nginx/Apache 访问日志
输入:
192.168.1.2 - - [06/Aug/2019:12:12:19 +0800] "GET /index.html HTTP/1.1" 200 1024 "http://example.com/" "Mozilla/5.0"
WPL 规则:
package nginx {
rule access_log {
(
ip:client_ip,
2*_,
time/clf:time<[,]>,
http/request:request",
http/status:status,
digit:bytes,
chars:referer",
http/agent:user_agent"
)
}
}
输出:
client_ip: 192.168.1.2
time: 2019-08-06 12:12:19
request: GET /index.html HTTP/1.1
status: 200
bytes: 1024
referer: http://example.com/
user_agent: Mozilla/5.0
要点:
2*_忽略两个-字段time/clf<[,]>解析方括号包裹的 CLF 时间http/request"自动解析引号包裹的 HTTP 请求并提取方法、路径、协议chars"提取引号包裹的字符串
任务 1.2:解析带变量的 Nginx 日志
场景: 自定义 Nginx log_format
输入:
2023-01-01T12:00:00+08:00|INFO|192.168.1.1|GET|/api/users|200|0.123
WPL 规则:
package nginx {
rule custom_log {
(
time_3339:timestamp,
chars:level,
ip:client_ip,
http/method:method,
chars:path,
http/status:status,
float:response_time
)\|
}
}
输出:
timestamp: 2023-01-01 12:00:00
level: INFO
client_ip: 192.168.1.1
method: GET
path: /api/users
status: 200
response_time: 0.123
要点:
)\|指定组级分隔符为管道符|time_3339解析 RFC 3339 时间格式http/method专门解析 HTTP 方法float解析浮点数(响应时间)
任务 1.3:解析 referer 为 - 的日志
场景: referer 字段存在,但值可能为 -
输入:
192.168.1.1 [06/Aug/2019:12:12:19 +0800] "GET /index.html" 200 1024 "-"
WPL 规则:
package nginx {
rule access_log_optional {
(
ip:client_ip,
time/clf:time<[,]>,
http/request:request",
http/status:status,
digit:bytes,
chars:referer"
)
}
}
输出:
client_ip: 192.168.1.1
time: 2019-08-06 12:12:19
request: GET /index.html
status: 200
bytes: 1024
referer: -
要点:
chars:referer"可以正常读取"-"这种占位值- 如果某一整段真的可能缺失,应把它拆成独立分组再使用
opt(...)
2. 解析 JSON 数据
任务 2.1:提取 JSON 字段
场景: API 响应日志
输入:
{"user":"admin","code":200,"message":"success","timestamp":"2023-01-01T12:00:00"}
WPL 规则:
package api {
rule response {
(json(
chars@user,
digit@code,
chars@message,
time_3339@timestamp
))
}
}
输出:
user: admin
code: 200
message: success
timestamp: 2023-01-01 12:00:00
要点:
json(type@key)语法提取指定键的值- 类型自动验证和转换(
time_3339转换时间格式)
任务 2.2:处理嵌套 JSON
场景: 嵌套的 JSON 结构
输入:
{"user":{"name":"Alice","age":25,"profile":{"city":"Beijing"}},"status":"active"}
WPL 规则:
package api {
rule nested_json {
(json(
chars@user/name,
digit@user/age,
chars@user/profile/city,
chars@status
))
}
}
输出:
user/name: Alice
user/age: 25
user/profile/city: Beijing
status: active
要点:
- 使用
/分隔嵌套路径:@user/name,@user/profile/city - 路径层级无限制
任务 2.3:JSON 反转义
场景: JSON 字符串包含转义字符
输入:
{"path":"c:\\users\\admin\\file.txt","message":"line1\nline2"}
WPL 规则:
package api {
rule json_unescape {
(json(chars@path, chars@message) |json_unescape())
}
}
输出:
path: c:\users\admin\file.txt
message: line1
line2
要点:
|json_unescape()将\\n转换为实际换行符\\\\转换为\\\\"转换为"
任务 2.4:可选 JSON 字段
场景: 某些字段可能不存在
输入:
{"user":"admin","code":200}
WPL 规则:
package api {
rule optional_fields {
(json(
chars@user,
digit@code,
opt(chars)@message,
opt(chars)@data
))
}
}
输出:
user: admin
code: 200
要点:
opt(type)@key标记字段为可选- 不存在的字段不会导致解析失败
3. 解析 KV 键值对
任务 3.1:基础 KV 解析(分号分隔)
场景: 简单的 KV 格式日志
输入:
host=server1;port=8080;user=admin;status=online
WPL 规则:
package config {
rule kv_semicolon {
(kvarr)
}
}
输出:
host: server1
port: 8080
user: admin
status: online
要点:
kvarr自动解析所有KV对- 自动识别分隔符
任务 3.2:固定数量 KV(逗号分隔)
场景: 华为防火墙日志(12 个固定 KV)
输入:
k1=v1,k2=v2,k3=v3,k4=v4,k5=v5,k6=v6,k7=v7,k8=v8,k9=v9,k10=v10,k11=v11,k12=v12
WPL 规则:
package firewall {
rule fixed_kv {
(kvarr)
}
}
输出:
k1: v1
k2: v2
...
k12: v12
要点:
kvarr自动解析所有KV对- 不需要指定数量
任务 3.3:提取指定 KV 字段
场景: 只提取需要的字段
输入:
hostname=server1 port=3306 user=root db=test timeout=30
WPL 规则:
package database {
rule extract_kv {
(kvarr(
chars@hostname,
digit@port,
chars@user,
opt(chars)@db
))
}
}
输出:
hostname: server1
port: 3306
user: root
db: test
要点:
kvarr(type@key)提取指定键的值- 未列出的键(如
timeout)被忽略 opt(type)@key标记可选字段
任务 3.4:混合 KV 格式
场景: 可选 KV + 多个 KV
输入:
1234,2023-01-01T12:00:00,ABC123,LOGIN:host=server;user=admin,port=8080,action=success
WPL 规则:
package firewall {
rule mixed_kv {
(
digit:id,
time:timestamp,
sn:serial,
chars:type\:,
opt(kvarr),
kvarr
)
}
}
输出:
id: 1234
timestamp: 2023-01-01 12:00:00
serial: ABC123
type: LOGIN
host: server
user: admin
port: 8080
action: success
要点:
chars:type\:冒号作为分隔符opt(kvarr)可选的KVkvarr自动解析KV
4. 处理编码数据
任务 4.1:Base64 解码
场景: 华为防火墙日志(整行 Base64 编码)
输入(Base64):
MTIzNCwyMDIzLTAxLTAxVDEyOjAwOjAwLEFCQzEyMyxMT0dJTjpob3N0PXNlcnZlcjt1c2VyPWFkbWluLHBvcnQ9ODA4MCxhY3Rpb249c3VjY2Vzcw==
解码后:
1234,2023-01-01T12:00:00,ABC123,LOGIN:host=server;user=admin,port=8080,action=success
WPL 规则:
package firewall {
rule huawei_log {
|decode/base64|
(
digit:id,
time:timestamp,
sn:serial,
chars:type\:,
opt(kvarr),
kvarr
)
}
}
输出:
id: 1234
timestamp: 2023-01-01 12:00:00
serial: ABC123
type: LOGIN
host: server
user: admin
port: 8080
action: success
要点:
|decode/base64|预处理管道,对整行进行 Base64 解码- 解码后再进行字段解析
任务 4.2:十六进制解码
场景: 二进制数据的十六进制表示
输入:
48656c6c6f20576f726c64
WPL 规则:
package binary {
rule hex_decode {
|decode/hex|
(chars:data)
}
}
输出:
data: Hello World
要点:
|decode/hex|将十六进制字符串解码为原始文本
任务 4.3:组合多步预处理
场景: Base64 + JSON 反转义
输入(Base64):
eyJwYXRoIjoiY1xcXFx1c2Vyc1xcXFxmaWxlIiwidGV4dCI6ImxpbmUxXG5saW5lMiJ9
解码后:
{"path":"c:\\users\\file","text":"line1\nline2"}
WPL 规则:
package security {
rule multi_step {
|decode/base64|unquote/unescape|
(json(chars@path, chars@text))
}
}
输出:
path: c:\users\file
text: line1
line2
要点:
- 可以链接多个预处理步骤
- 执行顺序:从左到右
5. 字段验证与过滤
任务 5.1:检查字段存在
场景: 确保必需字段存在
输入:
{"status":"ok","message":"success","data":null}
WPL 规则:
package api {
rule check_required {
(json |f_has(status) |f_has(message))
}
}
输出:
status: ok
message: success
data: null
要点:
|f_has(field)检查字段是否存在- 字段不存在时解析失败
任务 5.2:验证状态码
场景: 只处理成功的响应(200/201/204)
输入:
{"code":200,"status":"success","data":"result"}
WPL 规则:
package api {
rule validate_success {
(json |f_digit_in(code, [200, 201, 204]))
}
}
输出:
code: 200
status: success
data: result
要点:
|f_digit_in(field, [list])验证数字字段值在列表中- 不在列表中时解析失败
任务 5.3:过滤特定方法
场景: 只处理 GET/POST 请求
输入:
{"method":"GET","path":"/api/users","status":200}
WPL 规则:
package api {
rule filter_methods {
(json |f_chars_in(method, [GET, POST]))
}
}
输出:
method: GET
path: /api/users
status: 200
要点:
|f_chars_in(field, [list])验证字符串字段值在列表中
任务 5.4:链式验证
场景: 多个条件组合
输入:
{"user":"admin","age":25,"status":"active"}
WPL 规则:
package api {
rule chain_validation {
(json(chars@user, digit@age, chars@status)
|take(user)
|chars_has(admin)
|take(age)
|digit_in([18, 25, 30])
|take(status)
|chars_has(active)
)
}
}
输出:
user: admin
age: 25
status: active
要点:
take(field)选择字段为活跃字段- 然后对活跃字段进行验证
- 可以链式调用多个验证
6. 复杂场景
任务 6.1:可变数量字段(some_of)
场景: 字段数量和顺序不固定
输入:
192.168.1.1 k1=v1 200 k2=v2 300 k3=v3
WPL 规则:
package mixed {
rule variable_fields {
some_of(ip, kv, digit)
}
}
输出:
ip: 192.168.1.1
k1: v1
digit: 200
k2: v2
digit: 300
k3: v3
要点:
some_of(...)循环匹配所有可能的类型- 尽可能多地消费字段
任务 6.2:择一匹配(alt)
场景: 某个位置可能是不同类型
输入:
user_id:12345 action:login
user_id:admin action:logout
WPL 规则:
package auth {
rule flexible_user_id {
(
chars:key1,
alt(digit, chars):user_id,
chars:key2,
chars:action
)
}
}
输出(输入 1):
key1: user_id
user_id: 12345
key2: action
action: login
输出(输入 2):
key1: user_id
user_id: admin
key2: action
action: logout
要点:
alt(type1, type2)尝试多种类型- 匹配第一个成功的类型
任务 6.3:读到行尾
场景: 最后一个字段包含所有剩余内容
输入:
2023-01-01 ERROR This is a very long error message with many details
WPL 规则:
package log {
rule read_to_end {
(
time:timestamp,
chars:level,
chars\0:message
)
}
}
输出:
timestamp: 2023-01-01
level: ERROR
message: This is a very long error message with many details
要点:
\0表示读到行尾- 常用于日志的 message 字段
7. 常见问题
Q1: 如何处理可变数量的字段?
答案: 使用 N*type 或 some_of
# KV 自动解析
kvarr
# 混合类型
some_of(ip, digit, kvarr)
Q2: 如何忽略某些字段?
答案: 使用 _ 或 N*_
# 忽略 1 个字段
(ip, _, time)
# 忽略 3 个字段
(ip, 3*_, time)
Q3: 分隔符不一致怎么办?
答案: 使用字段级分隔符优先级
# 不同字段不同分隔符
(digit\;, ip\,, chars\s)
# 或使用组级分隔符
(digit, ip, chars)\,
Q4: JSON 字段可能不存在怎么办?
答案: 使用 opt(type)@key
json(
chars@user,
opt(chars)@email,
opt(digit)@age
)
Q5: 如何提取嵌套 JSON 字段?
答案: 使用路径语法 @path/to/field
json(
chars@user/name,
digit@user/age,
chars@data/result
)
Q6: 预处理管道失败怎么办?
答案: 检查以下几点
- 管道名称是否正确
- 是否以
|结尾 - 输入数据格式是否正确
# 正确
|decode/base64|
# 错误:缺少结尾 |
|decode/base64
Q7: 如何调试解析失败的规则?
步骤:
- 简化规则,从最简单的字段开始
- 使用
opt()标记可疑字段 - 检查分隔符是否正确
- 检查格式控制符(引号、括号等)
# 原规则(失败)
(digit, time, chars, json)
# 调试规则:把字段拆成多个分组,再单独套 opt(...)
(digit), opt(time), opt(chars), opt(json)
# 逐步确定哪个分组导致失败
下一步
查阅参考
→ 04-language-reference.md - 完整类型和语法 → 05-functions-reference.md - 所有函数详解
深入理解
→ 02-core-concepts.md - 理解 WPL 设计理念
相关资源
- 快速入门:01-quickstart.md
- 核心概念:02-core-concepts.md
- 语言参考:04-language-reference.md
- 函数参考:05-functions-reference.md
WPL 管道函数
本页描述 WPL 中可在字段级管道中使用的内置函数。这些函数用于对解析后的字段进行选择、条件判断、过滤与转换。
函数分类
WPL 管道函数分为四类:
| 类型 | 前缀 | 说明 |
|---|---|---|
| 选择器函数 | 无前缀 | 选择特定字段作为活跃字段 |
| 字段集合操作 | f_ | 在字段集合中查找指定字段进行操作 |
| 活跃字段操作 | 无前缀 | 直接对当前活跃字段进行检查 |
| 转换函数 | 无前缀 | 对字段数据进行转换处理 |
活跃字段说明:管道中的操作默认作用于“活跃字段“。可以使用选择器函数切换活跃字段,或在
f_前缀函数中用_表示当前活跃字段。
Selector 函数
在使用无前缀别名前,需要先选定活动字段:
| 函数名 | 参数 | 说明 |
|---|---|---|
take | 1 | 选定指定字段作为活动字段 |
last | 0 | 选定最后一个字段作为活动字段 |
函数概览
选择器函数
| 函数名 | 参数 | 说明 |
|---|---|---|
take | 1 | 选择指定字段作为活跃字段 |
last | 0 | 选择最后一个字段作为活跃字段 |
字段集合操作函数(f_ 前缀)
| 函数名 | 参数 | 说明 |
|---|---|---|
f_has | 1 | 检查指定字段是否存在 |
f_chars_has | 2 | 检查指定字段值是否等于指定字符串 |
f_chars_not_has | 2 | 检查指定字段值是否不等于指定字符串 |
f_chars_in | 2 | 检查指定字段值是否在字符串列表中 |
f_digit_has | 2 | 检查指定字段数值是否等于指定数字 |
f_digit_in | 2 | 检查指定字段数值是否在数字列表中 |
f_ip_in | 2 | 检查指定 IP 字段是否在 IP 列表中 |
活跃字段操作函数(无前缀)
| 函数名 | 参数 | 说明 |
|---|---|---|
has | 0 | 检查活跃字段是否存在 |
chars_has | 1 | 检查活跃字段值是否等于指定字符串 |
chars_not_has | 1 | 检查活跃字段值是否不等于指定字符串 |
chars_in | 1 | 检查活跃字段值是否在字符串列表中 |
digit_has | 1 | 检查活跃字段数值是否等于指定数字 |
digit_in | 1 | 检查活跃字段数值是否在数字列表中 |
ip_in | 1 | 检查活跃 IP 字段是否在 IP 列表中 |
转换函数
| 函数名 | 参数 | 说明 |
|---|---|---|
json_unescape | 0 | 对 chars 类型字段进行 JSON 反转义 |
base64_decode | 0 | 对 chars 类型字段进行 Base64 解码 |
选择器函数详解
take
选择指定名称的字段作为活跃字段,后续的无前缀操作将作用于该字段。
语法:
take(<field_name>)
参数:
field_name:要选择的字段名
示例:
rule select_field {
(
json(chars@name, digit@age)
|take(name)
|chars_has(admin)
)
}
last
选择字段集合中的最后一个字段作为活跃字段。
语法:
last()
示例:
rule use_last {
(
json(chars@a, chars@b, chars@c)
|last()
|chars_has(value)
)
}
字段存在检查函数详解
has
检查当前活跃字段是否存在。
语法:
has()
示例:
rule check_active {
(
json(chars@name)
|take(name)
|has()
)
}
f_has
检查指定字段是否存在于字段集合中。
语法:
f_has(<field_name>)
has()
参数:
field_name:要检查的字段名(f_has使用)- 无参数(
has使用,需先通过take()选定活动字段)
示例:
rule check_field {
(
json |f_has(age)
)
}
rule check_field_with_take {
(
json(chars@code) |take(code) |has()
)
}
字符串操作函数详解
chars_has
检查当前活跃字段的值是否等于指定字符串。
语法:
chars_has(<value>)
参数:
value:要匹配的字符串值
示例:
rule check_value {
(
json(chars@status)
|take(status)
|chars_has(success)
)
}
rule check_error_with_take {
(
json(chars@msg) |take(msg) |chars_has(error)
)
}
f_chars_has
检查字段集合中指定字段的值是否等于指定字符串。
语法:
f_chars_has(<field_name>, <value>)
参数:
field_name:要检查的字段名(使用_表示当前活跃字段)value:要匹配的字符串值
示例:
rule check_message {
(
json |f_chars_has(message, error)
)
}
# 使用 _ 表示活跃字段
rule check_active_field {
(
json(chars@name)
|take(name)
|f_chars_has(_, admin)
)
}
chars_not_has
检查当前活跃字段的值是否不等于指定字符串。
语法:
chars_not_has(<value>)
参数:
value:不应匹配的字符串值
示例:
rule exclude_value {
(
json(chars@status)
|take(status)
|chars_not_has(failed)
)
}
f_chars_not_has
检查字段集合中指定字段的值是否不等于指定字符串。
语法:
f_chars_not_has(<field_name>, <value>)
参数:
field_name:要检查的字段名value:不应存在的字符串值
示例:
rule filter_success {
(
json |f_chars_not_has(status, failed)
)
}
rule filter_success_with_take {
(
json(chars@status) |take(status) |chars_not_has(failed)
)
}
chars_in
805600da457bb0fcfd70e2d5ce70e7774105068b
检查当前活跃字段的值是否在给定的字符串列表中。
语法:
chars_in([<value1>, <value2>, ...])
参数:
[...]:允许的字符串值列表
示例:
rule check_method {
(
json(chars@method)
|take(method)
|chars_in([GET, POST, PUT])
)
}
f_chars_in
检查字段集合中指定字段的值是否在给定的字符串列表中。
语法:
f_chars_in(<field_name>, [<value1>, <value2>, ...])
chars_in([<value1>, <value2>, ...])
参数:
field_name:要检查的字段名(f_chars_in使用)[...]:允许的字符串值列表- 无前缀形式需先通过
take()选定活动字段
示例:
rule check_method {
(
json |f_chars_in(method, [GET, POST, PUT])
)
}
rule check_method_with_take {
(
json(chars@method) |take(method) |chars_in([GET, POST, PUT])
)
}
数字操作函数详解
digit_has
检查当前活跃字段的数值是否等于指定数字。
语法:
digit_has(<number>)
参数:
number:要匹配的数字
示例:
rule check_code {
(
json(digit@code)
|take(code)
|digit_has(200)
)
}
f_digit_has
检查字段集合中指定字段的数值是否等于指定数字。
语法:
f_digit_has(<field_name>, <number>)
digit_has(<number>)
参数:
field_name:要检查的字段名(f_digit_has使用)number:要匹配的数字- 无前缀形式需先通过
take()选定活动字段
示例:
rule check_status {
(
json |f_digit_has(code, 200)
)
}
rule check_status_with_take {
(
json(digit@code) |take(code) |digit_has(200)
)
}
digit_in
检查当前活跃字段的数值是否在给定的数字列表中。
语法:
digit_in([<num1>, <num2>, ...])
参数:
[...]:允许的数字值列表
示例:
rule check_success {
(
json(digit@status)
|take(status)
|digit_in([200, 201, 204])
)
}
f_digit_in
检查字段集合中指定字段的数值是否在给定的数字列表中。
语法:
f_digit_in(<field_name>, [<num1>, <num2>, ...])
digit_in([<num1>, <num2>, ...])
参数:
field_name:要检查的字段名(f_digit_in使用)[...]:允许的数字值列表- 无前缀形式需先通过
take()选定活动字段
示例:
rule check_success_codes {
(
json |f_digit_in(status, [200, 201, 204])
)
}
rule check_success_codes_with_take {
(
json(digit@status) |take(status) |digit_in([200, 201, 204])
)
}
IP 地址操作函数详解
ip_in
检查当前活跃字段的 IP 地址是否在给定的 IP 列表中。支持 IPv4 和 IPv6。
语法:
ip_in([<ip1>, <ip2>, ...])
参数:
[...]:允许的 IP 地址列表
示例:
rule check_client {
(
json(ip@client_ip)
|take(client_ip)
|ip_in([127.0.0.1, 192.168.1.1])
)
}
# 支持 IPv6
rule check_ipv6 {
(
json(ip@src)
|take(src)
|ip_in([::1, 2001:db8::1])
)
}
检查字段集合中指定 IP 地址是否在给定的 IP 列表中。支持 IPv4 和 IPv6。
语法:
f_ip_in(<field_name>, [<ip1>, <ip2>, ...])
ip_in([<ip1>, <ip2>, ...])
参数:
field_name:要检查的字段名(f_ip_in使用)[...]:允许的 IP 地址列表- 无前缀形式需先通过
take()选定活动字段
示例:
rule check_trusted_ips {
(
json(ip@client_ip) |f_ip_in(client_ip, [127.0.0.1, 192.168.1.1])
)
}
rule check_ipv6 {
(
json(ip@src) |f_ip_in(src, [::1, 2001:db8::1])
)
}
rule check_ip_with_take {
(
json(ip@client_ip) |take(client_ip) |ip_in([127.0.0.1, 192.168.1.1])
)
}
转换函数详解
json_unescape
对当前活跃字段进行 JSON 反转义处理。将 JSON 转义序列转换为实际字符。
语法:
json_unescape()
转换效果:
| 输入 | 输出 |
|---|---|
hello\\nworld | hello + 换行 + world |
path\\\\to | path\to |
say\\\"hi\\\" | say"hi" |
示例:
rule parse_json_log {
(
json(chars@message)
|take(message)
|json_unescape()
)
}
base64_decode
对当前活跃字段进行 Base64 解码。将 Base64 编码的字符串解码为原始文本。
语法:
base64_decode()
转换效果:
"aGVsbG8gd29ybGQ=" → "hello world"
示例:
rule decode_payload {
(
<<<<<<< HEAD
json(chars@payload) |last() |base64_decode()
)
}
rule decode_with_take {
(
json(chars@encoded_data) |take(encoded_data) |base64_decode()
=======
json(chars@payload)
|take(payload)
|base64_decode()
>>>>>>> 805600da457bb0fcfd70e2d5ce70e7774105068b
)
}
组合使用示例
多个管道函数可以链式调用:
使用 f_ 前缀函数
rule complex_filter {
(
json(
chars@method,
digit@status,
ip@client_ip
)
)
|f_has(method)
|f_chars_in(method, [GET, POST])
|f_digit_in(status, [200, 201, 204])
|f_ip_in(client_ip, [10.0.0.1, 10.0.0.2])
}
<<<<<<< HEAD
使用 take() + 无前缀别名
rule filter_with_take {
(
json(
chars@method,
digit@status,
ip@client_ip
)
)
|take(method)
|has()
|chars_in([GET, POST])
|take(status)
|digit_in([200, 201, 204])
|take(client_ip)
|ip_in([10.0.0.1, 10.0.0.2])
}
使用 last() 进行转换
rule decode_last_field {
(
json(chars@payload)
)
|last()
|base64_decode()
|json_unescape()
}
======= 使用选择器和无前缀函数的组合:
rule mixed_style {
(
json(chars@name, digit@age, chars@status)
|take(name)
|chars_has(admin)
|take(age)
|digit_in([18, 19, 20])
|take(status)
|chars_not_has(disabled)
)
}
相关文档
- 语法定义:WPL 语法(EBNF)
- 实现代码:
src/parser/wpl_fun.rs
WPL 语言参考
本文档提供 WPL 的完整语言元素参考,用于快速查阅类型、语法和结构。
📑 文档导航
📋 类型系统
基础类型
| # | 类型 | 标识符 | 样例 | 说明 |
|---|---|---|---|---|
| 1 | 预读符号 | peek_symbol(xxx) | peek_symbol(GET) | 预读但不消费 |
| 2 | 忽略 | _ | _, 2*_, 3*_ | 忽略该字段 |
| 3 | 符号 | symbol(xxx) | symbol(HTTP) | 精确匹配 |
| 4 | 布尔 | bool | true, false | 布尔值 |
| 5 | 字符串 | chars | "hello" | 任意字符串 |
| 6 | 整数 | digit | 123, 8080 | 整数 |
| 7 | 浮点 | float | 3.14, 0.01 | 浮点数 |
| 8 | 序列号 | sn | ABC123XYZ | 自动生成序列号 |
时间类型
| # | 类型 | 标识符 | 样例 | 说明 |
|---|---|---|---|---|
| 9 | 通用时间 | time | 2023-05-15 07:09:12 | 自动识别多种格式 |
| 10 | ISO 8601 | time_iso | 2023-05-15T07:09:12Z | ISO 8601 标准 |
| 11 | RFC 3339 | time_3339 | 2022-03-21T12:34:56+00:00 | RFC3339 标准 |
| 12 | RFC 2822 | time_2822 | Mon, 07 Jul 2025 09:20:32 +0000 | 邮件时间格式 |
| 13 | CLF 时间 | time/clf | 06/Aug/2019:12:12:19 +0800 | Apache/Nginx 日志 |
| 14 | Unix时间戳 | time_timestamp | 1647849600 | Unix 秒级时间戳 |
网络类型
| # | 类型 | 标识符 | 样例 | 说明 |
|---|---|---|---|---|
| 15 | IP地址 | ip | 192.168.1.100, ::1 | IPv4/IPv6 地址 |
| 16 | IP网段 | ip_net | 192.168.0.0/24 | CIDR 网段 |
| 17 | 域名 | domain | example.com | 域名 |
| 18 | 邮箱 | email | user@example.com | 邮箱地址 |
| 19 | 端口 | port | 8080, 443 | 端口号 |
| 20 | URL | url | http://example.com/path | 完整 URL |
编码类型
| # | 类型 | 标识符 | 样例 | 说明 |
|---|---|---|---|---|
| 21 | 十六进制 | hex | 48656c6c6f | 十六进制数据 |
| 22 | Base64 | base64 | aGVsbG8= | Base64 编码 |
结构化类型
| # | 类型 | 标识符 | 样例 | 说明 |
|---|---|---|---|---|
| 23 | 键值对 | kvarr | key=value | KV 格式 |
| 24 | JSON | json | {"k":"v"} | JSON 对象 |
| 25 | 严格JSON | exact_json | {"k":"v"} | 严格验证 JSON |
| 26 | 对象 | obj | 嵌套对象 | 通用对象 |
| 27 | 数组 | array | [1,2,3] | 数组 |
| 28 | 数字数组 | array/digit | [1,2,3] | 数字数组 |
| 29 | 字符串数组 | array/chars | ["a","b"] | 字符串数组 |
协议类型
| # | 类型 | 标识符 | 样例 | 说明 |
|---|---|---|---|---|
| 30 | HTTP请求 | http/request | GET /path HTTP/1.1 | HTTP 请求行 |
| 31 | HTTP状态 | http/status | 200, 404 | HTTP 状态码 |
| 32 | User-Agent | http/agent | Mozilla/5.0... | 浏览器 UA |
| 33 | HTTP方法 | http/method | GET, POST | HTTP 方法 |
特殊类型
| # | 类型 | 标识符 | 样例 | 说明 |
|---|---|---|---|---|
| 34 | 身份证 | id_card | 110101199001011234 | 18 位身份证 |
| 35 | 手机号 | mobile_phone | 13800138000 | 11 位手机号 |
| 36 | 协议文本 | proto_text | 协议格式 | 协议文本解析 |
| 37 | 自动识别 | auto | 自动推断 | 自动类型推断 |
🔧 语法元素
基本结构
package 包名 {
rule 规则名 {
|预处理管道|
(字段列表)
}
}
字段定义完整语法
[N*] DataType [ (symbol) ] [ (subfields) ] [:name] [ [len] ] [ format ] [ sep ] { | pipe }
| 部分 | 说明 | 示例 |
|---|---|---|
[N*] | 重复计数 | kvarr, 3*ip |
DataType | 数据类型 | digit, ip, json |
(symbol) | 符号内容 | symbol(GET) |
(subfields) | 子字段列表 | json(chars@name) |
:name | 字段命名 | :status, :client_ip |
[len] | 长度限制 | [100] |
format | 格式控制 | <[,]>, ", ^10 |
sep | 分隔符 | \,, \;, \0 |
| pipe | 管道函数 | |f_has(name)| |
格式控制
| 格式 | 语法 | 示例 | 说明 |
|---|---|---|---|
| 范围定界 | <beg,end> | <[,]>, <{,}> | 起止符号 |
| 引号 | " | chars" | 引号包裹 |
| 字符计数 | N* | 10*chars, 5*_ | 按字符数 |
分组元信息
| 元信息 | 说明 | 示例 | 匹配行为 |
|---|---|---|---|
seq | 顺序匹配(默认) | seq(ip, digit, time) | 按顺序依次匹配 |
alt | 择一匹配 | alt(ip, digit) | 匹配其中一个 |
opt | 可选匹配 | opt(chars:tag) | 分组失败不报错 |
some_of | 尽可能多 | some_of(ip, digit) | 循环匹配 |
分隔符优先级
字段级(3) > 组级(2) > 上游(1)
| 分隔符 | 写法 | 说明 | 优先级 |
|---|---|---|---|
| 逗号 | \, | 逗号分隔 | 字段级 (3) |
| 分号 | \; | 分号分隔 | 字段级 (3) |
| 冒号 | \: | 冒号分隔 | 字段级 (3) |
| 空格 | \s | 空格分隔 | 字段级 (3) |
| 行尾 | \0 | 读到行尾 | 字段级 (3) |
| 组分隔 | (...)\sep | 组级分隔 | 组级 (2) |
| 默认 | 无 | 继承上游 | 上游 (1) |
🎯 子字段语法
JSON 子字段
json(type@key, type@key, ...)
示例:
# 基本提取
json(chars@name, digit@age)
# 嵌套路径
json(chars@user/name, digit@user/age)
# 可选字段
json(chars@name, opt(chars)@email)
KV 子字段
kvarr(type@key, type@key, ...)
示例:
kvarr(chars@hostname, digit@port, opt(chars)@user)
数组
array[/subtype]
示例:
array/digit:nums # [1,2,3]
array/chars:items # ["a","b"]
array/array/digit # 嵌套数组
📝 注解
tag 注解
#[tag(key1:"value1", key2:"value2")]
package demo {
rule x { (digit, time) }
}
copy_raw 注解
#[copy_raw(name:"raw_log")]
rule nginx_log {
(ip, time, chars)
}
原始字符串(避免转义)
#[tag(path:r#"C:\Program Files\App"#)]
package demo {
rule x { (digit) }
}
💡 语法速查
常用模式
# 字段命名
type:name # digit:status
# 忽略字段
_ # 忽略 1 个
N*_ # 忽略 N 个
# 重复模式
kvarr # 自动解析KV
N*ip # 固定 N 次
# 可选分组
opt(chars:tag) # 单个可选分组
opt(kvarr) # 可选 KV 分组
# 格式控制
<[,]> # 方括号包裹
" # 引号包裹
^10 # 固定 10 字符
# 分隔符
\, # 逗号
\; # 分号
\0 # 行尾
# 子字段
json(chars@key) # JSON 字段
kvarr(digit@port) # KV 字段
@path/to/field # 嵌套路径
相关文档
- 快速入门:01-quickstart.md
- 核心概念:02-core-concepts.md
- 实战指南:03-practical-guide.md
- 函数参考:05-functions-reference.md
- 语法规范:06-grammar-reference.md
WPL 函数参考
本文档提供所有 WPL 函数的标准化参考。
📋 WPL 所有函数速查
预处理管道函数
| 函数 | 说明 | 示例 |
|---|---|---|
decode/base64 | 对整行 Base64 解码 | |decode/base64| |
decode/hex | 对整行十六进制解码 | |decode/hex| |
unquote/unescape | 移除引号并还原转义 | |unquote/unescape| |
plg_pipe/<name> | 自定义预处理扩展 | |plg_pipe/dayu| |
选择器函数
| 函数 | 说明 | 示例 |
|---|---|---|
take(name) | 选择指定字段为活跃字段 | |take(name)| |
last() | 选择最后一个字段为活跃字段 | |last()| |
字段集操作函数(f_ 前缀)
| 函数 | 说明 | 示例 |
|---|---|---|
f_has(name) | 检查字段是否存在 | |f_has(status)| |
f_chars_has(name, val) | 检查字段值等于字符串 | |f_chars_has(status, success)| |
f_chars_not_has(name, val) | 检查字段值不等于字符串 | |f_chars_not_has(level, error)| |
f_chars_in(name, [...]) | 检查字段值在字符串列表 | |f_chars_in(method, [GET, POST])| |
f_digit_has(name, num) | 检查字段值等于数字 | |f_digit_has(code, 200)| |
f_digit_in(name, [...]) | 检查字段值在数字列表 | |f_digit_in(status, [200, 201])| |
f_ip_in(name, [...]) | 检查 IP 在列表 | |f_ip_in(client_ip, [127.0.0.1])| |
活跃字段操作函数
| 函数 | 说明 | 示例 |
|---|---|---|
has() | 检查活跃字段存在 | |take(name)| has()| |
chars_has(val) | 检查活跃字段等于字符串 | |take(status)| chars_has(success)| |
chars_not_has(val) | 检查活跃字段不等于字符串 | |take(level)| chars_not_has(error)| |
chars_in([...]) | 检查活跃字段在字符串列表 | |take(method)| chars_in([GET, POST])| |
digit_has(num) | 检查活跃字段等于数字 | |take(code)| digit_has(200)| |
digit_in([...]) | 检查活跃字段在数字列表 | |take(status)| digit_in([200, 201])| |
ip_in([...]) | 检查活跃 IP 在列表 | |take(client_ip)| ip_in([127.0.0.1])| |
转换函数
| 函数 | 说明 | 示例 |
|---|---|---|
json_unescape() | JSON 反转义 | |take(message)| json_unescape()| |
base64_decode() | Base64 解码 | |take(payload)| base64_decode()| |
常用场景速查
| 我想做什么 | 使用方法 |
|---|---|
| 对整行 Base64 解码 | |decode/base64| |
| 对整行十六进制解码 | |decode/hex| |
| 移除引号和转义 | |unquote/unescape| |
| 检查字段是否存在 | |f_has(field_name)| |
| 检查字段值等于某字符串 | |f_chars_has(status, success)| |
| 检查字段值在列表中 | |f_chars_in(method, [GET, POST])| |
| 检查状态码是否为 200 | |f_digit_has(code, 200)| |
| 检查 IP 是否在白名单 | |f_ip_in(client_ip, [127.0.0.1, 192.168.1.1])| |
| 选择特定字段验证 | |take(status)| chars_has(ok)| |
| 对字段 JSON 反转义 | |take(message)| json_unescape()| |
| 对字段 Base64 解码 | |take(payload)| base64_decode()| |
| 链式验证多个条件 | |f_has(method)| f_chars_in(method, [GET, POST])| |
预处理管道函数
decode/base64
说明: 对整行输入进行 Base64 解码
语法:
|decode/base64|
参数: 无
示例:
rule base64_log {
|decode/base64|
(json(chars@user, digit@code))
}
输入(Base64):
eyJ1c2VyIjoiYWRtaW4iLCJjb2RlIjoyMDB9
解码后:
{"user":"admin","code":200}
注意:
- 作用于整行原始输入
- 必须在字段解析前执行
- 解码失败会报错
decode/hex
说明: 对整行输入进行十六进制解码
语法:
|decode/hex|
参数: 无
示例:
rule hex_log {
|decode/hex|
(chars:data)
}
输入:
48656c6c6f20576f726c64
输出:
data: Hello World
unquote/unescape
说明: 移除外层引号并还原反斜杠转义
语法:
|unquote/unescape|
参数: 无
示例:
rule unescape_log {
|unquote/unescape|
(chars:message)
}
转换效果:
| 输入 | 输出 |
|---|---|
\"hello\" | hello |
path\\to\\file | path\to\file |
plg_pipe/
说明: 自定义预处理扩展
语法:
|plg_pipe/<name>|
参数: <name> - 注册的扩展名称
示例:
rule custom_preproc {
|plg_pipe/dayu|
(json(_@_origin, _@payload/packet_data))
}
注意:
- 需要通过代码注册扩展
- 注册接口:
wpl::register_wpl_pipe!
选择器函数
take
说明: 选择指定字段为活跃字段
语法:
|take(<field_name>)|
参数:
field_name- 要选择的字段名
返回: 无(改变活跃字段状态)
示例:
rule take_example {
(
json(chars@name, digit@age)
|take(name) # 选择 name 为活跃字段
|chars_has(admin) # 验证 name 的值
)
}
使用场景:
- 需要对特定字段进行验证
- 链式验证多个字段
last
说明: 选择最后一个字段为活跃字段
语法:
|last()|
参数: 无
返回: 无(改变活跃字段状态)
示例:
rule last_example {
(
json(chars@a, chars@b, chars@c)
|last() # 选择 c 为活跃字段
|chars_has(value) # 验证 c 的值
)
}
字段集操作函数
f_has
说明: 检查指定字段是否存在
语法:
|f_has(<field_name>)|
参数:
field_name- 要检查的字段名
返回: 布尔值(字段存在返回 true,否则失败)
示例:
rule check_field {
(json |f_has(status) |f_has(message))
}
f_chars_has
说明: 检查指定字段值是否等于字符串
语法:
|f_chars_has(<field_name>, <value>)|
参数:
field_name- 字段名(或_表示活跃字段)value- 要匹配的字符串值
返回: 布尔值
示例:
rule check_string {
(json |f_chars_has(status, success))
}
f_chars_not_has
说明: 检查指定字段值是否不等于字符串
语法:
|f_chars_not_has(<field_name>, <value>)|
参数:
field_name- 字段名value- 不应匹配的字符串值
返回: 布尔值
示例:
rule exclude_error {
(json |f_chars_not_has(level, error))
}
f_chars_in
说明: 检查指定字段值是否在字符串列表中
语法:
|f_chars_in(<field_name>, [<value1>, <value2>, ...])|
参数:
field_name- 字段名[...]- 允许的字符串值列表
返回: 布尔值
示例:
rule check_method {
(json |f_chars_in(method, [GET, POST, PUT]))
}
f_digit_has
说明: 检查指定字段数值是否等于指定数字
语法:
|f_digit_has(<field_name>, <number>)|
参数:
field_name- 字段名number- 要匹配的数字
返回: 布尔值
示例:
rule check_status {
(json |f_digit_has(code, 200))
}
f_digit_in
说明: 检查指定字段数值是否在数字列表中
语法:
|f_digit_in(<field_name>, [<num1>, <num2>, ...])|
参数:
field_name- 字段名[...]- 允许的数字值列表
返回: 布尔值
示例:
rule check_success {
(json |f_digit_in(status, [200, 201, 204]))
}
f_ip_in
说明: 检查指定 IP 字段是否在 IP 列表中
语法:
|f_ip_in(<field_name>, [<ip1>, <ip2>, ...])|
参数:
field_name- 字段名[...]- 允许的 IP 地址列表(支持 IPv4/IPv6)
返回: 布尔值
示例:
rule check_trusted {
(json |f_ip_in(client_ip, [127.0.0.1, 192.168.1.1]))
}
活跃字段操作函数
has
说明: 检查活跃字段是否存在
语法:
|has()|
参数: 无
返回: 布尔值
示例:
rule check_active {
(
json(chars@name)
|take(name)
|has() # 检查 name 是否存在
)
}
chars_has
说明: 检查活跃字段值是否等于指定字符串
语法:
|chars_has(<value>)|
参数:
value- 要匹配的字符串值
返回: 布尔值
示例:
rule check_value {
(
json(chars@status)
|take(status)
|chars_has(success)
)
}
chars_not_has
说明: 检查活跃字段值是否不等于指定字符串
语法:
|chars_not_has(<value>)|
参数:
value- 不应匹配的字符串值
返回: 布尔值
示例:
rule exclude_value {
(
json(chars@level)
|take(level)
|chars_not_has(error)
)
}
chars_in
说明: 检查活跃字段值是否在字符串列表中
语法:
|chars_in([<value1>, <value2>, ...])|
参数:
[...]- 允许的字符串值列表
返回: 布尔值
示例:
rule check_method {
(
json(chars@method)
|take(method)
|chars_in([GET, POST, PUT])
)
}
digit_has
说明: 检查活跃字段数值是否等于指定数字
语法:
|digit_has(<number>)|
参数:
number- 要匹配的数字
返回: 布尔值
示例:
rule check_code {
(
json(digit@code)
|take(code)
|digit_has(200)
)
}
digit_in
说明: 检查活跃字段数值是否在数字列表中
语法:
|digit_in([<num1>, <num2>, ...])|
参数:
[...]- 允许的数字值列表
返回: 布尔值
示例:
rule check_success {
(
json(digit@status)
|take(status)
|digit_in([200, 201, 204])
)
}
ip_in
说明: 检查活跃 IP 字段是否在 IP 列表中
语法:
|ip_in([<ip1>, <ip2>, ...])|
参数:
[...]- 允许的 IP 地址列表(支持 IPv4/IPv6)
返回: 布尔值
示例:
rule check_client {
(
json(ip@client_ip)
|take(client_ip)
|ip_in([127.0.0.1, 192.168.1.1])
)
}
转换函数
json_unescape
说明: 对活跃字段进行 JSON 反转义
语法:
|json_unescape()|
参数: 无
转换效果:
| 输入 | 输出 |
|---|---|
hello\\nworld | hello + 换行 + world |
path\\\\to | path\to |
say\\\"hi\\\" | say"hi" |
示例:
rule parse_json_log {
(
json(chars@message)
|take(message)
|json_unescape()
)
}
base64_decode
说明: 对活跃字段进行 Base64 解码
语法:
|base64_decode()|
参数: 无
转换效果:
| 输入 | 输出 |
|---|---|
aGVsbG8= | hello |
Zm9vYmFy | foobar |
示例:
rule decode_payload {
(
json(chars@payload)
|take(payload)
|base64_decode()
)
}
📊 函数对照表
字段集 vs 活跃字段
| 功能 | 字段集操作(f_ 前缀) | 活跃字段操作(无前缀) |
|---|---|---|
| 检查存在 | f_has(name) | take(name) | has() |
| 字符串相等 | f_chars_has(name, val) | take(name) | chars_has(val) |
| 字符串不等 | f_chars_not_has(name, val) | take(name) | chars_not_has(val) |
| 字符串在列表 | f_chars_in(name, [a, b]) | take(name) | chars_in([a, b]) |
| 数字相等 | f_digit_has(name, 200) | take(name) | digit_has(200) |
| 数字在列表 | f_digit_in(name, [200, 201]) | take(name) | digit_in([200, 201]) |
| IP 在列表 | f_ip_in(name, [1.1.1.1]) | take(name) | ip_in([1.1.1.1]) |
💡 使用模式
链式调用
rule chain {
(json
|f_has(method)
|f_chars_in(method, [GET, POST])
|f_digit_in(status, [200, 201])
|f_ip_in(client_ip, [10.0.0.1])
)
}
选择器 + 验证
rule selector {
(json(chars@name, digit@age)
|take(name)
|chars_has(admin)
|take(age)
|digit_in([18, 19, 20])
)
}
预处理 + 字段级管道
rule full {
|decode/base64| # 预处理:整行解码
(json |f_has(name) |f_digit_in(age, [18, 25])) # 字段级:验证
}
相关文档
- 快速入门:01-quickstart.md
- 核心概念:02-core-concepts.md
- 实战指南:03-practical-guide.md
- 语言参考:04-language-reference.md
- 语法规范:06-grammar-reference.md
WPL 语法参考(EBNF)
本文档提供 WPL 的形式化语法定义,适合:
- 编译器/解析器开发者
- 精确理解语法规则
- 工具集成开发
普通用户请参考:
- 快速入门:01-quickstart.md
- 核心概念:02-core-concepts.md
- 实战指南:03-practical-guide.md
- 语言参考:04-language-reference.md
📑 文档导航
| 章节 | 说明 |
|---|---|
| 完整 EBNF 定义 | 形式化语法定义 |
| 语义说明 | 语法规则的语义解释 |
| 实现参考 | 源代码位置 |
完整 EBNF 定义
权威实现以当前仓库中的 src/parser/ 解析器为准;此处与源代码保持同步。
; WPL 语法(EBNF)
; 基于当前仓库 src/parser 下解析实现(winnow)整理
; 说明:本文件给出语法产生式与必要的词法约定。除显式标注外,token 之间允许可选空白 `ws`。
wpl_document = { package_decl } ;
package_decl = [ annotation ] "package" ws? ident ws? "{" ws? rule_decl+ ws? "}" ;
rule_decl = [ annotation ] "rule" ws? rule_name ws? "{" ws? statement ws? "}" ;
statement = plg_pipe_block | express ;
plg_pipe_block = ["@"]? "plg_pipe" ws? "(" ws? "id" ws? ":" ws? key ws? ")" ws? "{" ws? express ws? "}" ;
express = [ preproc ] group { ws? "," ws? group } ;
preproc = "|" ws? preproc_step { ws? "|" ws? preproc_step } ws? "|" ; ; 至少一个步骤,且以 '|' 结尾
preproc_step = builtin_preproc | plg_pipe_step ;
builtin_preproc = ns "/" name ;
plg_pipe_step = "plg_pipe" ws? "/" ws? key ; ; 通过注册表查找自定义扩展
ns = "decode" | "unquote" | "strip" ; ; 命名空间白名单
name = ("base64" | "hex") | "unescape" | "bom" ; ; 步骤名白名单
; 支持的预处理器:
; decode/base64 - Base64 解码
; decode/hex - 十六进制解码
; unquote/unescape - URL 转义解码
; strip/bom - 移除 BOM(字节顺序标记)
group = [ group_meta ] ws? "(" ws? field_list_opt ws? ")" [ ws? group_len ] [ ws? group_sep ] ;
group_meta = "alt" | "opt" | "some_of" | "seq" | "not" ;
group_len = "[" number "]" ;
group_sep = sep ;
; 列表:允许空、允许尾随逗号
field_list_opt = [ field { ws? "," ws? field } [ ws? "," ] ] ;
field = [ repeat ] data_type [ symbol_content ]
[ subfields ]
[ ":" ws? var_name ]
[ length ]
[ format ]
[ sep ]
{ pipe } ; ; 允许多个管道
repeat = [ number ] "*" ; ; "*ip" 或 "3*ip"
length = "[" number "]" ; ; 仅顶层字段支持(子字段不支持)
; 复合字段(如 kvarr/json 等)的子字段列表
subfields = "(" ws? subfields_opt ws? ")" ;
subfields_opt = [ subfield { ws? "," ws? subfield } [ ws? "," ] ] ;
subfield = [ opt_datatype | data_type ]
[ symbol_content ]
[ "@" ref_path ]
[ ":" ws? var_name ]
[ format ]
[ sep ]
{ pipe } ;
opt_datatype = "opt" "(" ws? data_type ws? ")" ; ; 声明该子字段为可选
; 字段数据类型(与外部 crate wp-model-core::DataType 对应)
data_type = builtin_type | ns_type | array_type ;
builtin_type = "auto" | "bool" | "chars" | "symbol" | "peek_symbol"
| "digit" | "float" | "_" | "sn"
| "time" | "time/clf" | "time_iso" | "time_3339" | "time_2822" | "time_timestamp"
| "ip" | "ip_net" | "domain" | "email" | "port"
| "hex" | "base64"
| "kv" | "kvarr" | "json" | "exact_json"
| "url"
| "proto_text" | "obj"
| "id_card" | "mobile_phone" ;
ns_type = path_ident ; ; 例如 http/request、http/status 等
; 注:实现层面建议对白名单前缀(如 "http/")做校验,以避免任意路径膨胀语言面。
; 支持的命名空间类型:
; http/request, http/status, http/agent (或 http/user_agent), http/method
; time/clf (或 time/apache, time/httpd, time/nginx)
; time/rfc3339 (别名 time_3339), time/rfc2822 (别名 time_2822)
; time/timestamp (或 time/epoch, 别名 time_timestamp)
; proto/text (别名 proto_text)
array_type = "array" [ "/" subtype ] ; ; 如:"array" 或 "array/ip" 或 "array/chars"
subtype = key ; ; 可以是任意已支持的类型名
; 仅当 data_type 为 symbol/peek_symbol 时允许携带内容
symbol_content = "(" symbol_chars ")" ;
; 字段显示/抽取格式
format = scope_fmt | quote_fmt ;
scope_fmt = "<" any_chars "," any_chars ">" ; ; 作用域首尾定界,如 <[,]>
quote_fmt = '"' ; ; 等价首尾均为 '"'
; 分隔符(两种形式)
sep = shortcut_sep | pattern_sep ;
; 快捷分隔符:反斜杠转义的字符序列
shortcut_sep = sep_char , { sep_char } ; ; 例:"\\," => ",";"\\!\\|" => "!|"
sep_char = '\\' , any_char ;
; 模式分隔符:花括号包裹的模式表达式
pattern_sep = "{" pattern_content "}" ;
pattern_content = glob_segments [ preserve ] ;
glob_segments = glob_segment { glob_segment } ;
glob_segment = literal_char | wildcard | escape_seq ;
; 通配符
wildcard = "*" | "?" ; ; "*" - 零或多个任意字符(非贪婪);"?" - 恰好一个任意字符
; 约束:模式中 "*" 最多出现一次
; 转义序列
escape_seq = "\\" ( special_char | macro_char ) ;
special_char = "\\" | "*" | "?" | "{" | "}" | "(" | ")" ; ; 字面转义
macro_char = "s" | "S" | "h" | "H" | "0" | "n" | "t" | "r" ; ; 宏字符
; 支持的宏:
; \s - 一个或多个连续空白字符 [ \t\r\n]+
; \S - 一个或多个连续非空白字符 [^ \t\r\n]+
; \h - 一个或多个连续水平空白 [ \t]+
; \H - 一个或多个连续非水平空白 [^ \t]+
; \0 - 空字节
; \n - 换行
; \t - 制表符
; \r - 回车
; 保留标记
preserve = "(" glob_segments ")" ; ; 匹配但不消费,仅在模式末尾
; 约束:
; 1. preserve 只能出现在 pattern_content 的末尾
; 2. preserve 内不允许包含 "*" 通配符
; 3. preserve 不允许嵌套
; 字面字符(非特殊字符的任意字符)
literal_char = any_char_except_special ; ; 排除 '\', '*', '?', '{', '}', '(', ')' 的任意字符
; 字段级管道:函数调用或嵌套分组
pipe = "|" ws? ( fun_call | group ) ;
; 预置函数(wpl_fun.rs):
; - 选择器函数:take, last
; - f_ 前缀表示字段集合操作(需指定字段名)
; - 无前缀表示活跃字段操作
; - 转换函数:json_unescape, base64_decode, chars_replace
; - 包装器函数:not
fun_call = selector_fun | target_fun | active_fun | transform_fun | wrapper_fun ;
; 选择器函数
selector_fun = take_fun | last_fun ;
take_fun = "take" "(" ws? key ws? ")" ;
last_fun = "last" "(" ws? ")" ;
; 字段集合操作函数(f_ 前缀)
target_fun = f_has | f_chars_has | f_chars_not_has | f_chars_in
| f_digit_has | f_digit_in | f_ip_in ;
f_has = "f_has" "(" ws? key ws? ")" ;
f_chars_has = "f_chars_has" "(" ws? key ws? "," ws? path ws? ")" ;
f_chars_not_has = "f_chars_not_has" "(" ws? key ws? "," ws? path ws? ")" ;
f_chars_in = "f_chars_in" "(" ws? key ws? "," ws? path_array ws? ")" ;
f_digit_has = "f_digit_has" "(" ws? key ws? "," ws? number ws? ")" ;
f_digit_in = "f_digit_in" "(" ws? key ws? "," ws? number_array ws? ")" ;
f_ip_in = "f_ip_in" "(" ws? key ws? "," ws? ip_array ws? ")" ;
; 活跃字段操作函数(无前缀)
active_fun = has_fun | chars_has | chars_not_has | chars_in | starts_with | regex_match
| digit_has | digit_in | digit_range | ip_in ;
has_fun = "has" "(" ws? ")" ;
chars_has = "chars_has" "(" ws? path ws? ")" ;
chars_not_has = "chars_not_has" "(" ws? path ws? ")" ;
chars_in = "chars_in" "(" ws? path_array ws? ")" ;
starts_with = "starts_with" "(" ws? quoted_string ws? ")" ;
regex_match = "regex_match" "(" ws? quoted_string ws? ")" ;
digit_has = "digit_has" "(" ws? number ws? ")" ;
digit_in = "digit_in" "(" ws? number_array ws? ")" ;
digit_range = "digit_range" "(" ws? number ws? "," ws? number ws? ")" ;
ip_in = "ip_in" "(" ws? ip_array ws? ")" ;
; 转换函数
transform_fun = json_unescape | base64_decode | chars_replace ;
json_unescape = "json_unescape" "(" ws? ")" ;
base64_decode = "base64_decode" "(" ws? ")" ;
chars_replace = "chars_replace" "(" ws? path ws? "," ws? path ws? ")" ;
; 包装器函数
wrapper_fun = not_fun ;
not_fun = "not" "(" ws? fun_call ws? ")" ;
path_array = "[" ws? path { ws? "," ws? path } ws? "]" ;
number_array = "[" ws? number { ws? "," ws? number } ws? "]" ;
ip_array = "[" ws? ip_addr { ws? "," ws? ip_addr } ws? "]" ;
annotation = "#[" ws? ann_item { ws? "," ws? ann_item } ws? "]" ;
ann_item = tag_anno | copy_raw_anno ;
tag_anno = "tag" "(" ws? tag_kv { ws? "," ws? tag_kv } ws? ")" ;
tag_kv = ident ":" ( quoted_string | raw_string ) ; ; 键为标识符;值为字符串
copy_raw_anno = "copy_raw" "(" ws? "name" ws? ":" ws? ( quoted_string | raw_string ) ws? ")" ;
; 词法与辅助记号 --------------------------------------------------------
field_name = var_name ;
rule_name = exact_path ;
key = key_char { key_char } ; ; [A-Za-z0-9_./-]+
var_name = var_char { var_char } ; ; [A-Za-z0-9_.-]+
ref_path = ref_char { ref_char } ; ; [A-Za-z0-9_./\-.[\]*]+
; 标识符与路径标识符(推荐写法)
ident = ( letter | '_' ) { letter | digit | '_' | '.' | '-' } ;
path_ident = ident { "/" ident } ;
exact_path = exact_path_char { exact_path_char } ; ; 不含 '[' ']' '*'
exact_path_char = letter | digit | '_' | '.' | '/' | '-' ;
path = key | ref_path ;
number = digit { digit } ;
digit = '0' | '1' | '2' | '3' | '4' | '5' | '6' | '7' | '8' | '9' ;
key_char = letter | digit | '_' | '.' | '/' | '-' ;
var_char = letter | digit | '_' | '.' | '-' ;
ref_char = key_char | '[' | ']' | '*' ;
letter = 'A'..'Z' | 'a'..'z' ;
quoted_string = '"' { escaped | char_no_quote_backslash } '"' ;
raw_string = 'r' '#' '"' { any_char } '"' '#' ; ; r#"..."#,内部不处理转义(内容可包含 '"')
char_no_quote = ? any char except '"' ? ;
escaped = '\\' ( '"' | '\\' | 'n' | 't' | 'r' | 'x' hex hex ) ;
char_no_quote_backslash = ? any char except '"' and '\\' ? ;
hex = '0'..'9' | 'a'..'f' | 'A'..'F' ;
free_string = { fchar } ; ; 直至 ',' 或 ')'(不含)
fchar = ? any char except ',' and ')' ? ;
symbol_chars = { schar } ; ; 允许除 ')' 与 '\\' 外字符,或使用 '\)' 转义
schar = char_no_close_paren_backslash | '\\' ')' ;
char_no_close_paren_backslash = ? any char except ')' and '\\' ? ;
any_chars = { any_char } ;
any_char = ? any character ? ;
ip_addr = quoted_string | ipv4 | ipv6 ; ; 支持 IPv4/IPv6 裸字面量或带引号
ipv4 = digit1 "." digit1 "." digit1 "." digit1 ;
digit1 = digit { digit } ;
ipv6 = ? valid IPv6 literal (RFC 4291), including compressed forms like "::1" ? ;
ws = { ' ' | '\t' | '\n' | '\r' } ;
;保留关键字(不可作为标识符使用;由实现侧进行冲突校验)
ReservedKeyword = "package" | "rule" | "alt" | "opt" | "some_of" | "seq" | "not" | "order"
| "tag" | "copy_raw" | "include" | "macro" ;
语义说明
预处理管道
preproc管道(例如|decode/base64|unquote/unescape|)出现在express起始处,独立于字段级pipe- 作用于整行输入,在字段解析前执行
- 执行顺序:从左到右
- 必须以
|结尾 - 支持的预处理器:
decode/base64- Base64 解码decode/hex- 十六进制解码unquote/unescape- URL 转义解码strip/bom- 移除 BOM(字节顺序标记)
分组元数据(Group Meta)
group_meta用于指定分组的行为模式alt- 选择性匹配,匹配组内任意一个字段即可opt- 可选分组,整个分组可以不存在some_of- 部分匹配,匹配组内部分字段seq- 序列匹配,按顺序匹配组内所有字段not- 否定匹配,匹配除组内字段外的其他内容
分组长度和分隔符
group后可跟[n]与分隔符sep- 长度会应用到组内所有字段
sep仅存储在组上,具体组合策略见实现
符号类型
symbol/peek_symbol可携带symbol_content,如symbol(boy)peek_symbol等价于symbol,且仅改变“窥探“语义(预读但不消费)
子字段
subfields中未显式"@ref"时,键默认为"*"(通配键)- 子字段支持
opt(type)标记为可选
分隔符
分隔符支持两种形式:
快捷分隔符
- 使用反斜杠转义的单个或多个字符
- 例如
\\,代表逗号,,\\!\\|代表字符串"!|" - 优先级:字段级 > 组级 > 上游
模式分隔符
- 使用花括号
{...}包裹的模式表达式 - 支持通配符、空白匹配宏和保留标记
- 适用于复杂场景的分隔
通配符:
*- 零或多个任意字符(非贪婪,最短匹配)?- 恰好一个任意字符- 约束:模式中
*最多出现一次
空白匹配宏:
\s- 一个或多个连续空白字符[ \t\r\n]+\S- 一个或多个连续非空白字符[^ \t\r\n]+\h- 一个或多个连续水平空白[ \t]+\H- 一个或多个连续非水平空白[^ \t]+
保留标记:
(...)- 匹配但不消费,将匹配的内容留给下一阶段- 只能出现在模式末尾
- 内部不允许包含
*通配符
示例:
chars{*=}- 匹配到第一个=符号chars{\s=}- 跳过空白后匹配=chars{*(key=)}- 匹配到key=并保留key=给下一个字段chars{field?:\s}- 匹配field+ 任意字符 +:+ 空白
约束:
- 模式中
*最多出现一次 ()只能在模式末尾()内不允许*()不允许嵌套- 不能与 upstream separator 混用
注解
annotation可用于package与rule- 若同时存在,会在
rule侧合并(rule优先)
管道函数
- 字段级管道函数包括:选择器、条件检查、转换、包装器
not()包装器可反转任何管道函数的成功/失败结果starts_with()检查字符串字段是否以指定前缀开始regex_match()支持正则表达式模式匹配digit_range()支持数值范围检查(闭区间)chars_replace()执行字符串替换操作
相关文档
- 快速入门:01-quickstart.md
- 核心概念:02-core-concepts.md
- 实战指南:03-practical-guide.md
- 语言参考:04-language-reference.md
- 函数参考:05-functions-reference.md
实现参考
- 语法实现:
src/parser/ - 管道函数:
src/parser/wpl_fun.rs - 数据类型:外部 crate
wp-model-core
WPL 完整类型系统示例
一个示例展示 WPL 支持的所有主要数据类型
本文档提供一个完整的、可运行的 WPL 规则示例,展示 23 种主要数据类型的使用方法。这是学习 WPL 类型系统的最佳参考。
📑 文档导航
📋 类型覆盖清单
本示例包含以下类型:
| 类别 | 包含类型 | 数量 |
|---|---|---|
| 基础类型 | peek_symbol、symbol、bool、chars、digit、float、_ | 7 |
| 时间类型 | time_3339、time_2822、time/clf、time_timestamp | 4 |
| 网络类型 | ip、ip_net、port | 3 |
| 结构化类型 | kvarr、json | 2 |
| 协议类型 | http/request、http/status、http/agent、http/method | 4 |
| 编码类型 | hex、base64 | 2 |
| 特殊类型 | sn | 1 |
| 总计 | 23 种类型 |
🚀 完整示例
输入数据
peek_symbol symbol true "hello world" 123 3.14 2026-01-19T12:34:56Z 2022-03-21T12:34:56+00:00 Mon, 07 Jul 2025 09:20:32 +0000 [06/Aug/2019:12:12:19 +0800] 1647849600 192.168.1.100 192.168.0.0/24 name=test {"strict":true} "GET /api/users HTTP/1.1" 200 "Mozilla/5.0" "POST" 8080 ABC123XYZ 0x1A2B YmFzZTY0ZGF0YQ==
WPL 规则
package wpl_example {
rule full_types {
(
// 1. peek_symbol - 预读符号(不消费)
peek_symbol(peek_symbol):peek_sym,
// 2. symbol - 精确匹配符号
symbol(symbol):sym,
// 3. bool - 布尔值
bool:bool_val,
// 4. chars - 字符串(带引号)
chars:quoted_str",
// 5. digit - 整数
digit:integer,
// 6. float - 浮点数
float:float_val,
// 7. time_3339 - ISO 8601 / RFC3339
time_3339:time_iso,
// 8. time_3339 - RFC3339(带时区)
time_3339:time_rfc3339,
// 9. time_2822 - RFC2822(邮件时间格式)
time_2822:time_rfc2822,
// 10. time/clf - Common Log Format(Apache/Nginx)
time/clf:time_clf<[,]>,
// 11. time_timestamp - Unix 时间戳
time_timestamp:timestamp,
// 12. ip - IP 地址
ip:ip_addr,
// 13. ip_net - IP 网段(CIDR)
ip_net:ip_network,
// 14. kvarr - 键值对
kvarr(chars@name):kv_data,
// 15. json - JSON 对象
json(bool@strict):json_data,
// 16. http/request - HTTP 请求行
http/request:http_req",
// 17. http/status - HTTP 状态码
http/status:http_status,
// 18. http/agent - User-Agent
http/agent:user_agent",
// 19. http/method - HTTP 方法
http/method:http_method",
// 20. port - 端口号
port:port_num,
// 21. sn - 序列号
sn:serial,
// 22. hex - 十六进制
hex:hex_data,
// 23. base64 - Base64 编码
base64:base64_data
)
}
}
输出结果
{
"peek_sym": "peek_symbol",
"sym": "symbol",
"bool_val": true,
"quoted_str": "hello world",
"integer": 123,
"float_val": 3.14,
"time_iso": "2026-01-19 12:34:56",
"time_rfc3339": "2022-03-21 12:34:56",
"time_rfc2822": "2025-07-07 09:20:32",
"time_clf": "2019-08-06 12:12:19",
"timestamp": 1647849600,
"ip_addr": "192.168.1.100",
"ip_network": "192.168.0.0/24",
"kv_data": {"name": "test"},
"json_data": {"strict": true},
"http_req": "GET /api/users HTTP/1.1",
"http_status": 200,
"user_agent": "Mozilla/5.0",
"http_method": "POST",
"port_num": 8080,
"serial": "ABC123XYZ",
"hex_data": "0x1A2B",
"base64_data": "YmFzZTY0ZGF0YQ=="
}
📖 类型详解
基础类型
1. peek_symbol - 预读符号
peek_symbol(peek_symbol):peek_sym
- 作用:预读匹配但不消费输入
- 用途:用于向前查看而不影响后续解析
2. symbol - 精确匹配符号
symbol(symbol):sym
- 作用:精确匹配指定字符串
- 用途:匹配固定关键字、分隔符等
3. bool - 布尔值
bool:bool_val
- 匹配:
true或false - 输出:布尔类型
4. chars - 字符串
chars:quoted_str"
- 格式:支持引号包裹
"hello"或裸字符串hello - 用途:提取任意字符串
5. digit - 整数
digit:integer
- 匹配:整数,如
123、-456 - 输出:整数类型
6. float - 浮点数
float:float_val
- 匹配:浮点数,如
3.14、-0.5 - 输出:浮点数类型
时间类型
7-8. time_3339 - RFC3339/ISO 8601
time_3339:time_iso // 2026-01-19T12:34:56Z
time_3339:time_rfc3339 // 2022-03-21T12:34:56+00:00
- 格式:ISO 8601 / RFC3339 标准
- 支持:带时区或不带时区
9. time_2822 - RFC2822(邮件时间)
time_2822:time_rfc2822
- 格式:
Mon, 07 Jul 2025 09:20:32 +0000 - 用途:邮件头、RSS 等
10. time/clf - Common Log Format
time/clf:time_clf<[,]>
- 格式:
[06/Aug/2019:12:12:19 +0800] - 用途:Apache/Nginx 日志
11. time_timestamp - Unix 时间戳
time_timestamp:timestamp
- 格式:秒级时间戳,如
1647849600 - 输出:时间类型
网络类型
12. ip - IP 地址
ip:ip_addr
- 支持:IPv4(
192.168.1.100)和 IPv6(::1)
13. ip_net - IP 网段
ip_net:ip_network
- 格式:CIDR 表示法,如
192.168.0.0/24
14. port - 端口号
port:port_num
- 范围:1-65535
结构化类型
15. kvarr - 键值对
kvarr(chars@name):kv_data
- 格式:
key=value - 支持:自动解析或指定键提取
- 示例:
name=test→{name: "test"}
16. json - JSON 对象
json(bool@strict):json_data
- 支持:完整 JSON 解析
- 子字段:可提取嵌套字段
- 示例:
{"strict":true}→{strict: true}
协议类型
17. http/request - HTTP 请求行
http/request:http_req"
- 格式:
"GET /api/users HTTP/1.1" - 提取:方法 + 路径 + 协议版本
18. http/status - HTTP 状态码
http/status:http_status
- 格式:
200、404、500等
19. http/agent - User-Agent
http/agent:user_agent"
- 格式:
"Mozilla/5.0..." - 用途:浏览器标识
20. http/method - HTTP 方法
http/method:http_method"
- 支持:
GET、POST、PUT、DELETE等
编码类型
21. hex - 十六进制
hex:hex_data
- 格式:
0x1A2B或1A2B - 输出:十六进制字符串
22. base64 - Base64 编码
base64:base64_data
- 格式:
YmFzZTY0ZGF0YQ== - 输出:Base64 编码字符串
特殊类型
23. sn - 序列号
sn:serial
- 格式:字母数字组合,如
ABC123XYZ - 用途:设备序列号、订单号等
💡 使用建议
学习路径
- 第一步:先理解基础类型(
digit、chars、ip) - 第二步:掌握时间类型(根据日志格式选择)
- 第三步:学习结构化类型(
json、kvarr) - 第四步:了解协议类型(
http/*)
实战建议
- 快速查阅:遇到不认识的数据格式,先在本页面搜索
- 复制即用:直接复制对应类型的语法到你的规则中
- 类型组合:多种类型可以自由组合使用
常见组合
// Web 日志
(ip, time/clf<[,]>, http/request", http/status, digit)
// API 日志
(time_3339, chars, json(chars@user, digit@code))
// 防火墙日志
(ip, port, time, kvarr)
🔗 相关文档
- 快速入门:01-quickstart.md - 5 分钟上手
- 核心概念:02-core-concepts.md - 深入理解类型系统
- 实战指南:03-practical-guide.md - 按任务查找解决方案
- 语言参考:04-language-reference.md - 完整类型列表
- 函数参考:05-functions-reference.md - 所有函数详解
📌 快速导航
提示:将本页面加入书签,作为 WPL 类型系统的速查手册!
分隔符模式(Sep Pattern)
本文档介绍 WPL 中 {...} 分隔符模式语法,用于在字段分隔位置使用通配符和特殊匹配进行灵活切分。
适用于快捷分隔符(\,、\s 等)无法满足的复杂场景,例如“跳过任意内容直到关键字““空白 + 特定前缀“等。
提示:如果你的分隔需求可以用固定字符串满足,优先使用快捷分隔符(参考 WPL 基础 - 分隔符优先级与合并)。
📚 文档导航
| 主题 | 内容 |
|---|---|
| 基本语法 | {...} 写法、通配符、转义字符 |
| 语法表 | 所有支持的记法一览 |
通配符 * 与 ? | 非贪婪匹配、单字符匹配 |
| 空白匹配 | \s 连续空白、\h 水平空白 |
保留标记 () | 匹配但不消费,留给下一阶段 |
| 使用约束 | * 和 () 的限制 |
| 实战示例 | 常见场景与完整规则 |
基本语法
在字段的分隔符位置使用花括号 {...} 包裹模式表达式:
# 快捷分隔符
chars\,
# 模式分隔符
chars{*=}
模式分隔符与快捷分隔符遵循相同的优先级规则(字段级 > 组级 > 上游)。
语法表
| 记法 | 说明 | 示例 |
|---|---|---|
a | 字面字符 a | {abc} 匹配 "abc" |
* | 零或多个任意字符(非贪婪,最短匹配) | {*=} 匹配到第一个 = |
? | 恰好一个任意字符 | {field?:} 匹配 "fieldA:" |
\0 | 空字节 | |
\n | 换行 | |
\t | 制表符 | |
\r | 回车 | |
\s | 一个或多个连续空白 [ \t\r\n]+ | {\s=} 跳过空白后匹配 = |
\h | 一个或多个水平空白 [ \t]+ | {\h:\h} 匹配 " : " |
\\ \* \? \{ \} \( \) | 字面转义 | {\*} 匹配字面 * |
(...) | 匹配但不消费(仅限模式末尾) | {*(key=)} 保留 key= |
注意:
\s和\h在{}模式内部匹配一个或多个连续空白;{}之外的\s沿用原有语义,旧配置不受影响。
通配符 * 与 ?
* — 非贪婪匹配
* 匹配零或多个任意字符,采用最短匹配策略。
输入:a=b=c
模式:{*=}
匹配:a= ← 找到第一个 "=" 即停止,而非 "a=b="
典型场景: 消费到某个关键字符。
# 匹配到第一个等号
chars{*=}
# 匹配到第一个冒号加空格
chars{*:\s}
? — 单字符匹配
? 恰好匹配一个任意字符。
输入:field1: value
模式:{field?:\s}
匹配:field1: ← "?" 匹配了 "1"
约束: 模式中 * 最多出现一次,超过则报配置错误。? 无数量限制。
空白匹配 \s 与 \h
\s — 连续空白
匹配一个或多个空白字符(空格、制表符、回车、换行)。
输入:key =value
模式:{\s=}
匹配: = ← 三个空格 + "="
\h — 水平空白
匹配一个或多个水平空白字符(仅空格和制表符,不含换行)。
输入:name : value
模式:{\h:\h}
匹配: : ← 制表/空格 + ":" + 制表/空格
\S 与 \H
与上面相反:
| 记法 | 说明 |
|---|---|
\S | 一个或多个连续非空白字符 |
\H | 一个或多个连续非水平空白字符 |
保留标记(Preserve)
() 包裹的内容参与匹配以确认分隔位置,但不会从输入流中消费。下一阶段从 () 内容的起始处继续读取。
输入:hello key=value
模式:{*\s(key=)}
消费:hello ← 被截断,作为当前字段的值
保留:key=value ← 留在输入流中,下一个字段从这里开始
使用方式
# 消费到 "command=" 之前,保留 "command=" 给下一个字段
chars{*(command=)}
# 消费任意内容 + 空白区域,保留 "next" 给下一个字段
chars{*\s(next)}
约束
()只能出现在模式末尾。{*(key=)}合法,{(key)*=}不合法。()不允许嵌套。()内允许字面量、\s\h\0\n\t\r、?及转义字符。()内不允许*——保留部分必须是确定长度。
使用约束
| 约束 | 说明 |
|---|---|
* 最多一个 | 整个模式中 * 最多出现一次,多于一个报错 |
() 仅末尾 | 保留标记只能出现在模式的最后 |
() 内无 * | 保留段不允许不确定长度的通配 |
() 无嵌套 | 不允许 ((...)) |
| 不可与 ups_val 混用 | 同时配置 {} 与次级结束符时,解析阶段报错 |
实战示例
场景 1:Key=Value 风格日志
日志格式中,字段以 key=value 排列,每个 value 后面跟空白和下一个 key。
输入:src=192.168.1.1 dst=10.0.0.1 action=accept proto=TCP
rule kv_log {
(
ip{*\s(dst=)}:src,
ip{*\s(action=)}:dst,
chars{*\s(proto=)}:action,
chars:proto
)
}
# 输出:src=192.168.1.1, dst=10.0.0.1, action=accept, proto=TCP
说明:每个字段使用 {*\s(next_key=)} 消费到下一个 key 之前的空白,同时保留下一个 key 给后续字段。
场景 2:分隔符中包含空白
日志中字段之间用 |(空格 + 竖线 + 空格)分隔。
输入:192.168.1.1 | admin | 2024-01-01 10:00:00
rule pipe_sep {
(ip:client, chars:user, time:ts){\h|\h}
}
# 输出:client=192.168.1.1, user=admin, ts=2024-01-01 10:00:00
场景 3:匹配到特定关键字
消费到 command= 出现的位置。
输入:user=admin role=root command=ls -la
rule cmd_log {
(
chars{*(command=)}:prefix,
chars:command
)
}
# prefix = "user=admin role=root "
# command = "ls -la"(前面 "command=" 被 consume_sep 消费)
场景 4:字段名后跟变化字符
某些日志的字段名格式为 fieldN:,N 是一个可变字符。
输入:field1: hello field2: world
rule field_var {
(chars{field?:\s}:f1, chars:f2)
}
# f1 = "hello", f2 = "world"
场景 5:纯字面量模式
当 {} 内不含通配符时,等价于快捷字面量分隔符,但可以表达多字符序列。
# 以下两种写法效果相同
chars{::}
# 等价于
chars\:\:
场景 6:结合管道函数
模式分隔符可与字段级管道组合使用。
rule combined {
(
chars{*\s(src=)}:header,
kvarr(\s):payload
) |(take src)
}
与快捷分隔符的对比
| 特性 | 快捷分隔符 | 模式分隔符 |
|---|---|---|
| 语法 | \, \; \s 等 | {...} |
| 匹配能力 | 固定字符串 | 通配符、空白区域、保留标记 |
| 性能 | 最优(memchr) | 接近(纯字面退化为 memchr) |
| 适用场景 | 分隔符是确定字符 | 分隔逻辑含变化部分 |
| 优先级 | 与字段/组级一致 | 与字段/组级一致 |
选择建议:
- 分隔符是固定字符(逗号、空格、竖线等)→ 使用快捷分隔符
- 分隔符包含空白区域、需要跳过到关键字、需要保留部分内容 → 使用模式分隔符
常见问题
Q: {...} 内的 \s 和外面的 \s 一样吗?
不完全一样。{} 内的 \s 匹配一个或多个连续空白字符;{} 外面的 \s 沿用原有语义(表示空格分隔符)。旧配置不受影响。
Q: 可以在组级使用模式分隔符吗?
可以。与快捷分隔符一样,模式分隔符支持字段级和组级:
# 字段级
(chars{*=}, digit)
# 组级
(chars, digit){*=}
Q: * 匹配到行尾怎么办?
如果 * 后续没有其他匹配内容,* 会匹配到输入的末尾。如果没找到后续内容的匹配,则该模式整体不匹配,字段将读取到行尾。
Q: 可以只用 () 不带 * 吗?
可以。() 不依赖 *,例如 {\s(key=)} 表示:匹配空白区域后确认 key= 存在,消费空白部分,保留 key=。
相关资源
- WPL 基础:01-wpl_basics.md — 字段、分组、分隔符基础
- 核心概念:02-core-concepts.md — 分隔符优先级详解
- 管道函数:03-wpl_pipe_functions.md — 字段级管道
- 语言参考:04-language-reference.md — 完整类型列表
Strip BOM Processor 使用示例
概述
strip/bom 处理器用于移除数据中所有位置的 BOM (Byte Order Mark) 标记。
支持的 BOM 类型
- UTF-8 BOM:
0xEF 0xBB 0xBF - UTF-16 LE BOM:
0xFF 0xFE - UTF-16 BE BOM:
0xFE 0xFF - UTF-32 LE BOM:
0xFF 0xFE 0x00 0x00 - UTF-32 BE BOM:
0x00 0x00 0xFE 0xFF
使用方法
在 WPL 规则中使用
// 清除 UTF-8 BOM
field_name | strip/bom
在管道链中使用
// 先清除 BOM,再进行其他处理
content | strip/bom | base64_decode | json_parse
代码示例
Rust 代码
#![allow(unused)]
fn main() {
use wp_lang::eval::builtins::{ensure_builtin_pipe_units, registry};
use wp_parse_api::RawData;
// 1. 确保内置管道单元已注册
ensure_builtin_pipe_units();
// 2. 创建 BOM 清除处理器
let processor = registry::create_pipe_unit("strip/bom")
.expect("strip/bom processor should be registered");
// 3. 准备带 BOM 的数据 (UTF-8 BOM + "Hello")
let mut data_with_bom = vec![0xEF, 0xBB, 0xBF];
data_with_bom.extend_from_slice(b"Hello");
let input = RawData::from_string(
String::from_utf8(data_with_bom).unwrap()
);
// 4. 处理数据
let result = processor.process(input).unwrap();
// 5. 验证 BOM 已被移除
assert_eq!(
wp_lang::eval::builtins::raw_to_utf8_string(&result),
"Hello"
);
}行为说明
1. 检测并移除 BOM
#![allow(unused)]
fn main() {
// 输入: "\u{FEFF}Hello World" (UTF-8 BOM + 文本)
// 输出: "Hello World"
}2. 无 BOM 时保持不变
#![allow(unused)]
fn main() {
// 输入: "Hello World"
// 输出: "Hello World" (无变化)
}3. 移除所有位置的 BOM
#![allow(unused)]
fn main() {
// 输入: "\u{FEFF}Hello\u{FEFF}World"
// 输出: "HelloWorld" (移除所有 BOM)
}4. 容器类型保持一致
#![allow(unused)]
fn main() {
// String 输入 → String 输出
// Bytes 输入 → Bytes 输出
// ArcBytes 输入 → ArcBytes 输出
}常见场景
场景 1: 处理用户上传的文本文件
许多 Windows 文本编辑器(如记事本)会在 UTF-8 文件开头添加 BOM。
// 清除 BOM 后再解析
file_content | strip/bom | parse_csv
场景 2: 处理 Web API 响应
某些旧版 API 可能在 JSON 响应前添加 BOM。
// 清除 BOM 后再解析 JSON
api_response | strip/bom | json_parse
场景 3: 日志文件处理
某些日志系统可能在每个日志文件开头添加 BOM。
// 清除 BOM 后提取日志内容
log_line | strip/bom | syslog_parse
性能特点
- 快速检测:仅检查当前位置的 2-4 字节
- 零拷贝优化:无 BOM 时直接返回原数据
- O(n) 时间复杂度:需要扫描整个数据
注意事项
- 移除所有 BOM:数据中任意位置的 BOM 都会被移除
- 非破坏性:如果没有 BOM,数据完全不变
- 类型安全:保持输入容器类型不变
测试覆盖
✅ UTF-8 BOM 检测和移除 ✅ UTF-16 LE/BE BOM 检测和移除 ✅ UTF-32 LE/BE BOM 检测和移除 ✅ 无 BOM 数据保持不变 ✅ 空数据处理 ✅ 只有 BOM 的数据 ✅ 包含中文的 UTF-8 BOM 数据 ✅ 容器类型保持一致性 ✅ 数据中间的 BOM 移除 ✅ 多个 BOM 移除 ✅ 混合类型 BOM 移除 ✅ 数据末尾的 BOM 移除 ✅ 连续 BOM 移除
版本: 1.15.0 更新日期: 2026-02-07
WPL Field Function
chars_replace 函数使用指南
概述
chars_replace 是 WPL (WP Language) 中的字符串替换函数,用于在日志字段中查找并替换指定的子字符串。
快速开始
基本语法
chars_replace(target, replacement)
- target: 要查找并替换的字符串
- replacement: 替换后的新字符串
简单示例
# 将 "error" 替换为 "warning"
chars_replace(error, warning)
# 将 "ERROR" 替换为 "WARN"
chars_replace(ERROR, WARN)
参数格式
1. 不带引号(简单标识符)
适用于简单的字段名或关键词:
chars_replace(old_value, new_value)
chars_replace(test-old, test-new)
chars_replace(错误, 警告)
支持的字符:
- 字母(a-z, A-Z)
- 数字(0-9)
- 下划线(_)
- 点(.)
- 斜杠(/)
- 连字符(-)
- Unicode 字符(中文、日文等)
2. 带引号(特殊字符)
适用于包含特殊字符的字符串:
chars_replace("test,old", "test,new") # 包含逗号
chars_replace("hello world", "goodbye world") # 包含空格
chars_replace("status=error", "status=ok") # 包含等号
chars_replace("[ERROR]", "[WARN]") # 包含方括号
必须使用引号的场景:
- 包含逗号(,)
- 包含空格
- 包含等号(=)
- 包含方括号([])
- 包含其他特殊符号
3. 混合使用
可以混合使用带引号和不带引号的参数:
chars_replace("test,old", new_value)
chars_replace(old_value, "new,value")
4. 空字符串(删除文本)
使用空引号删除目标字符串:
# 删除 "DEBUG: " 前缀
chars_replace("DEBUG: ", "")
# 删除逗号
chars_replace(",", "")
实际应用场景
场景 1:标准化日志级别
# 统一大小写
chars_replace(error, ERROR)
chars_replace(warning, WARNING)
# 标准化格式
chars_replace("[ERROR]", "ERROR:")
chars_replace("[WARN]", "WARNING:")
场景 2:清理日志内容
# 删除调试前缀
chars_replace("DEBUG: ", "")
# 删除多余的空格
chars_replace(" ", " ")
# 删除换行符
chars_replace("\n", " ")
场景 3:URL 参数替换
chars_replace("status=error", "status=ok")
chars_replace("code=500", "code=200")
场景 4:CSV 字段处理
# 替换带逗号的名字
chars_replace("Smith, John", "John Smith")
chars_replace("Doe, Jane", "Jane Doe")
场景 5:路径标准化
# Windows 路径转 Unix 路径
chars_replace("\\", "/")
# 简化路径
chars_replace("/usr/local/", "/opt/")
场景 6:多语言支持
# 中文替换
chars_replace(错误, 警告)
chars_replace("错误:", "警告:")
# 日文替换
chars_replace(エラー, 警告)
场景 7:敏感信息脱敏
# 替换密码
chars_replace("password=12345", "password=***")
# 替换令牌
chars_replace("token=abc123xyz", "token=***")
使用限制
不支持的特性
-
转义字符:
# ❌ 不支持(会解析错误) chars_replace("say \"hello\"", "say 'hi'") -
正则表达式:
# ❌ 不支持正则 chars_replace("[0-9]+", "NUMBER") # 会按字面匹配 -
通配符:
# ❌ 不支持通配符 chars_replace("error*", "warning") # 会按字面匹配
类型限制
chars_replace 只能处理字符串类型的字段:
# ✅ 正确 - 字段是字符串
message: "error occurred" -> chars_replace(error, warning)
# ❌ 错误 - 字段是数字
status_code: 500 -> chars_replace(500, 200) # 会失败
# ❌ 错误 - 字段是 IP 地址
ip_address: 192.168.1.1 -> chars_replace(192, 10) # 会失败
替换行为
-
全局替换:替换字段中所有匹配的子字符串
# 输入: "hello hello hello" chars_replace(hello, hi) # 输出: "hi hi hi" -
大小写敏感:区分大小写
# 输入: "Error error ERROR" chars_replace(error, warning) # 输出: "Error warning ERROR" # 只替换小写的 error
完整示例
示例 1:日志级别标准化流水线
rule log_normalization {
# 标准化不同格式的 ERROR
| chars_replace("[ERROR]", "ERROR:")
| chars_replace("ERR:", "ERROR:")
| chars_replace("Err:", "ERROR:")
# 标准化 WARNING
| chars_replace("[WARN]", "WARNING:")
| chars_replace("Warn:", "WARNING:")
# 删除调试信息
| chars_replace("DEBUG: ", "")
}
示例 2:CSV 数据清理
rule csv_cleanup {
# 标准化姓名格式(从 "Last, First" 到 "First Last")
| chars_replace("Smith, John", "John Smith")
| chars_replace("Doe, Jane", "Jane Doe")
# 删除多余的引号
| chars_replace("\"", "")
# 标准化分隔符
| chars_replace(";", ",")
}
示例 3:多步骤替换
rule multi_step_replace {
# 第一步:替换日志级别
| chars_replace(error, ERROR)
# 第二步:添加时间戳前缀(通过替换空字符串)
| chars_replace("", "[2024-01-29] ")
# 第三步:替换服务名
| chars_replace(old-service, new-service)
}
性能说明
- 时间复杂度:O(n) - n 为字段长度
- 空间复杂度:O(n) - 需要创建新字符串
- 性能建议:
- 短字符串(< 1KB):性能优秀,延迟 < 1μs
- 长字符串(1-10KB):仍然快速,延迟 < 10μs
- 超长字符串(> 10KB):考虑性能影响
错误处理
常见错误
-
字段不存在
错误: chars_replace | no active field 原因: 当前没有活动字段 解决: 使用 take() 或其他选择器先选择字段 -
字段类型不匹配
错误: chars_replace 原因: 字段不是字符串类型 解决: 确保字段是 Chars 类型 -
语法错误
错误: invalid symbol, expected need ',' 原因: 包含逗号的参数未使用引号 解决: 使用引号包裹参数
与其他函数配合使用
与字段选择器配合
# 先选择字段,再替换
| take(message)
| chars_replace(error, warning)
与条件检查配合
# 只在特定条件下替换
| chars_has(error)
| chars_replace(error, warning)
与转换函数配合
# 先解码 Base64,再替换
| base64_decode()
| chars_replace(old_value, new_value)
最佳实践
1. 优先使用不带引号的格式
# ✅ 推荐(简洁)
chars_replace(error, warning)
# ⚠️ 可以但不必要
chars_replace("error", "warning")
2. 复杂字符串使用引号
# ✅ 正确
chars_replace("status=error", "status=ok")
# ❌ 错误(语法错误)
chars_replace(status=error, status=ok)
3. 空字符串删除文本
# ✅ 推荐(明确意图)
chars_replace("DEBUG: ", "")
# ⚠️ 不清晰
chars_replace("DEBUG: ", nothing) # 不存在 nothing 关键字
4. 按顺序执行多次替换
# ✅ 正确(逐步替换)
| chars_replace(error, ERROR)
| chars_replace(ERROR, WARNING)
# 结果: error -> ERROR -> WARNING
# ⚠️ 注意顺序
| chars_replace(ERROR, WARNING)
| chars_replace(error, ERROR)
# 结果: error -> ERROR(第二步不会再变成 WARNING)
5. 测试边界情况
# 测试空字符串
chars_replace("", "prefix") # 在每个字符间插入
# 测试单字符
chars_replace(",", ";") # 简单替换
# 测试长字符串
chars_replace("very long string to find", "replacement")
调试技巧
1. 逐步测试
# 第一步:只做替换
| chars_replace(error, warning)
# 第二步:添加更多替换
| chars_replace(error, warning)
| chars_replace(warning, info)
2. 检查字段类型
# 使用 has() 确认字段存在
| has()
# 使用 chars_has() 确认是字符串类型
| chars_has(some_value)
3. 查看替换结果
在测试环境中打印替换前后的值:
# 使用 WP-Motor 的调试模式
wp-motor --debug rule.wpl < test.log
常见问题 (FAQ)
Q1: 如何替换换行符?
# 方法 1:使用实际的换行符(如果解析器支持)
chars_replace("\n", " ")
# 方法 2:根据实际编码处理
chars_replace("
", " ") # 实际换行
Q2: 如何同时替换多个不同的字符串?
# 使用多个 chars_replace 调用
| chars_replace(error, ERROR)
| chars_replace(warning, WARNING)
| chars_replace(info, INFO)
Q3: 如何实现大小写不敏感的替换?
chars_replace 是大小写敏感的,需要多次调用:
| chars_replace(error, ERROR)
| chars_replace(Error, ERROR)
| chars_replace(ERROR, ERROR)
Q4: 替换会修改原始字段吗?
是的,chars_replace 会直接修改活动字段的值。
Q5: 性能够用吗?
对于大多数日志处理场景,性能完全足够:
- 单条日志 < 10KB:几乎无感知
- 高吞吐量场景:可处理 100K+ 日志/秒
更多资源
- 开发指南:
docs/guide/wpl_field_func_development_guide.md - 解析器实现:
docs/guide/chars_replace_parser_tests.md - 性能分析:
docs/guide/take_quoted_string_performance.md - 源代码:
src/ast/processor/function.rs
版本历史
- 1.11.0 (2026-01-29)
- 初始实现
- 支持基本字符串替换
- 支持带引号字符串(包含逗号、空格等)
- 添加完整的测试覆盖
提示: 如果您在使用过程中遇到问题,请参考错误处理章节或查看开发指南。
digit_range 函数使用指南
概述
digit_range 是 WPL (WP Language) 中的数值范围检查函数,用于判断日志字段的数值是否在指定的单个范围内。这是一个简单高效的闭区间检查函数。
快速开始
基本语法
digit_range(begin, end)
- begin: 范围下界(标量值)
- end: 范围上界(标量值)
- 检查方式:
begin <= value <= end(闭区间)
简单示例
# 检查数值是否在 [0, 100] 范围内
digit_range(0, 100)
# 检查 HTTP 成功状态码(200-299)
digit_range(200, 299)
# 检查端口号是否在标准范围内(0-65535)
digit_range(0, 65535)
参数格式
1. 单个范围
检查单个连续范围:
# 检查端口号是否在标准范围内(0-65535)
digit_range(0, 65535)
# 检查 HTTP 成功状态码(200-299)
digit_range(200, 299)
# 检查年龄是否成年(18-150)
digit_range(18, 150)
2. 范围限制说明
注意: 从 1.13.1 版本开始,digit_range 仅支持单个范围检查。如需检查多个不连续的范围,请使用多个规则或分支逻辑(见下文“与分支逻辑配合“部分)。
# ✅ 单个范围检查
digit_range(200, 299) # 2xx 状态码
# ❌ 不再支持多范围数组语法
# digit_range([200, 300], [299, 399]) # 旧版本语法,已废弃
3. 边界值处理
范围检查是闭区间,包含边界值:
# [100, 200] - 包含 100 和 200
digit_range(100, 200)
# 检查值 100: ✅ 通过(等于下界)
# 检查值 200: ✅ 通过(等于上界)
# 检查值 150: ✅ 通过(在范围内)
# 检查值 99: ❌ 失败(小于下界)
# 检查值 201: ❌ 失败(大于上界)
4. 负数范围
支持负数范围:
# 温度范围检查(-20°C 到 40°C)
digit_range(-20, 40)
# 海拔范围(死海 -400m 到 珠峰 8848m)
digit_range(-400, 8848)
实际应用场景
场景 1:HTTP 状态码分类
rule http_success_check {
# 选择状态码字段
| take(status_code)
# 检查是否为成功状态码(2xx)
| digit_range(200, 299)
}
# 示例数据:
# status_code: 200 → ✅ 通过(在 [200,299] 范围内)
# status_code: 204 → ✅ 通过(在 [200,299] 范围内)
# status_code: 301 → ❌ 失败(不在范围内)
# status_code: 404 → ❌ 失败(不在范围内)
# 如需检查多个状态码范围(如 2xx 或 3xx),使用分支逻辑:
rule http_ok_or_redirect {
| take(status_code)
| (digit_range(200, 299) | digit_range(300, 399))
}
场景 2:性能指标监控
rule response_time_check {
# 选择响应时间字段(毫秒)
| take(response_time)
# 检查响应时间是否在正常范围(0-500ms)
| digit_range(0, 500)
}
# 示例数据:
# response_time: 50 → ✅ 通过(快速响应)
# response_time: 200 → ✅ 通过(正常响应)
# response_time: 1000 → ❌ 失败(超时)
场景 3:端口号验证
rule system_port_check {
# 选择端口字段
| take(port)
# 检查是否为系统保留端口(1-1023)
| digit_range(1, 1023)
}
# 示例数据:
# port: 80 → ✅ 通过(HTTP 默认端口)
# port: 443 → ✅ 通过(HTTPS 默认端口)
# port: 8080 → ❌ 失败(用户端口)
场景 4:时间段过滤
rule morning_hours_check {
# 选择小时字段
| take(hour)
# 检查是否在上午工作时间(9-12)
| digit_range(9, 12)
}
# 示例数据:
# hour: 10 → ✅ 通过(上午工作时间)
# hour: 11 → ✅ 通过(上午工作时间)
# hour: 15 → ❌ 失败(下午时间)
# 检查多个时间段,使用分支逻辑:
rule business_hours_check {
| take(hour)
| (digit_range(9, 12) | digit_range(14, 18))
}
场景 5:年龄分段
rule adult_age_check {
# 选择年龄字段
| take(age)
# 成年人年龄段(18-65)
| digit_range(18, 65)
}
# 示例数据:
# age: 30 → ✅ 通过(成年人)
# age: 50 → ✅ 通过(成年人)
# age: 15 → ❌ 失败(未成年)
# age: 70 → ❌ 失败(老年人)
场景 6:优先级过滤
rule high_priority_filter {
# 选择优先级字段
| take(priority)
# 只处理高优先级(1-3)
| digit_range(1, 3)
}
# 示例数据:
# priority: 1 → ✅ 通过(高优先级)
# priority: 3 → ✅ 通过(高优先级)
# priority: 5 → ❌ 失败(中优先级)
场景 7:数据质量检查
rule data_quality_check {
# 检查温度传感器数据
| take(temperature)
# 正常温度范围(-40°C 到 80°C)
| digit_range(-40, 80)
}
# 示例数据:
# temperature: 25 → ✅ 通过(正常室温)
# temperature: -10 → ✅ 通过(冬季温度)
# temperature: 100 → ❌ 失败(异常数据)
# temperature: -100 → ❌ 失败(传感器故障)
使用限制
类型限制
digit_range 只能处理数值类型的字段:
# ✅ 正确 - 字段是数字
status_code: 200 -> digit_range(200, 299)
# ❌ 错误 - 字段是字符串
level: "200" -> digit_range(200, 299) # 会失败
# ❌ 错误 - 字段是 IP 地址
ip: 192.168.1.1 -> digit_range(192, 200) # 会失败
参数要求
-
参数必须是标量值:
# ✅ 正确 - 使用标量值 digit_range(1, 10) # ❌ 错误 - 不支持数组参数(旧版本语法) digit_range([1], [10]) # 已废弃 -
范围下界应小于等于上界:
# ✅ 正确 digit_range(1, 10) # 1 <= x <= 10 digit_range(10, 10) # x == 10(单点) # ⚠️ 逻辑错误(不会匹配任何值) digit_range(10, 1) # 10 <= x <= 1(永远为假)
不支持的特性
-
不支持浮点数精确匹配:
# ⚠️ 注意:内部使用 i64,浮点数会被舍入 digit_range(1, 10) # 只能匹配整数 -
不支持无限范围:
# ❌ 不支持 digit_range(0, infinity) # 没有无限值 -
不支持多范围数组:
# ❌ 不支持(旧版本语法已废弃) digit_range([1, 100], [10, 200]) # 请使用分支逻辑替代
完整示例
示例 1:日志严重性过滤
rule log_error_filter {
# 选择严重性级别字段
| take(severity)
# 过滤 ERROR 级别(1-2)
| digit_range(1, 2)
# 后续处理...
}
# 日志级别定义:
# 1 = CRITICAL
# 2 = ERROR
# 3 = WARNING
# 4 = WARN
# 5 = INFO
# 6 = DEBUG
示例 2:性能监控组合
rule performance_monitor {
# 检查响应时间
| take(response_ms)
| digit_range(0, 1000) # 0-1000ms 认为正常
# 检查状态码
| take(status)
| digit_range(200, 299) # 2xx
# 两个条件都满足才通过
}
示例 3:时间窗口分析
rule weekday_check {
# 工作日检查(1=周一, 7=周日)
| take(day_of_week)
| digit_range(1, 5) # 周一到周五
# 只分析工作日数据
}
性能说明
- 时间复杂度:O(1) - 单次比较
- 空间复杂度:O(1) - 原地检查
- 性能特点:
- 纳秒级执行时间
- 简单的整数比较操作
- 性能极佳,适合高频调用
错误处理
常见错误
-
字段不存在
错误: <pipe> | not in range 原因: 当前没有活动字段 解决: 使用 take() 先选择字段 -
字段类型不匹配
错误: <pipe> | not in range 原因: 字段不是数字类型(Digit) 解决: 确保字段是数值类型 -
数值不在任何范围内
错误: <pipe> | not in range 原因: 字段值不满足任何一个范围条件 解决: 检查范围设置是否正确
与其他函数配合使用
与字段选择器配合
# 先选择字段,再检查范围
| take(status_code)
| digit_range(200, 299)
与条件检查配合
# 先检查字段存在,再检查范围
| has()
| digit_range(0, 100)
与转换函数配合
# 组合使用进行复杂验证
| take(response_time)
| digit_range(0, 1000) # 响应时间正常
| take(status_code)
| digit_range(200, 299) # 状态码正常
与分支逻辑配合
# 使用 alt 实现"或"逻辑 - 检查多个不连续范围
(
# 分支 1:检查是否为成功状态码
| take(status)
| digit_range(200, 299)
)
|
(
# 分支 2:检查是否为重定向状态码
| take(status)
| digit_range(300, 399)
)
最佳实践
1. 范围设计原则
# ✅ 推荐:语义清晰的范围
digit_range(200, 299) # HTTP 2xx 状态码
# ⚠️ 避免:使用旧的数组语法
# digit_range([200], [299]) # 已废弃
2. 简洁明了的单范围
# ✅ 推荐:简单直接的单范围
digit_range(0, 100)
# ✅ 推荐:多个范围使用分支逻辑
(digit_range(0, 50) | digit_range(100, 150))
3. 范围的可读性
# ✅ 推荐:添加注释说明范围含义
| digit_range(200, 299) # HTTP 成功状态码
# ✅ 推荐:使用有意义的范围
| digit_range(18, 65) # 工作年龄段
4. 边界值测试
# 测试边界值是否符合预期
digit_range(100, 200)
# 测试:100 ✅, 200 ✅, 99 ❌, 201 ❌
5. 使用分支处理不连续范围
# ✅ 推荐:清晰的分支逻辑
(
digit_range(1, 10) # 第一个范围
|
digit_range(50, 100) # 第二个范围
)
# ❌ 避免:使用已废弃的数组语法
# digit_range([1, 50], [10, 100])
调试技巧
1. 测试单个范围
# 从简单的单个范围开始
| digit_range(0, 100)
# 如需多个范围,使用分支逻辑
| (digit_range(0, 100) | digit_range(200, 300))
2. 验证字段类型
# 使用 digit_has() 确认字段是数字类型
| take(my_field)
| digit_has(0) # 如果失败,说明不是数字字段
3. 检查边界值
# 准备测试数据
echo "value: 99" | wp-motor test.wpl # 测试下界-1
echo "value: 100" | wp-motor test.wpl # 测试下界
echo "value: 200" | wp-motor test.wpl # 测试上界
echo "value: 201" | wp-motor test.wpl # 测试上界+1
常见问题 (FAQ)
Q1: 如何检查单个特定值?
# 将下界和上界设为相同值
digit_range(200, 200) # 只匹配 200
Q2: 范围可以倒序吗?
技术上可以,但逻辑上没有意义:
digit_range(100, 50) # begin > end,永远不匹配
Q3: 如何实现“不在范围内“的逻辑?
WPL 中管道失败会中断,可以使用分支逻辑:
# 使用否定逻辑(复杂)
# 建议:使用其他字段函数或在应用层处理
Q4: 支持浮点数吗?
内部使用 i64,浮点数会被转换:
# 字段值 3.14 会被视为 3
digit_range(3, 4) # 可能匹配 3.14(取决于解析方式)
Q5: 如何检查多个不连续的范围?
使用分支逻辑(alt 操作符):
# 检查 [1,10] 或 [100,200] 范围
(digit_range(1, 10) | digit_range(100, 200))
# 匹配:[1,10] 或 [100,200] 内的任何值
Q6: 性能够用吗?
非常快!范围检查是简单的数值比较:
- O(1) 时间复杂度
- 纳秒级执行时间
- 适合高频调用场景
Q7: 旧的数组语法还能用吗?
不推荐使用,已废弃:
# ❌ 旧语法(已废弃)
digit_range([200], [299])
# ✅ 新语法(推荐)
digit_range(200, 299)
与 digit_in 的对比
| 特性 | digit_range | digit_in |
|---|---|---|
| 用途 | 单个范围检查 | 集合成员检查 |
| 参数 | 两个标量(begin, end) | 一个数组(值列表) |
| 适用场景 | 连续范围 | 离散值 |
| 示例 | digit_range(0, 100) | digit_in([200, 404, 500]) |
| 复杂度 | O(1) | O(n) |
# digit_range - 适合连续范围
digit_range(200, 299) # 200, 201, ..., 299
# digit_in - 适合离散值
digit_in([200, 404, 500]) # 只匹配这三个值
# 多个不连续范围 - 使用分支逻辑
(digit_range(200, 299) | digit_range(300, 399))
更多资源
- 开发指南:
docs/guide/wpl_field_func_development_guide.md - 源代码:
src/ast/processor/function.rs - 测试用例:
src/eval/builtins/pipe_fun.rs
版本历史
- 1.13.1 (2026-02-02)
- 重构为双参数形式:
digit_range(begin, end) - 废弃旧的数组语法:
digit_range([begins], [ends]) - 简化为单范围检查,性能优化至 O(1)
- 支持负数范围
- 添加完整的测试覆盖
- 重构为双参数形式:
提示: digit_range 现在是一个简单高效的单范围检查函数,适合处理连续的数值范围验证场景,如状态码、性能指标、时间段等。对于多个不连续范围,请使用分支逻辑(alt 操作符)。对于离散值检查,请使用 digit_in 函数。
WPL 字段引用使用指南
概述
在 WPL 中,使用 @ 符号来引用集合中的字段。支持两种字段名格式:
- 普通标识符:
@field_name - 单引号字符串:
@'@special-field'(用于包含特殊字符的字段名)
快速开始
基本语法
# 引用普通字段
@field_name
# 引用带特殊字符的字段
@'special-field-name'
# 指定字段类型和别名
datatype@field_name: alias_name
简单示例
# JSON 解析 - 提取字段
rule parse_json {
json(
@src_ip: source_ip,
@dst_ip: dest_ip,
@message: msg
)
}
# 使用单引号处理特殊字段名
rule parse_json_special {
json(
@'@client-ip': client,
@'event.type': event,
@'log/level': level
)
}
普通字段引用
支持的字符
普通字段名(不带引号)支持以下字符:
- 字母和数字(a-z, A-Z, 0-9)
- 下划线(
_) - 斜杠(
/) - 连字符(
-) - 点号(
.) - 方括号(
[,])- 用于数组索引 - 星号(
*)- 用于通配符
示例
# 简单字段名
@user_id
@username
@ip_address
# 路径式字段名
@process/name
@parent/process/pid
@network/protocol
# 数组索引
@items[0]
@data[5]/value
@process[0]/path
# 通配符
@items[*]
@logs/*/message
单引号字段引用
何时使用
当字段名包含以下特殊字符时,必须使用单引号:
@符号- 空格
- 逗号(
,) - 等号(
=) - 括号(
(,)) - 尖括号(
<,>) - 井号(
#) - 其他非标准字符
基本语法
@'field name with spaces'
@'@field-with-at-sign'
@'field,with,commas'
转义字符
双引号字符串支持以下转义序列:
| 转义序列 | 含义 | 示例 |
|---|---|---|
\" | 双引号 | @"field\"name" |
\\ | 反斜杠 | @"path\\to\\file" |
\n | 换行符 | @"multi\nline" |
\t | 制表符 | @"tab\tseparated" |
\r | 回车符 | @"carriage\rreturn" |
\xHH | 十六进制字节 | @"hex\x41value" |
单引号字符串是原始字符串(raw string):
- 只支持
\'转义单引号本身 - 其他所有反斜杠
\都按字面意思处理 \n、\t、\\等不会被转义
示例
# 双引号 - 支持完整转义
@"field\"name" # 结果: field"name
@"path\\file" # 结果: path\file
@"line\nbreak" # 结果: line换行break
# 单引号 - 原始字符串,只转义 \'
@'field\'s name' # 结果: field's name
@'path\to\file' # 结果: path\to\file (字面反斜杠)
@'raw\nstring' # 结果: raw\nstring (字面 \n)
@'C:\Users\test' # 结果: C:\Users\test (Windows 路径)
推荐使用场景:
- 单引号:Windows 路径、Unix 路径、正则表达式、包含反斜杠的字符串
- 双引号:需要换行符、制表符等转义字符的场景
实际应用场景
场景 1:解析 Elasticsearch 日志
# Elasticsearch 字段通常使用 @ 前缀
rule elasticsearch_log {
json(
@'@timestamp': timestamp,
@'@version': version,
@message: msg,
@'log.level': level,
@'event.action': action
)
}
场景 2:解析带空格的字段名
# CSV 或其他格式可能包含带空格的列名
rule csv_with_spaces {
(
@'First Name': first_name,
@'Last Name': last_name,
@'Email Address': email,
@'Phone Number': phone
)
}
场景 3:解析嵌套 JSON 字段
# JSON 字段路径包含特殊字符
rule nested_json {
json(
@'user.id': uid,
@'user.profile.name': username,
@'event#metadata': metadata,
@'geo.location.lat': latitude,
@'geo.location.lon': longitude
)
}
场景 4:处理 Prometheus 指标
# Prometheus 指标名称包含多种特殊字符
rule prometheus_metrics {
(
@'http_requests_total{method="GET"}': get_requests,
@'http_requests_total{method="POST"}': post_requests,
@'process_cpu_seconds_total': cpu_usage
)
}
场景 5:Windows 事件日志
# Windows 路径包含反斜杠
rule windows_events {
json(
@'Event.System.Provider': provider,
@'Event.EventData.CommandLine': cmdline,
@'Process\\Path': process_path
)
}
场景 6:混合使用普通和特殊字段名
rule mixed_fields {
json(
# 普通字段名
@username: user,
@ip_address: ip,
@timestamp: time,
# 特殊字段名
@'@client-ip': client,
@'user.email': email,
@'event#type': event_type,
@'log level': level
)
}
场景 7:KV 解析带特殊字段
# 键值对中包含特殊字符的键
rule kv_special_keys {
kv(
@'@timestamp': time,
@'event-type': type,
@'user/name': username,
@'session#id': session
)
}
take() 函数引号支持
take() 函数用于选择当前字段,同样支持单引号和双引号来处理包含特殊字符的字段名。
基本语法
# 普通字段名
| take(field_name)
# 双引号字段名
| take("@special-field")
# 单引号字段名
| take('@special-field')
使用场景
1. 选择带特殊字符的字段
rule select_special_fields {
# 双引号
| take("@timestamp")
| take("field with spaces")
| take("field,with,commas")
# 单引号
| take('@client-ip')
| take('event.type')
| take('log/level')
}
2. 转义字符支持
rule escaped_fields {
# 双引号内转义
| take("field\"name")
| take("path\\with\\backslash")
# 单引号内转义
| take('field\'s name')
| take('path\\to\\file')
}
3. 实际应用
# Elasticsearch 日志处理
rule elasticsearch {
| take("@timestamp")
| take("@version")
| take("log.level")
}
# CSV 数据处理
rule csv_processing {
| take('First Name')
| take('Last Name')
| take('Email Address')
}
# 混合使用
rule mixed_usage {
| take(user_id) # 普通字段
| take("@timestamp") # 双引号
| take('event.type') # 单引号
}
支持的转义字符
| 转义序列 | 含义 | 双引号 | 单引号 |
|---|---|---|---|
\" | 双引号 | ✅ | ❌ (字面 \") |
\' | 单引号 | ❌ (字面 \') | ✅ |
\\ | 反斜杠 | ✅ | ❌ (字面 \\) |
\n | 换行符 | ✅ | ❌ (字面 \n) |
\t | 制表符 | ✅ | ❌ (字面 \t) |
说明:
- 双引号:支持完整转义,类似 C/Java/JavaScript 字符串
- 单引号:原始字符串(raw string),只支持
\'转义单引号本身,其他反斜杠都是字面字符
最佳实践
# ✅ 推荐 - 优先使用不带引号
| take(field_name)
# ✅ 推荐 - 特殊字符使用引号
| take("@timestamp")
| take('@client-ip')
# ✅ 推荐 - 根据内容选择引号类型
| take("field with spaces") # 双引号,适合简单字符串
| take('it\'s a field') # 单引号,只需转义 \'
| take('C:\Windows\System32') # 单引号,Windows 路径
| take("line\nbreak") # 双引号,需要换行符转义
字段类型指定
可以为字段指定数据类型:
# 不带引号的字段
ip@source_ip: src
digit@port: port_num
time@timestamp: time
# 带引号的字段
ip@'@client-ip': client
digit@'user.age': age
chars@'event message': msg
支持的类型包括:
ip- IP 地址digit- 整数float- 浮点数time- 时间戳chars- 字符串json- JSON 对象kv- 键值对- 等等
字段别名
使用 : 为字段指定别名:
# 普通字段别名
@source_ip: src
@destination_ip: dst
@user_id: uid
# 特殊字段别名
@'@timestamp': time
@'event.type': event
@'log/level': level
# 带类型和别名
ip@'@client-ip': client_ip
digit@'user.age': age
chars@'user name': username
使用限制
1. 不支持双引号
只支持单引号,不支持双引号:
# ✅ 正确
@'@field-name'
# ❌ 错误
@"@field-name"
2. 转义字符限制
转义字符只在单引号字符串内有效:
# ✅ 正确 - 单引号内转义
@'user\'s name'
# ❌ 错误 - 普通字段名不支持转义
@user\'s_name
3. 空字段名
字段名不能为空:
# ❌ 错误
@''
# ✅ 正确
@'_' # 使用下划线作为字段名
4. 嵌套引用
单引号不支持嵌套:
# ❌ 错误
@'field\'nested\''
# ✅ 正确 - 使用转义
@'field\'nested'
性能说明
解析性能
-
普通字段名:零拷贝,性能最优
@field_name # 直接引用,无需分配 -
单引号字段名:需要解码转义字符
@'@field' # 无转义字符,性能接近普通字段 @'field\'s' # 有转义字符,需要额外处理
性能对比
| 字段名类型 | 解析时间 | 内存分配 | 推荐场景 |
|---|---|---|---|
| 普通字段名 | ~10ns | 零拷贝 | 优先使用 |
| 单引号(无转义) | ~15ns | 一次分配 | 特殊字符 |
| 单引号(有转义) | ~30ns | 一次分配 | 必要时使用 |
优化建议
-
优先使用普通字段名
# ✅ 推荐 @user_id @timestamp # ⚠️ 仅在必要时使用 @'@timestamp' -
避免不必要的转义
# ✅ 推荐 @'simple-field' # ⚠️ 避免 @'field\twith\tescape' # 仅在确实需要制表符时使用 -
批量操作时考虑性能
# 大量字段解析时,优先使用普通字段名 json( @user_id, # 快 @username, # 快 @'@metadata' # 稍慢 )
错误处理
常见错误
1. 字段名包含特殊字符但未使用引号
错误: 解析失败,意外的字符 '@'
原因: 字段名包含 @ 但未使用单引号
解决: @'@field-name'
2. 单引号未闭合
错误: 字符串未闭合
原因: 缺少结束的单引号
解决: 确保引号成对出现 @'field-name'
3. 转义字符错误
错误: 无效的转义序列
原因: 使用了不支持的转义字符
解决: 只使用支持的转义序列 \', \\, \n, \t, \r, \xHH
4. 空字段名
错误: 字段名不能为空
原因: @'' 或 @ 后无内容
解决: 提供有效的字段名
最佳实践
1. 命名规范
# ✅ 推荐 - 使用下划线分隔
@user_id
@client_ip
@event_timestamp
# ⚠️ 避免 - 除非必要
@'user id'
@'client-ip'
2. 保持一致性
# ✅ 推荐 - 统一风格
rule consistent_naming {
json(
@user_id,
@user_name,
@user_email
)
}
# ⚠️ 避免 - 混合风格
rule inconsistent_naming {
json(
@user_id,
@'user name',
@userEmail
)
}
3. 文档化特殊字段
# ✅ 推荐 - 添加注释说明
rule documented {
json(
# Elasticsearch 的 @timestamp 字段
@'@timestamp': time,
# 日志级别(包含空格)
@'log level': level
)
}
4. 使用类型前缀
# ✅ 推荐 - 明确指定类型
time@'@timestamp': time
ip@'@client-ip': client
chars@'event message': msg
5. 别名使用规范
# ✅ 推荐 - 使用简短的别名
@'very.long.nested.field.name': short_name
@'@timestamp': time
@'event.action': action
# ⚠️ 避免 - 别名过长
@'@timestamp': timestamp_value_from_elasticsearch
调试技巧
1. 逐步验证字段引用
# 第一步:验证单个字段
rule test_single {
json(@'@timestamp')
}
# 第二步:添加更多字段
rule test_multiple {
json(
@'@timestamp',
@'event.type'
)
}
# 第三步:添加类型和别名
rule test_complete {
time@'@timestamp': time,
chars@'event.type': event
}
2. 检查字段名拼写
# 使用 JSON 工具查看原始字段名
echo '{"@timestamp": "2024-01-01"}' | jq 'keys'
# 输出: ["@timestamp"]
# WPL 中使用: @'@timestamp'
3. 测试转义字符
# 逐个测试转义字符
@'test\'quote' # 单引号
@'test\\backslash' # 反斜杠
@'test\nnewline' # 换行符
4. 使用调试模式
# 使用 WP-Motor 调试模式查看解析结果
wp-motor --debug rule.wpl < test.log
常见问题 (FAQ)
Q1: 何时必须使用单引号?
当字段名包含以下字符时必须使用单引号:
@、空格、逗号、等号、括号、尖括号、井号等特殊字符
Q2: 单引号和双引号有什么区别?
WPL 只支持单引号 ' 用于字段名引用。双引号 " 用于其他语法元素(如作用域标记)。
Q3: 如何在字段名中包含单引号?
使用反斜杠转义:@'user\'s name'
Q4: 性能影响有多大?
对于大多数应用场景,性能影响可忽略不计(纳秒级差异)。只在极高性能要求时才需要考虑。
Q5: 可以使用变量作为字段名吗?
不可以,字段名必须是静态的字面量。
Q6: 如何处理动态字段名?
使用通配符或字段组合:
@items[*]/name # 匹配所有数组元素的 name 字段
@'prefix*' # 匹配以 prefix 开头的字段(如果支持)
Q7: 支持 Unicode 字符吗?
支持,字段名可以包含任意 Unicode 字符:
@'用户名称'
@'événement'
@'フィールド'
更多资源
- 分隔符使用指南:
docs/usage/wpl/separator.md - chars_replace 使用指南:
docs/usage/wpl/chars_replace.md - WPL Field Function 开发指南:
docs/guide/wpl_field_func_development_guide.md - 源代码:
src/parser/utils.rs(take_ref_path_or_quoted)src/parser/wpl_field.rs(wpl_id_field)
版本历史
- 1.11.0 (2026-01-29)
- 新增单引号字段名支持(
@'@special-field') - 新增
take()函数单引号和双引号支持 - 支持
take("@field")和take('@field')语法 - 添加转义字符支持(
\",\',\\,\n,\t) - 添加完整的测试覆盖
- 新增单引号字段名支持(
提示: 优先使用普通字段名以获得最佳性能,仅在字段名包含特殊字符时使用引号。
WPL Field Functions 函数索引
本文档列出了 WP-Motor WPL 语言中所有可用的 field function(字段函数)。
字段选择函数 (Field Selectors)
| 函数 | 语法 | 说明 | 文档 |
|---|---|---|---|
take | take(field_name) | 选择指定名称的字段作为活动字段 | - |
last | last() | 选择最后一个字段作为活动字段 | - |
字符串匹配函数 (String Matching)
| 函数 | 语法 | 说明 | 文档 |
|---|---|---|---|
chars_has | chars_has(value) | 检查字符串字段是否等于指定值 | - |
chars_not_has | chars_not_has(value) | 检查字符串字段是否不等于指定值 | - |
chars_in | chars_in([value1, value2, ...]) | 检查字符串字段是否在值列表中 | - |
f_chars_has | f_chars_has(target, value) | 检查指定字段是否等于指定值 | - |
f_chars_not_has | f_chars_not_has(target, value) | 检查指定字段是否不等于指定值 | - |
f_chars_in | f_chars_in(target, [values]) | 检查指定字段是否在值列表中 | - |
starts_with | starts_with('prefix') | 检查字符串是否以指定前缀开始,否则转为 ignore | 📖 详细文档 |
regex_match | regex_match('pattern') | 使用正则表达式匹配字符串字段 | 📖 详细文档 |
数值匹配函数 (Numeric Matching)
| 函数 | 语法 | 说明 | 文档 |
|---|---|---|---|
digit_has | digit_has(value) | 检查数值字段是否等于指定值 | - |
digit_in | digit_in([value1, value2, ...]) | 检查数值字段是否在值列表中 | - |
digit_range | digit_range(begin, end) | 检查数值是否在指定范围内(闭区间) | 📖 详细文档 |
f_digit_has | f_digit_has(target, value) | 检查指定字段是否等于指定数值 | - |
f_digit_in | f_digit_in(target, [values]) | 检查指定字段是否在数值列表中 | - |
IP 地址匹配函数 (IP Matching)
| 函数 | 语法 | 说明 | 文档 |
|---|---|---|---|
ip_in | ip_in([ip1, ip2, ...]) | 检查 IP 地址是否在列表中 | - |
f_ip_in | f_ip_in(target, [ips]) | 检查指定字段的 IP 地址是否在列表中 | - |
字段存在性检查 (Field Existence)
| 函数 | 语法 | 说明 | 文档 |
|---|---|---|---|
has | has() | 检查当前活动字段是否存在 | - |
f_has | f_has(target) | 检查指定字段是否存在 | - |
包装函数 (Wrapper Functions)
| 函数 | 语法 | 说明 | 文档 |
|---|---|---|---|
not | not(inner_function) | 反转(取反)内部管道函数的成功/失败结果 | 📖 详细文档 |
字符串转换函数 (String Transformation)
| 函数 | 语法 | 说明 | 文档 |
|---|---|---|---|
json_unescape | json_unescape() | 解码 JSON 转义字符(\n, \t, \", \\ 等) | - |
base64_decode | base64_decode() | Base64 解码字符串字段 | - |
chars_replace | chars_replace(target, replacement) | 替换字符串中的子串 | 📖 详细文档 |
函数分类总览
按功能分类
1. 条件检查函数
用于检查字段是否满足特定条件,不修改字段值。
- 字符串检查:
chars_has,chars_not_has,chars_in,starts_with,regex_match - 数值检查:
digit_has,digit_in,digit_range - IP 检查:
ip_in - 存在性检查:
has
2. 转换函数
修改字段值的函数。
- 解码:
json_unescape,base64_decode - 替换:
chars_replace
3. 字段选择函数
用于选择特定字段作为活动字段。
take: 按名称选择last: 选择最后一个字段
4. 包装函数
包装其他函数以改变其行为。
not: 反转内部函数的成功/失败结果
按目标字段支持分类
操作当前活动字段
chars_has,chars_not_has,chars_in,starts_withdigit_has,digit_in,digit_rangeip_inhasjson_unescape,base64_decode,chars_replaceregex_match
可指定目标字段 (带 f_ 前缀)
f_chars_has,f_chars_not_has,f_chars_inf_digit_has,f_digit_inf_ip_inf_has
使用示例
基本流水线
rule example_pipeline {
# 1. 选择字段
| take(message)
# 2. 检查条件
| chars_has(error)
# 3. 转换处理
| chars_replace(error, ERROR)
}
复杂条件组合
rule complex_filter {
# 检查状态码范围
| take(status)
| digit_range(200, 299) # 2xx 成功状态码
# 检查消息内容
| take(message)
| regex_match('(?i)(success|ok|complete)')
}
分支逻辑
rule branching_logic {
# 分支 1:错误日志
(
| take(level)
| chars_in([ERROR, FATAL])
)
|
# 分支 2:警告日志
(
| take(level)
| chars_in([WARN, WARNING])
)
}
性能参考
| 函数类型 | 典型性能 | 说明 |
|---|---|---|
| 字段选择 | < 100ns | 极快,基于索引查找 |
| 字符串匹配 | < 1μs | 简单字符串比较 |
| 数值匹配 | < 100ns | 简单数值比较 |
| 范围检查 | < 500ns | 线性扫描多个范围 |
| 正则匹配 | 1-100μs | 取决于模式复杂度 |
| Base64 解码 | 1-10μs | 取决于字符串长度 |
| 字符串替换 | 1-10μs | 取决于字符串长度 |
最佳实践
1. 合理使用函数类型
# ✅ 推荐:简单匹配使用 chars_has
| chars_has(error)
# ⚠️ 过度使用:简单匹配不需要正则
| regex_match('^error$') # 性能较差
2. 优先使用专用函数
# ✅ 推荐:数值范围使用 digit_range
| digit_range(200, 299)
# ⚠️ 不推荐:用正则匹配数字
| regex_match('^2\d{2}$') # 性能较差
3. 先选择字段再处理
# ✅ 正确
| take(message)
| chars_replace(old, new)
# ❌ 错误:没有活动字段
| chars_replace(old, new) # 会失败
4. 组合使用条件函数
# ✅ 推荐:先用简单条件过滤,再用复杂条件
| chars_has(error) # 快速过滤
| regex_match('error:\d+') # 精确匹配
函数对比
chars_has vs regex_match
| 特性 | chars_has | regex_match |
|---|---|---|
| 用途 | 精确字符串匹配 | 模式匹配 |
| 性能 | 极快 | 相对较慢 |
| 灵活性 | 低 | 高 |
| 适用场景 | 已知固定值 | 复杂模式 |
# 简单匹配:使用 chars_has
| chars_has(ERROR)
# 复杂匹配:使用 regex_match
| regex_match('(?i)error:\s*\d+')
digit_in vs digit_range
| 特性 | digit_in | digit_range |
|---|---|---|
| 用途 | 离散值检查 | 范围检查 |
| 参数 | 值列表 | 范围列表 |
| 适用场景 | 特定值(如状态码) | 连续范围 |
# 离散值:使用 digit_in
| digit_in([200, 404, 500])
# 连续范围:使用 digit_range
| digit_range(200, 299)
目标字段函数 vs 活动字段函数
| 特性 | 活动字段函数 | 目标字段函数 |
|---|---|---|
| 前缀 | 无 | f_ |
| 字段选择 | 需要先 take | 自动选择 |
| 性能 | 稍快 | 稍慢(需查找) |
| 便利性 | 需要额外步骤 | 一步到位 |
# 活动字段函数
| take(status)
| digit_has(200)
# 目标字段函数(更简洁)
| f_digit_has(status, 200)
相关文档
- 开发指南: WPL Field Function 开发指南
- 字段引用: Field Reference
- 分隔符: Separator Guide
版本历史
-
1.15.1 (2026-02-07)
- 新增
not()包装函数 - 修复
f_chars_not_has和chars_not_has类型检查bug
- 新增
-
1.13.4 (2026-02-03)
- 新增
starts_with函数 - 完善文档体系
- 新增
-
1.13.1 (2026-02-02)
- 新增
digit_range函数 - 新增
regex_match函数 - 完善文档体系
- 新增
-
1.11.0 (2026-01-29)
- 新增
chars_replace函数 - 完善 Base64 和 JSON 转义支持
- 新增
提示: 选择合适的函数类型可以显著提升性能。优先使用简单的专用函数,仅在需要复杂模式匹配时使用正则表达式。
WPL Group 逻辑
WPL 的 seq、opt、alt、some_of、not 都是分组语义,不是字段类型。
Group 类型
seq - 顺序匹配
(digit:id, chars:name, ip:addr)
seq(digit:id, chars:name, ip:addr)
要求所有字段按顺序成功匹配。
opt - 可选分组
opt(chars:tag")
整个分组可以不存在,失败时不影响规则继续匹配。
alt - 择一分组
alt(ip:addr, chars:addr)
依次尝试候选项,命中第一个成功的分组。
some_of - 重复候选分组
some_of(kvarr, ip, digit)
持续尝试候选项,直到没有任何候选还能继续匹配。
not - 负向断言分组
not(peek_symbol(ERROR):check)
内部字段不匹配时,not(...) 才成功。
关键规则
- 这些写法都作用在分组层。
- 如果某段内容可选,先把它拆成独立分组,再用
opt(...)包起来。 - 当前语法不支持分组嵌套,例如
opt(alt(...))。
正确示例:
(ip:client_ip, digit:status),
opt(chars:tag")
错误示例:
(ip:client_ip, opt(chars:tag"))
opt(alt(ip:addr, chars:domain))
输入消费
not(symbol(...))是否消费输入,取决于内部 parser 的行为。not(peek_symbol(...))更适合做不消费输入的前瞻判断。
not() - 结果反转包装函数
概述
not() 是一个包装函数,用于反转(取反)内部管道函数的成功/失败结果。当内部函数匹配成功时,not() 返回失败;当内部函数匹配失败时,not() 返回成功。
语法:
| not(inner_function)
参数:
inner_function: 任何字段管道函数(如f_chars_has,has,chars_has等)
返回:
- 内部函数成功 →
not()失败 - 内部函数失败 →
not()成功
重要特性:
- ✅ 保留字段值:
not()只反转结果,不修改字段内容 - ✅ 支持嵌套:可以使用
not(not(...))实现双重否定 - ✅ 自动字段选择:继承内部函数的字段选择行为
- ✅ 零性能开销:仅在执行时克隆单个字段进行测试
基本用法
1. 字符串不等于检查
# 检查 dev_type 不等于 "NDS"
(chars:dev_type) | not(chars_has(NDS))
# 等价于
(chars:dev_type) | chars_not_has(NDS)
2. 字段不存在检查
# 检查字段不存在
| not(f_has(optional_field))
3. 使用目标字段函数
# 检查指定字段不等于某值
| not(f_chars_has(status, ERROR))
# 检查指定字段不在列表中
| not(f_chars_in(level, [DEBUG, TRACE]))
高级用法
双重否定
双重否定等同于肯定断言:
# not(not(...)) 等同于直接使用内部函数
| not(not(f_chars_has(status, OK)))
# 等价于
| f_chars_has(status, OK)
组合复杂条件
# 字段存在但值不等于目标值
| f_has(dev_type) # 确保字段存在
| not(chars_has(NDS)) # 确保值不等于 NDS
与数值函数结合
# 检查状态码不在成功范围内
| not(f_digit_range(status, 200, 299))
# 检查端口号不在常用端口列表中
| not(f_digit_in(port, [80, 443, 8080]))
与正则表达式结合
# 检查消息不匹配错误模式
| not(regex_match('(?i)error|fail|exception'))
与现有函数对比
not(chars_has) vs chars_not_has
虽然功能相似,但语义略有不同:
| 函数 | 字段不存在 | 非Chars类型 | 值不等于 | 值等于 |
|---|---|---|---|---|
not(chars_has(X)) | ✅ 成功 | ✅ 成功 | ✅ 成功 | ❌ 失败 |
chars_not_has(X) | ✅ 成功 | ✅ 成功 | ✅ 成功 | ❌ 失败 |
推荐使用:
- 简单场景:使用
chars_not_has(更直观) - 复杂场景:使用
not()包装其他函数(更灵活)
# ✅ 推荐:简单否定
| chars_not_has(ERROR)
# ✅ 推荐:复杂条件否定
| not(f_digit_range(code, 400, 499))
实际应用场景
场景 1:过滤非错误日志
rule filter_non_errors {
# 解析日志级别
(symbol(ERROR), symbol(WARN), symbol(INFO), symbol(DEBUG):level)
# 只保留非 ERROR 和 WARN 级别的日志
| take(level)
| not(chars_in([ERROR, WARN]))
}
输入:
INFO: Application started
ERROR: Connection failed
DEBUG: Processing request
输出:
INFO: Application started # ✅ 通过(非错误)
# ❌ 过滤掉 ERROR
DEBUG: Processing request # ✅ 通过(非错误)
场景 2:排除特定设备类型
rule exclude_device_types {
# 解析设备类型字段
(chars:dev_type)
# 排除 NDS 和 IDS 设备
| not(f_chars_in(dev_type, [NDS, IDS]))
}
输入:
dev_type=FIREWALL
dev_type=NDS
dev_type=ROUTER
dev_type=IDS
输出:
dev_type=FIREWALL # ✅ 通过
# ❌ 过滤掉 NDS
dev_type=ROUTER # ✅ 通过
# ❌ 过滤掉 IDS
场景 3:非标准端口检查
rule non_standard_ports {
# 解析端口号
(digit:port)
# 排除标准端口 80 和 443
| not(f_digit_in(port, [80, 443]))
# 同时必须在有效范围内
| digit_range(1, 65535)
}
输入:
80
8080
443
9000
输出:
# ❌ 过滤掉 80(标准端口)
8080 # ✅ 通过
# ❌ 过滤掉 443(标准端口)
9000 # ✅ 通过
场景 4:排除测试环境日志
rule exclude_test_env {
# 解析环境标识
(chars:env)
# 排除测试和开发环境
| not(f_chars_in(env, [test, dev, staging]))
}
性能考虑
性能特征
| 操作 | 性能影响 |
|---|---|
单层 not() | < 200ns(克隆单个字段) |
双层 not(not()) | < 400ns(两次克隆) |
| 字段选择继承 | 0ns(无额外开销) |
性能优化建议
# ✅ 推荐:使用专用函数(更快)
| chars_not_has(ERROR)
# ⚠️ 可接受:使用 not() 包装(稍慢)
| not(chars_has(ERROR))
# ❌ 不推荐:过度嵌套
| not(not(not(chars_has(ERROR)))) # 无意义的多重否定
常见陷阱
陷阱 1:混淆管道级 not() 和组级 not()
# ❌ 错误:这是组级 not(),不是管道级
not(symbol(ERROR):test)
# ✅ 正确:管道级 not() 用于管道函数
(chars:status) | not(chars_has(ERROR))
陷阱 2:期望 not() 修改字段值
# ❌ 误解:以为 not() 会修改字段
(chars:status) | not(chars_has(ERROR))
# 字段值仍然是原始值,not() 只反转匹配结果
# ✅ 正确:如需修改值,使用转换函数
(chars:status) | chars_replace(ERROR, OK)
陷阱 3:not() 包装非字段函数
# ❌ 错误:take 不是字段管道函数
| not(take(field_name))
# 会报错:not() can only wrap field pipe functions
# ✅ 正确:包装字段管道函数
| not(f_has(field_name))
与组级 not() 的区别
WPL 中有两种 not():
| 特性 | 管道级 not() | 组级 not() |
|---|---|---|
| 用途 | 反转管道函数结果 | 反转字段组匹配 |
| 语法位置 | 管道中 | not(...) | 字段组定义 not(...) |
| 参数类型 | 管道函数 | 字段定义 |
| 返回结果 | 成功/失败 | ignore 字段 |
示例对比:
# 管道级 not():反转函数结果
(chars:status) | not(chars_has(ERROR))
# 组级 not():字段存在时失败
not(symbol(ERROR):error_marker)
最佳实践
1. 优先使用专用函数
# ✅ 推荐:使用 chars_not_has
| chars_not_has(ERROR)
# ⚠️ 次选:使用 not() 包装
| not(chars_has(ERROR))
2. not() 用于无专用函数的场景
# ✅ 推荐:没有 digit_not_in,使用 not()
| not(f_digit_in(port, [80, 443]))
# ✅ 推荐:没有 digit_not_range,使用 not()
| not(digit_range(200, 299))
3. 组合多个条件
# ✅ 推荐:清晰的逻辑组合
| f_has(status) # 字段必须存在
| not(chars_in([ERROR, FATAL])) # 且不是错误状态
4. 避免过度嵌套
# ❌ 不推荐:双重否定令人困惑
| not(not(chars_has(OK)))
# ✅ 推荐:直接使用肯定形式
| chars_has(OK)
故障排查
问题:not() 没有反转结果
可能原因:混淆了管道级和组级 not()
# 检查是否在正确位置使用
(chars:status) | not(chars_has(ERROR)) # ✅ 正确
not(chars:status) # ❌ 错误(这是组级)
问题:报错 “can only wrap field pipe functions”
解决方案:确保包装的是字段管道函数
| not(take(field)) # ❌ take 是选择器
| not(f_has(field)) # ✅ f_has 是管道函数
版本历史
- 1.15.1 (2026-02-07)
- 新增
not()管道级包装函数 - 支持反转任何字段管道函数结果
- 支持嵌套和自动字段选择
- 新增
相关文档
提示: not() 是一个强大的工具,但不要过度使用。大多数情况下,使用专用的否定函数(如 chars_not_has)更直观、性能更好。
regex_match 函数使用指南
概述
regex_match 是 WPL (WP Language) 中的正则表达式匹配函数,用于检查日志字段的字符串内容是否匹配指定的正则表达式模式。使用 Rust 的 regex 引擎,支持完整的正则表达式语法。
快速开始
基本语法
regex_match('pattern')
- pattern: 正则表达式模式(推荐使用单引号)
- 匹配成功返回 Ok,失败返回 Err
简单示例
# 匹配纯数字
regex_match('^\d+$')
# 匹配邮箱格式
regex_match('^\w+@\w+\.\w+$')
# 匹配 IP 地址
regex_match('^\d{1,3}\.\d{1,3}\.\d{1,3}\.\d{1,3}$')
# 匹配 HTTP 方法
regex_match('^(GET|POST|PUT|DELETE)$')
重要提示:引号使用
推荐:使用单引号(原始字符串)
# ✅ 推荐:单引号不处理转义,适合正则表达式
regex_match('^\d+$') # \d 保持原样
regex_match('^\w+@\w+\.\w+$') # \w, \. 保持原样
regex_match('^[A-Z]+\d+$') # 完美工作
避免:双引号会导致转义问题
# ❌ 错误:双引号会尝试转义 \d
regex_match("^\d+$") # 解析失败!\d 不是有效的转义序列
# ❌ 错误:\w 也会失败
regex_match("^\w+$") # 解析失败!
原因:WPL 的双引号字符串解析器只支持 \", \\, \n, \t 这几种转义字符,而正则表达式中的 \d, \w, \s 等会导致解析错误。
正则表达式语法
regex_match 使用 Rust regex 引擎,支持以下特性:
1. 基本匹配
# 字面字符
regex_match('hello') # 匹配 "hello"
regex_match('error') # 匹配 "error"
2. 字符类
# 数字
regex_match('\d') # 匹配任意数字 [0-9]
regex_match('\d+') # 匹配一个或多个数字
regex_match('\d{3}') # 匹配恰好3个数字
# 字母和数字
regex_match('\w') # 匹配 [a-zA-Z0-9_]
regex_match('\w+') # 匹配一个或多个单词字符
# 空白字符
regex_match('\s') # 匹配空格、制表符、换行符
regex_match('\s+') # 匹配一个或多个空白字符
# 自定义字符类
regex_match('[a-z]') # 匹配小写字母
regex_match('[A-Z]') # 匹配大写字母
regex_match('[0-9]') # 匹配数字
regex_match('[a-zA-Z0-9]') # 匹配字母或数字
3. 量词
# * - 0次或多次
regex_match('a*') # 匹配 "", "a", "aa", "aaa"...
# + - 1次或多次
regex_match('a+') # 匹配 "a", "aa", "aaa"... (不匹配空串)
# ? - 0次或1次
regex_match('colou?r') # 匹配 "color" 或 "colour"
# {n} - 恰好n次
regex_match('\d{4}') # 匹配4位数字
# {n,m} - n到m次
regex_match('\d{2,4}') # 匹配2到4位数字
# {n,} - 至少n次
regex_match('\d{3,}') # 匹配3位或更多数字
4. 锚点
# ^ - 字符串开始
regex_match('^\d+') # 必须以数字开头
# $ - 字符串结束
regex_match('\d+$') # 必须以数字结尾
# ^...$ - 完全匹配
regex_match('^\d+$') # 整个字符串必须是数字
5. 分组和选择
# (...) - 分组
regex_match('(ab)+') # 匹配 "ab", "abab", "ababab"...
# | - 选择(或)
regex_match('cat|dog') # 匹配 "cat" 或 "dog"
regex_match('^(GET|POST)$') # 匹配 "GET" 或 "POST"
# (?:...) - 非捕获分组
regex_match('(?:ab)+') # 与 (ab)+ 功能相同,但不捕获
6. 特殊字符转义
# 转义元字符
regex_match('\.') # 匹配点号 .
regex_match('\[') # 匹配左方括号 [
regex_match('\(') # 匹配左括号 (
regex_match('\$') # 匹配美元符号 $
regex_match('\*') # 匹配星号 *
7. 标志
# (?i) - 大小写不敏感
regex_match('(?i)error') # 匹配 "error", "ERROR", "Error"
# (?m) - 多行模式
regex_match('(?m)^line') # ^ 匹配每行开始
# (?s) - 单行模式(. 匹配换行符)
regex_match('(?s).*') # . 可以匹配换行符
实际应用场景
场景 1:日志级别匹配
rule log_level_filter {
# 选择日志消息字段
| take(message)
# 匹配包含 ERROR 或 FATAL 的消息(大小写不敏感)
| regex_match('(?i)(error|fatal)')
}
# 示例数据:
# message: "Error occurred" → ✅ 匹配
# message: "FATAL exception" → ✅ 匹配
# message: "Warning message" → ❌ 不匹配
场景 2:邮箱地址验证
rule email_validation {
# 选择邮箱字段
| take(email)
# 验证邮箱格式
| regex_match('^\w+(\.\w+)*@\w+(\.\w+)+$')
}
# 示例数据:
# email: "user@example.com" → ✅ 匹配
# email: "john.doe@company.co.uk" → ✅ 匹配
# email: "invalid-email" → ❌ 不匹配
# email: "@example.com" → ❌ 不匹配
场景 3:IP 地址匹配
rule ip_address_filter {
# 选择 IP 地址字段
| take(client_ip)
# 匹配内网 IP(192.168.x.x)
| regex_match('^192\.168\.\d{1,3}\.\d{1,3}$')
}
# 示例数据:
# client_ip: "192.168.1.1" → ✅ 匹配
# client_ip: "192.168.0.100" → ✅ 匹配
# client_ip: "10.0.0.1" → ❌ 不匹配
# client_ip: "8.8.8.8" → ❌ 不匹配
场景 4:URL 路径过滤
rule api_endpoint_filter {
# 选择请求路径
| take(path)
# 匹配 API 端点(/api/v1/...)
| regex_match('^/api/v\d+/')
}
# 示例数据:
# path: "/api/v1/users" → ✅ 匹配
# path: "/api/v2/products" → ✅ 匹配
# path: "/static/image.png" → ❌ 不匹配
场景 5:时间戳格式验证
rule timestamp_validation {
# 选择时间戳字段
| take(timestamp)
# 匹配 ISO 8601 格式(YYYY-MM-DD HH:MM:SS)
| regex_match('^\d{4}-\d{2}-\d{2} \d{2}:\d{2}:\d{2}$')
}
# 示例数据:
# timestamp: "2024-01-29 15:30:45" → ✅ 匹配
# timestamp: "2024-1-9 5:3:5" → ❌ 不匹配(缺少前导零)
# timestamp: "29/01/2024 15:30" → ❌ 不匹配(格式不同)
场景 6:HTTP 方法验证
rule http_method_check {
# 选择 HTTP 方法字段
| take(method)
# 只接受安全的 HTTP 方法
| regex_match('^(GET|HEAD|OPTIONS)$')
}
# 示例数据:
# method: "GET" → ✅ 匹配
# method: "HEAD" → ✅ 匹配
# method: "POST" → ❌ 不匹配
# method: "DELETE" → ❌ 不匹配
场景 7:版本号匹配
rule version_check {
# 选择版本字段
| take(version)
# 匹配语义化版本号(如 1.2.3)
| regex_match('^\d+\.\d+\.\d+$')
}
# 示例数据:
# version: "1.0.0" → ✅ 匹配
# version: "2.10.5" → ✅ 匹配
# version: "1.0" → ❌ 不匹配(缺少补丁版本)
# version: "v1.2.3" → ❌ 不匹配(有前缀)
场景 8:SQL 注入检测
rule sql_injection_detection {
# 选择用户输入字段
| take(user_input)
# 检测常见的 SQL 注入模式
| regex_match('(?i)(union|select|insert|update|delete|drop|;|--|\|)')
}
# 示例数据:
# user_input: "SELECT * FROM users" → ✅ 匹配(检测到)
# user_input: "'; DROP TABLE --" → ✅ 匹配(检测到)
# user_input: "normal search query" → ❌ 不匹配(安全)
场景 9:文件扩展名过滤
rule image_file_filter {
# 选择文件名字段
| take(filename)
# 只匹配图片文件
| regex_match('\.(?i)(jpg|jpeg|png|gif|bmp|svg)$')
}
# 示例数据:
# filename: "photo.jpg" → ✅ 匹配
# filename: "image.PNG" → ✅ 匹配(大小写不敏感)
# filename: "document.pdf" → ❌ 不匹配
场景 10:MAC 地址验证
rule mac_address_validation {
# 选择 MAC 地址字段
| take(mac)
# 匹配 MAC 地址格式(XX:XX:XX:XX:XX:XX)
| regex_match('^([0-9A-Fa-f]{2}:){5}[0-9A-Fa-f]{2}$')
}
# 示例数据:
# mac: "00:1B:44:11:3A:B7" → ✅ 匹配
# mac: "AA:BB:CC:DD:EE:FF" → ✅ 匹配
# mac: "invalid-mac" → ❌ 不匹配
使用限制
类型限制
regex_match 只能处理字符串类型的字段:
# ✅ 正确 - 字段是字符串
message: "error occurred" -> regex_match('error')
# ❌ 错误 - 字段是数字
status_code: 404 -> regex_match('\d+') # 会失败
# ❌ 错误 - 字段是 IP 地址(非字符串类型)
ip: 192.168.1.1 -> regex_match('\d+') # 会失败
性能考虑
-
正则表达式编译开销:
- 每次调用都会重新编译正则表达式
- 复杂的正则表达式编译可能需要几微秒
-
匹配性能:
- 简单模式:微秒级
- 复杂模式(大量回溯):可能较慢
- 建议:避免过度复杂的正则表达式
-
优化建议:
# ✅ 推荐:简单直接的模式 regex_match('^\d{4}$') # ⚠️ 慎用:复杂的回溯模式 regex_match('^(a+)+b$') # 可能导致性能问题
不支持的特性
-
不支持命名捕获组:
# ❌ 不支持(无法提取捕获的内容) regex_match('(?P<year>\d{4})') -
不支持替换:
# ❌ regex_match 只做匹配,不做替换 # 需要替换请使用 chars_replace -
不支持多个模式:
# ❌ 不能传递多个模式 regex_match('pattern1', 'pattern2') # ✅ 使用选择符 | regex_match('pattern1|pattern2')
完整示例
示例 1:日志分类流水线
rule log_classification {
# 选择日志消息
| take(message)
# 分类为错误日志
(
| regex_match('(?i)(error|exception|failed|fatal)')
| tag(level, ERROR)
)
|
# 或分类为警告日志
(
| regex_match('(?i)(warn|warning|deprecated)')
| tag(level, WARNING)
)
|
# 或分类为普通日志
(
| tag(level, INFO)
)
}
示例 2:安全审计过滤
rule security_audit {
# 检查用户输入中的危险模式
| take(user_input)
# 检测脚本注入
| regex_match('(?i)(<script|javascript:|onerror=)')
# 或检测 SQL 注入
| regex_match('(?i)(union|select.*from|insert.*into)')
# 或检测路径遍历
| regex_match('(\.\./|\.\.\\)')
# 匹配到任何一个就记录为安全事件
| tag(security_event, true)
}
示例 3:结构化日志解析
rule structured_log_parsing {
# 验证 JSON 日志格式
| take(raw_message)
| regex_match('^\{.*\}$')
# 验证包含必需字段
| regex_match('"timestamp":\s*"\d{4}-\d{2}-\d{2}')
| regex_match('"level":\s*"(INFO|WARN|ERROR)"')
| regex_match('"message":\s*"[^"]+"')
# 所有验证通过后继续处理
}
性能说明
- 正则编译:每次调用都会编译,建议使用简单模式
- 匹配速度:
- 简单模式(如
^\d+$):< 1μs - 中等复杂度(如邮箱验证):1-10μs
- 复杂模式(大量回溯):可能 > 100μs
- 简单模式(如
- 内存开销:每个正则表达式约 1-10KB
错误处理
常见错误
-
无效的正则表达式
错误: regex_match | invalid regex pattern 原因: 正则表达式语法错误 解决: 检查正则表达式语法 -
字段不存在
错误: regex_match | no active field 原因: 当前没有活动字段 解决: 使用 take() 先选择字段 -
字段类型不匹配
错误: regex_match | field is not a string 原因: 字段不是字符串类型 解决: 确保字段是 Chars 类型 -
模式不匹配
错误: regex_match | not matched 原因: 字段内容不匹配正则表达式 解决: 这是正常的过滤逻辑
与其他函数配合使用
与字段选择器配合
# 先选择字段,再匹配
| take(message)
| regex_match('error')
与条件检查配合
# 组合多个条件
| take(status)
| regex_match('^[45]\d{2}$') # 4xx 或 5xx
与 chars_replace 配合
# 先匹配,再替换
| regex_match('error')
| chars_replace(error, ERROR)
与分支逻辑配合
# 不同模式走不同分支
(
| regex_match('^2\d{2}$') # 2xx
| tag(status_class, success)
)
|
(
| regex_match('^4\d{2}$') # 4xx
| tag(status_class, client_error)
)
最佳实践
1. 优先使用单引号
# ✅ 推荐
regex_match('^\d+$')
# ❌ 避免(会导致解析错误)
regex_match("^\d+$")
2. 使用锚点明确匹配范围
# ✅ 推荐:完全匹配
regex_match('^\d{4}$') # 恰好4位数字
# ⚠️ 可能不符合预期:部分匹配
regex_match('\d{4}') # 包含4位数字即可
3. 简化正则表达式
# ✅ 推荐:简单清晰
regex_match('^\d{1,3}\.\d{1,3}\.\d{1,3}\.\d{1,3}$')
# ⚠️ 过度复杂
regex_match('^(?:(?:25[0-5]|2[0-4][0-9]|[01]?[0-9][0-9]?)\.){3}(?:25[0-5]|2[0-4][0-9]|[01]?[0-9][0-9]?)$')
4. 使用注释文档化复杂模式
# 匹配邮箱:用户名@域名.后缀
regex_match('^\w+@\w+\.\w+$')
5. 测试边界情况
# 测试模式的边界
regex_match('^\d{2,4}$')
# 测试:1 ❌, 12 ✅, 123 ✅, 1234 ✅, 12345 ❌
正则表达式测试
在线测试工具
-
regex101.com
- 选择 Rust flavor
- 测试你的正则表达式
- 查看匹配详情和性能
-
regexr.com
- 可视化匹配过程
- 提供备忘清单
命令行测试
# 使用 WP-Motor 测试
echo "test_value: 12345" | wp-motor test.wpl
# 查看匹配结果
wp-motor --debug test.wpl < test_data.log
常见问题 (FAQ)
Q1: 为什么必须使用单引号?
因为 WPL 的双引号字符串解析器只支持有限的转义序列(\", \\, \n, \t),而正则表达式需要 \d, \w, \s 等,这些会导致解析失败。
Q2: 如何匹配点号(.)?
# 使用反斜杠转义
regex_match('\.') # 匹配字面的点号
Q3: 如何实现大小写不敏感匹配?
# 使用 (?i) 标志
regex_match('(?i)error') # 匹配 error, ERROR, Error
Q4: 正则表达式是完全匹配还是部分匹配?
默认是部分匹配。使用 ^ 和 $ 实现完全匹配:
# 部分匹配
regex_match('\d+') # "abc123def" → ✅ 匹配
# 完全匹配
regex_match('^\d+$') # "abc123def" → ❌ 不匹配
Q5: 如何匹配多行文本?
# 使用 (?m) 多行模式
regex_match('(?m)^ERROR') # 匹配任意行开头的 ERROR
# 使用 (?s) 单行模式让 . 匹配换行符
regex_match('(?s)start.*end') # 跨行匹配
Q6: 性能如何?
- 简单模式:非常快(微秒级)
- 复杂模式:可能较慢
- 建议:避免过度复杂的回溯模式
Q7: 能否提取匹配的内容?
不支持。regex_match 只做匹配判断,不提取内容。
正则表达式速查表
常用模式
| 模式 | 说明 | 示例 |
|---|---|---|
\d | 数字 | \d+ 匹配 “123” |
\w | 单词字符 | \w+ 匹配 “hello” |
\s | 空白字符 | \s+ 匹配 “ “ |
. | 任意字符 | .* 匹配任何内容 |
^ | 行首 | ^start 必须开头匹配 |
$ | 行尾 | end$ 必须结尾匹配 |
* | 0或多次 | a* 匹配 “”, “a”, “aa” |
+ | 1或多次 | a+ 匹配 “a”, “aa” |
? | 0或1次 | a? 匹配 “”, “a” |
{n} | 恰好n次 | \d{4} 匹配 “2024” |
{n,m} | n到m次 | \d{2,4} 匹配 “12”, “123” |
[abc] | 字符集 | [aeiou] 匹配元音 |
[^abc] | 非字符集 | [^0-9] 匹配非数字 |
| | 选择 | cat|dog 匹配 “cat” 或 “dog” |
() | 分组 | (ab)+ 匹配 “ab”, “abab” |
更多资源
- Rust Regex 文档: https://docs.rs/regex/
- 开发指南:
docs/guide/wpl_field_func_development_guide.md - 源代码:
src/ast/processor/function.rs - 测试用例:
src/eval/builtins/pipe_fun.rs
版本历史
- 1.13.1 (2026-02-02)
- 初始实现
- 支持完整的 Rust regex 语法
- 支持所有标准正则表达式特性
- 添加完整的测试覆盖
提示: regex_match 功能强大但也可能影响性能。对于简单的字符串匹配,优先考虑使用 chars_has 或 chars_in;对于数值范围检查,使用 digit_range 或 digit_in。正则表达式适合复杂的模式匹配场景。
WPL 分隔符使用指南
概述
分隔符(Separator)是 WPL 中用于分割日志字段的关键语法元素。通过灵活使用分隔符,可以解析各种格式的结构化日志数据。
快速开始
基本语法
| take(field_name) separator
分隔符写在字段定义之后,用于指示该字段在何处结束。
简单示例
# 使用空格分隔
| take(ip) \s
| take(method) \s
| take(path)
# 使用逗号分隔
| take(name) ,
| take(age) ,
| take(city)
内置分隔符
1. 空格分隔符 \s
匹配单个空格字符。
# 输入: "192.168.1.1 GET /api/users"
rule parse_log {
| take(ip) \s
| take(method) \s
| take(path)
}
适用场景:
- Apache/Nginx 访问日志
- 空格分隔的简单日志
- 标准格式日志文件
2. 制表符分隔符 \t
匹配单个制表符(Tab)字符。
# 输入: "user001\t25\tBeijing"
rule parse_tsv {
| take(user_id) \t
| take(age) \t
| take(city)
}
适用场景:
- TSV(Tab-Separated Values)文件
- 数据库导出文件
- 制表符对齐的日志
3. 通用空白分隔符 \S
匹配空格或制表符(二选一)。
# 输入: "field1 field2\tfield3"(混合空格和制表符)
rule parse_flexible {
| take(col1) \S
| take(col2) \S
| take(col3)
}
适用场景:
- 格式不统一的日志(混合空格和 Tab)
- 手工编辑过的配置文件
- 宽松的数据解析
行为说明:
- 遇到空格或制表符都会停止
- 灵活处理格式不一致的数据源
4. 行尾分隔符 \0
读取到行尾(换行符或字符串结束)。
# 输入: "prefix_value some remaining text until end"
rule parse_to_end {
| take(prefix) _
| take(remaining) \0
}
适用场景:
- 解析最后一个字段
- 读取消息正文
- 获取剩余所有内容
别名:
\0和0等价
5. 自定义字符分隔符
使用任意单个字符作为分隔符。
# 逗号分隔
| take(name) ,
| take(age) ,
# 竖线分隔
| take(id) |
| take(status) |
# 分号分隔
| take(key) ;
| take(value) ;
支持的字符:
- 逗号
, - 竖线
| - 分号
; - 冒号
: - 等号
= - 斜杠
/ - 等任意单字符
6. 自定义字符串分隔符
使用多字符字符串作为分隔符。
# 使用 " | " 分隔
| take(field1) " | "
| take(field2) " | "
# 使用 " :: " 分隔
| take(module) " :: "
| take(function) " :: "
适用场景:
- 格式化输出的日志
- 特定格式协议
- 需要明确边界的数据
实际应用场景
场景 1:解析 Nginx 访问日志
# 日志格式: 192.168.1.1 - - [29/Jan/2024:10:30:45 +0800] "GET /api/users HTTP/1.1" 200 1234
rule nginx_access_log {
| take(client_ip) \s
| take(identity) \s
| take(user) \s
| take(timestamp) \s
| take(request) \s
| take(status_code) \s
| take(bytes_sent) \0
}
场景 2:解析 TSV 数据
# 输入: "2024-01-29\t10:30:45\tERROR\tDatabase connection failed"
rule tsv_log {
| take(date) \t
| take(time) \t
| take(level) \t
| take(message) \0
}
场景 3:解析 CSV 数据
# 输入: "John Smith,30,New York,Engineer"
rule csv_parser {
| take(name) ,
| take(age) ,
| take(city) ,
| take(job) \0
}
场景 4:解析结构化日志
# 输入: "level=error | module=database | msg=Connection timeout"
rule structured_log {
| take(level_prefix) =
| take(level_value) " | "
| take(module_prefix) =
| take(module_value) " | "
| take(msg_prefix) =
| take(message) \0
}
场景 5:处理混合空白的日志
# 输入: "192.168.1.1 \tGET\t /api/data"(混合空格和制表符)
rule flexible_whitespace {
| take(ip) \S
| take(method) \S
| take(path) \0
}
场景 6:解析 Syslog 格式
# 输入: "Jan 29 10:30:45 hostname app[1234]: Error message here"
rule syslog {
| take(month) \s
| take(day) \s
| take(time) \s
| take(hostname) \s
| take(app_tag) ": "
| take(message) \0
}
场景 7:解析键值对日志
# 输入: "user=admin;action=login;ip=192.168.1.1;status=success"
rule kv_log {
| take(user_key) =
| take(user_value) ;
| take(action_key) =
| take(action_value) ;
| take(ip_key) =
| take(ip_value) ;
| take(status_key) =
| take(status_value) \0
}
分隔符优先级
WPL 支持三个级别的分隔符设置:
1. 字段级分隔符(优先级 3,最高)
| take(field1) , # 该字段使用逗号
| take(field2) \s # 该字段使用空格
2. 组级分隔符(优先级 2)
group {
sep = \t # 组内所有字段默认使用制表符
| take(field1)
| take(field2)
}
3. 继承分隔符(优先级 1,最低)
从上游规则继承的默认分隔符。
优先级规则
字段级 > 组级 > 继承级
group {
sep = \t # 组级:制表符
| take(f1) # 使用 \t
| take(f2) , # 使用 ,(字段级覆盖组级)
| take(f3) # 使用 \t
}
分隔符行为
全局替换 vs 单次匹配
分隔符只在当前字段结束位置匹配一次:
# 输入: "hello,world,test"
| take(first) , # 读取 "hello",消费第一个逗号
| take(second) , # 读取 "world",消费第二个逗号
| take(third) \0 # 读取 "test"
分隔符消费行为
默认情况下,分隔符会被消费(从输入中移除):
# 输入: "a,b,c"
| take(x) , # 读取 "a",消费 ",",剩余 "b,c"
| take(y) , # 读取 "b",消费 ",",剩余 "c"
分隔符不存在的情况
如果到达字符串末尾仍未找到分隔符,读取到末尾:
# 输入: "field1 field2"
| take(f1) , # 未找到逗号,读取全部 "field1 field2"
高级用法
组合使用多种分隔符
# 输入: "192.168.1.1:8080/api/users?id=123"
rule url_parse {
| take(ip) :
| take(port) /
| take(api_path) /
| take(resource) ?
| take(query_string) \0
}
处理可选字段
# 输入可能是: "user,30,city" 或 "user,,city"(age 为空)
rule optional_fields {
| take(name) ,
| take(age) , # 可能为空字符串
| take(city) \0
}
跳过不需要的字段
# 只提取第 1 和第 3 个字段
rule skip_fields {
| take(field1) ,
| take(_skip) , # 临时变量,不保存
| take(field3) \0
}
使用限制
1. 分隔符不支持正则表达式
# ❌ 不支持正则
| take(field) [0-9]+
# ✅ 使用固定字符串
| take(field) \s
2. 分隔符区分大小写
# "ABC" 和 "abc" 是不同的分隔符
| take(field1) ABC
| take(field2) abc
3. 空字符串不能作为分隔符
# ❌ 不支持
| take(field) ""
# ✅ 使用 \0 读取到末尾
| take(field) \0
4. 转义字符限制
当前支持的转义字符:
\s- 空格\t- 制表符\S- 空格或制表符\0- 行尾
其他转义字符(如 \n、\r)需要使用实际字符。
性能说明
单字符分隔符
性能最优,推荐优先使用:
| take(f1) ,
| take(f2) \s
| take(f3) \t
- 时间复杂度:O(n)
- 扫描速度:约 500 MB/s
多字符分隔符
性能略低,但仍然高效:
| take(f1) " | "
| take(f2) " :: "
- 时间复杂度:O(n × m),m 为分隔符长度
- 扫描速度:约 300-400 MB/s
通用空白分隔符 \S
需要逐字符检查,性能介于两者之间:
| take(f1) \S
- 时间复杂度:O(n)
- 扫描速度:约 400 MB/s
错误处理
常见错误
1. 分隔符未找到
错误: 未找到分隔符 ','
原因: 输入字符串中不包含指定的分隔符
解决: 检查输入格式或使用 \0 读取到末尾
2. 分隔符语法错误
错误: invalid separator
原因: 使用了不支持的分隔符语法
解决: 参考本文档使用正确的分隔符格式
3. 字段顺序错误
错误: 字段解析失败
原因: 字段定义顺序与实际数据不匹配
解决: 调整字段顺序以匹配输入格式
最佳实践
1. 优先使用内置分隔符
# ✅ 推荐
| take(f1) \s
| take(f2) \t
# ⚠️ 避免(除非必要)
| take(f1) " "
| take(f2) "\t"
2. 明确指定最后字段的分隔符
# ✅ 推荐(明确到行尾)
| take(message) \0
# ⚠️ 不清晰
| take(message) # 依赖默认行为
3. 使用 \S 处理不规范数据
# ✅ 推荐(兼容性好)
| take(field1) \S
| take(field2) \S
# ⚠️ 可能失败(如果混合了空格和制表符)
| take(field1) \s
| take(field2) \s
4. 复杂格式使用多字符分隔符
# ✅ 清晰准确
| take(level) " | "
| take(message) " | "
# ⚠️ 可能误匹配
| take(level) |
| take(message) |
5. 组合使用字段级和组级分隔符
# ✅ 推荐(减少重复)
group {
sep = ,
| take(f1)
| take(f2)
| take(f3) \0 # 最后字段使用不同分隔符
}
调试技巧
1. 逐字段验证
# 先解析第一个字段
| take(field1) ,
# 确认成功后添加第二个
| take(field1) ,
| take(field2) ,
# 依次添加...
2. 使用临时字段查看中间结果
| take(field1) ,
| take(_debug) , # 临时字段,查看剩余内容
| take(field2) \0
3. 打印分隔符位置
在测试环境中,使用调试模式查看分隔符匹配情况:
wp-motor --debug rule.wpl < test.log
4. 验证分隔符字符
对于不可见字符(如制表符),使用十六进制查看器确认:
# 查看文件中的制表符
cat -A test.log
# 或
hexdump -C test.log | head
常见问题 (FAQ)
Q1: \s 和 \S 有什么区别?
\s:只匹配空格 (space)\S:匹配空格或制表符 (space OR tab)
# 输入: "a b"
| take(x) \s # ✅ 匹配成功
# 输入: "a\tb"
| take(x) \s # ❌ 匹配失败(这是制表符,不是空格)
| take(x) \S # ✅ 匹配成功
Q2: 如何处理连续的分隔符?
WPL 会将连续分隔符视为多个空字段:
# 输入: "a,,c"
| take(f1) , # 读取 "a"
| take(f2) , # 读取 ""(空字符串)
| take(f3) \0 # 读取 "c"
Q3: 分隔符会影响性能吗?
单字符分隔符性能最优,多字符分隔符略慢,但对于大多数场景影响可忽略。
Q4: 如何解析嵌套结构?
使用多级分隔符:
# 输入: "k1=v1;k2=v2|k3=v3;k4=v4"
rule nested {
| take(group1) |
| take(group2) \0
}
# 然后在每个 group 内再用 ; 和 = 解析
Q5: 分隔符可以是中文吗?
可以,支持 Unicode 字符:
# 使用中文逗号分隔
| take(field1) ,
| take(field2) ,
Q6: \0 和省略分隔符有区别吗?
建议显式使用 \0,语义更清晰:
# ✅ 推荐(明确)
| take(message) \0
# ⚠️ 可以但不明确
| take(message)
Q7: 如何处理引号内的分隔符?
对于包含引号的复杂格式,建议使用专门的解析器(如 JSON、KV 解析器):
# 复杂 CSV(带引号)
# 输入: "field1","field with , comma","field3"
# 建议使用 CSV 解析器而非手动分隔符
更多资源
- WPL 语法参考:
docs/guide/wpl_syntax.md - 解析器开发指南:
docs/guide/wpl_field_func_development_guide.md - chars_replace 使用指南:
docs/usage/wpl/chars_replace.md - 源代码:
src/ast/syntax/wpl_sep.rs
版本历史
-
1.11.0 (2026-01-29)
- 新增
\t制表符分隔符支持 - 新增
\S通用空白分隔符(空格或制表符) - 优化 Whitespace 分隔符性能
- 添加完整的测试覆盖
- 新增
-
1.10.x 及更早版本
- 支持
\s(空格)和\0(行尾) - 支持自定义字符和字符串分隔符
- 支持
提示: 分隔符是 WPL 解析的核心,选择合适的分隔符可以大大简化日志解析规则。
starts_with 函数使用指南
简介
starts_with 是一个 WPL pipe 函数,用于检查字符串字段是否以指定的前缀开始。
语法
field_name | starts_with('prefix')
参数
prefix: 字符串类型,要检查的前缀
行为
- 如果字段值以指定前缀开始,字段保持不变并继续传递
- 如果字段值不以指定前缀开始,字段转换为 ignore 类型,后续规则将忽略该字段
- 如果字段不是字符串类型,字段转换为 ignore 类型
- 前缀匹配是大小写敏感的
- 空前缀
''匹配任何字符串
使用示例
示例 1: 过滤 HTTPS URL
rule https_filter {
(chars:url) | starts_with('https://')
}
输入: https://example.com
输出: 匹配成功,提取 url = "https://example.com"
输入: http://example.com
输出: url 字段转换为 ignore,规则匹配失败
示例 2: 过滤 API 路径
rule api_filter {
(chars:path) | starts_with('/api/')
}
输入: /api/users
输出: 匹配成功,提取 path = "/api/users"
输入: /home/users
输出: path 字段转换为 ignore,规则匹配失败
示例 3: 检查日志级别
rule error_log {
(chars:log_level) | starts_with('ERROR'),
(chars:message)
}
输入: ERROR: Database connection failed
输出: 匹配成功
log_level = "ERROR:"message = "Database connection failed"
示例 4: 结合其他函数使用
rule secure_url {
(chars:url) | starts_with('https://') | chars_has('secure')
}
只匹配以 https:// 开头且包含 secure 的 URL。
示例 5: 多分支条件
rule protocol_filter {
(
(chars:url) | starts_with('https://')
) | (
(chars:url) | starts_with('wss://')
)
}
匹配以 https:// 或 wss:// 开头的 URL。
与 regex_match 的对比
| 特性 | starts_with | regex_match |
|---|---|---|
| 性能 | 更快(字符串前缀检查) | 较慢(正则表达式编译和匹配) |
| 功能 | 只能检查前缀 | 支持复杂模式匹配 |
| 使用难度 | 简单直观 | 需要了解正则表达式 |
| 失败行为 | 转换为 ignore | 解析失败 |
何时使用 starts_with:
- 只需要检查字符串前缀
- 性能要求高
- 简单场景
- 需要在管道中继续处理(通过 ignore 字段)
何时使用 regex_match:
- 需要复杂的模式匹配
- 需要检查中间或结尾内容
- 需要使用正则表达式特性(捕获组等)
注意事项
- 大小写敏感:
starts_with('HTTP')不会匹配http://example.com - 完全匹配前缀: 前缀必须完全匹配,不支持通配符
- 仅支持字符串: 如果字段不是字符串类型,将转换为 ignore
- ignore 类型传播: 转换为 ignore 的字段在后续管道函数中会被跳过
实现细节
- 定义位置:
src/ast/processor/function.rs - 实现位置:
src/eval/builtins/pipe_fun.rs - 解析器:
src/parser/wpl_fun.rs - 测试:
src/eval/builtins/pipe_fun.rs(tests 模块)
相关函数
regex_match(pattern): 正则表达式匹配chars_has(value): 检查字段值是否等于指定字符串chars_in([values...]): 检查字段值是否在列表中chars_replace(target, replacement): 替换字符串中的子串
OML 对象模型语言
OML (Object Modeling Language) 是 Warp Parse 使用的数据转换语言,用于对 WPL 解析后的结构化数据进行转换、聚合和富化。
📚 文档导航
按学习路径
🆕 新手入门
↓
01-quickstart.md ────────→ 5分钟上手,复制即用
↓
07-complete-example.md ──→ 🌟 完整功能演示(强烈推荐)
↓
02-core-concepts.md ─────→ 理解设计理念和核心概念
↓
03-practical-guide.md ───→ 按任务查找解决方案
↓
04-functions-reference.md → 查阅函数
↓
05-integration.md ───────→ 集成到数据流
按用户角色
| 我是… | 推荐阅读 |
|---|---|
| OML 新手 | 01-quickstart.md → 07-complete-example.md |
| 日常使用者 | 03-practical-guide.md - 按任务查找 |
| 开发者/集成 | 07-complete-example.md + 04-functions-reference.md |
| 系统集成 | 05-integration.md - WPL/OML/Sink 关联 |
按任务查找
| 我想… | 查看文档 |
|---|---|
| 🚀 快速上手 | 01-quickstart.md |
| 🌟 查看完整示例 | 07-complete-example.md |
| 💡 理解概念 | 02-core-concepts.md |
| 📝 提取字段 | 03-practical-guide.md § 数据提取 |
| 🔄 类型转换 | 03-practical-guide.md § 数据转换 |
| 🧮 数值计算 | 03-practical-guide.md § 数值计算 |
| 🔤 忽略大小写匹配 | functions/match_functions.md |
| 📚 静态字典查表 | functions/lookup_nocase.md |
| 📦 创建对象/数组 | 03-practical-guide.md § 数据聚合 |
| ✅ 条件判断 | 03-practical-guide.md § 条件处理 |
| 🔍 SQL 查询 | 03-practical-guide.md § 数据富化 |
| ⚙️ 查某个函数 | 04-functions-reference.md |
| 🔗 集成到流水线 | 05-integration.md |
| 📖 查语法规则 | 06-grammar-reference.md |
📖 文档列表
| 文档 | 内容 | 适合人群 |
|---|---|---|
| 01-quickstart.md | 5 分钟快速入门 + 3 个最常用操作 | 所有人 |
| 🌟 07-complete-example.md | 完整功能演示(强烈推荐) | 所有人 |
| 02-core-concepts.md | 设计理念 + 类型系统 + 读取语义 | 想深入理解的用户 |
| 03-practical-guide.md | 按任务组织的实战示例 | 日常使用者 |
| 04-functions-reference.md | 所有函数的标准化参考 | 开发者 |
| 05-integration.md | WPL/OML/Sink 集成指南 | 系统集成者 |
| 06-grammar-reference.md | EBNF 形式化语法定义 | 编译器开发者 |
⚡ 快速示例
基础字段提取
name : nginx_access
rule : /nginx/access_log
---
user_id = read(user_id) ;
uri = read(request_uri) ;
status : digit = read(status) ;
数据聚合
name : system_metrics
rule : /system/metrics
---
metrics : obj = object {
hostname : chars = read(hostname) ;
cpu : float = read(cpu_usage) ;
memory : float = read(mem_usage) ;
} ;
条件处理
name : log_classifier
rule : /app/logs
---
level = match read(status_code) {
in (digit(200), digit(299)) => chars(success) ;
in (digit(400), digit(499)) => chars(client_error) ;
in (digit(500), digit(599)) => chars(server_error) ;
_ => chars(unknown) ;
} ;
管道转换
name : data_transform
rule : /data/raw
---
# 时间转时间戳
ts = read(event_time) | Time::to_ts_zone(0, ms) ;
# URL 解析
domain = read(url) | url(domain) ;
path = read(url) | url(path) ;
# Base64 解码
decoded = read(base64_data) | base64_decode(Utf8) ;
数值计算
name : risk_score
rule : /system/metrics
---
risk_score : float = calc(read(cpu) * 0.7 + read(mem) * 0.3) ;
error_pct : digit = calc(round((read(err_cnt) * 100) / read(total_cnt))) ;
bucket : digit = calc(read(uid) % 16) ;
忽略大小写匹配
name : status_class
rule : /app/status
---
status_class = match read(status) {
iequals_any('success', 'ok', 'done') => chars(good) ;
iequals_any('error', 'failed', 'timeout') => chars(bad) ;
_ => chars(other) ;
} ;
静态字典查表
name : status_score
rule : /app/status
---
static {
score_map = object {
error = float(90.0);
warning = float(70.0);
success = float(20.0);
};
}
risk_score : float = lookup_nocase(score_map, read(status), 40.0) ;
SQL 数据富化
name : user_enrichment
rule : /app/user_activity
---
user_id = read(user_id) ;
# 从数据库查询用户信息
user_name, user_level =
select name, level
from users
where id = read(user_id) ;
🎯 核心特性
- 声明式:描述“想要什么“,而非“怎么做“
- 类型安全:8 种数据类型,自动推断或显式声明
- WPL 关联:通过
rule字段匹配 WPL 解析规则 - 读取模式:read(非破坏性)vs take(破坏性)
- 强大的管道:链式转换(时间/编解码/URL 解析等)
- 条件匹配:match 表达式支持范围、否定、多源匹配、OR 条件
- 数值表达式:
calc(...)支持+ - * / %与abs/round/floor/ceil - 忽略大小写匹配:
iequals/iequals_any(...)用于字符串状态归类 - 静态字典查表:
lookup_nocase(...)支持对staticobject 做忽略大小写查表 - 数据聚合:object(对象)和 collect(数组)
- SQL 集成:直接查询数据库进行数据富化
🔗 WPL 与 OML 关联
OML 通过 rule 字段与 WPL 的 package/rule 建立关联:
原始数据
↓
[WPL 解析] → 生成结构化数据 + rule 标识
↓
数据携带: rule = "/nginx/access_log"
↓
[查找匹配的 OML] → 匹配 rule 字段
↓
[执行 OML 转换]
↓
[输出到 Sink]
示例:
WPL 规则:
package nginx {
rule access_log {
(ip:client_ip, chars:uri, digit:status)
}
}
OML 配置:
name : nginx_handler
rule : /nginx/access_log # 匹配 WPL 的 package/rule
---
client : ip = read(client_ip) ;
uri : chars = read(uri) ;
status : digit = read(status) ;
💬 快速帮助
常见问题
Q: 从哪里开始学习? A: 从 01-quickstart.md 开始,然后查看 🌟 完整功能示例。
Q: 如何将 OML 与 WPL 关联?
A: 使用 rule 字段匹配 WPL 的 package/rule 值,详见 05-integration.md。
Q: read 和 take 有什么区别?
A: read 是非破坏性的(可重复读取),take 是破坏性的(读取后移除),详见 02-core-concepts.md。
Q: 某个函数怎么用? A: 查看 04-functions-reference.md 或 🌟 完整功能示例。
Q: calc(...) 失败时会怎样?
A: 除零、缺失字段、非数值输入、整数溢出、NaN/inf 都会返回 ignore,详见 04-functions-reference.md 和 03-practical-guide.md。
Q: 状态值大小写不稳定,怎么匹配?
A: 用 iequals(...) 或 iequals_any(...),详见 functions/match_functions.md。
Q: 想做状态到分值的映射,但不区分大小写?
A: 用 static + lookup_nocase(...),详见 functions/lookup_nocase.md。
Q: 如何调试 OML 转换? A: 参考 05-integration.md § 故障排查。
📝 相关文档
开始学习: 01-quickstart.md - 5分钟快速入门
完整示例: 🌟 07-complete-example.md - 所有功能演示
OML 快速入门
5 分钟快速上手 OML(Object Modeling Language)
💡 提示:想要查看所有功能的完整演示?请访问 完整功能示例
📚 快速导航
| 章节 | 内容 |
|---|---|
| 什么是 OML | OML 简介 |
| 最小示例 | 5 行代码上手 |
| 基本语法 | 配置结构、WPL 关联、语法规则 |
| 三个最常用操作 | 读取字段、类型转换、数据聚合 |
| 常见数值计算 | calc(...) 算术表达式 |
| 常用数据类型 | 8 种数据类型速查 |
| 常用内置函数 | 时间函数 |
| read vs take | 两种读取模式对比 |
| 完整示例 | 日志处理完整示例 |
什么是 OML
OML 是一种声明式的数据转换语言,用于将解析后的结构化数据转换为目标格式。它提供了简洁的语法来完成字段提取、类型转换、数据聚合等常见操作。
最小示例
name : my_first_oml
rule : /nginx/access_log
---
user_id = read(user_id) ;
timestamp : time = Now::time() ;
说明:
name : my_first_oml- OML 配置名称声明rule : /nginx/access_log- 匹配 WPL 的 package/rule 值(关键!)---- 分隔符,区分声明区和配置区user_id = read(user_id)- 从输入读取 user_id 字段timestamp : time = Now::time()- 调用内置函数获取当前时间
重要:rule 字段用于关联 WPL 解析规则,只有当数据的 WPL rule 匹配时,这个 OML 配置才会被应用。
基本语法
1. 配置结构
name : <配置名称>
rule : <WPL 规则匹配模式>
---
<目标字段>[:<类型>] = <表达式> ;
2. WPL 与 OML 的关联
关键概念:一个 WPL 规则可以对应一个或多个 OML 配置。
WPL 解析 → 数据携带 rule 标识 → 匹配 OML 的 rule 字段 → 执行转换
示例:
# OML 配置
name : nginx_access
rule : /nginx/access_log # 匹配 WPL 的 package/rule 值
---
# 转换逻辑...
当 WPL 解析后的数据携带 rule = /nginx/access_log 时,这个 OML 配置会被自动应用。
支持通配符:
rule : /nginx/*- 匹配所有 /nginx/ 开头的规则rule : */access_log- 匹配所有以 /access_log 结尾的规则rule : *- 匹配所有规则
3. 必须记住的规则
- 每个配置条目必须以分号
;结束 - 使用
---分隔配置的不同部分 rule字段用于匹配 WPL 的 package/rule 值- 类型声明可选,默认为
auto自动推断
三个最常用操作
操作 1:读取字段
场景:从输入数据中提取字段
name : read_example
---
# 读取单个字段
user_id = read(user_id) ;
# 读取并指定类型
port : digit = read(port) ;
# 读取时提供默认值
country = read(country) { _ : chars(CN) } ;
输入示例:
user_id = "user123"
port = "8080"
输出:
user_id = "user123"
port = 8080
country = "CN" # 使用默认值
操作 2:类型转换
场景:转换字段类型
name : type_conversion
---
# 字符串转 IP
src_ip : ip = read(src_ip) ;
# 字符串转整数
port : digit = read(port) ;
# 字符串转浮点数
cpu_usage : float = read(cpu) ;
# 字符串转时间
event_time : time = read(time) ;
输入示例:
src_ip = "192.168.1.100"
port = "8080"
cpu = "85.5"
time = "2024-01-15 14:30:00"
输出:
src_ip = 192.168.1.100 # IP 类型
port = 8080 # 整数
cpu_usage = 85.5 # 浮点数
event_time = 2024-01-15 14:30:00 # 时间类型
操作 3:数据聚合
场景:将多个字段组合成对象或数组
创建对象
name : create_object
---
system_info : obj = object {
hostname : chars = read(hostname) ;
cpu : float = read(cpu_usage) ;
memory : float = read(mem_usage) ;
} ;
输入:
hostname = "web-server-01"
cpu_usage = "75.5"
mem_usage = "60.2"
输出:
{
"system_info": {
"hostname": "web-server-01",
"cpu": 75.5,
"memory": 60.2
}
}
创建数组
name : create_array
---
# 收集多个字段到数组
ports : array = collect read(keys:[sport, dport]) ;
输入:
sport = "8080"
dport = "443"
输出:
ports = [8080, 443]
常见数值计算
场景:计算比例、差值、分桶、取整百分比
name : calc_example
---
risk_score : float = calc(read(cpu) * 0.7 + read(mem) * 0.3) ;
delta : digit = calc(read(cur) - read(prev)) ;
error_pct : digit = calc(round((read(err_cnt) * 100) / read(total_cnt))) ;
bucket : digit = calc(read(uid) % 16) ;
规则:
- 支持
+ - * / % - 支持
abs(...)、round(...)、floor(...)、ceil(...) /始终返回float%仅支持整数取模- 除零、字段缺失、非数值输入、整数溢出、
NaN/inf都会返回ignore
常用数据类型
| 类型 | 说明 | 示例 |
|---|---|---|
auto | 自动推断(默认) | value = read() ; |
chars | 字符串 | name : chars = read() ; |
digit | 整数 | count : digit = read() ; |
float | 浮点数 | ratio : float = read() ; |
ip | IP 地址 | addr : ip = read() ; |
time | 时间 | timestamp : time = Now::time() ; |
obj | 对象 | info : obj = object { ... } ; |
array | 数组 | items : array = collect read(...) ; |
常用内置函数
name : builtin_functions
---
# 获取当前时间
now : time = Now::time() ;
# 获取当前日期(YYYYMMDD 格式)
today : digit = Now::date() ;
# 获取当前小时(YYYYMMDDHH 格式)
current_hour : digit = Now::hour() ;
除了 Now::*,也可以使用 calc(...) 执行显式算术表达式;详见 04-functions-reference.md。
read vs take:两种读取模式
read(非破坏性)
- 可以多次读取同一字段
- 不会从输入中移除字段
name : read_mode
---
field1 = read(data) ;
field2 = read(data) ; # 仍可读取到 data
take(破坏性)
- 读取后会从输入中移除
- 后续无法再读取同一字段
name : take_mode
---
field1 = take(data) ;
field2 = take(data) ; # 读取失败,data 已被移除
使用建议:
- 需要复用字段时使用
read - 确保字段只使用一次时使用
take
完整示例:日志处理
这个示例展示了 OML 的主要功能:字段提取、类型转换、条件判断、数据聚合。
输入数据(WPL 解析后):
user_id = "user123"
uri = "/api/users"
status = "200"
timestamp = "2024-01-15 14:30:00"
OML 配置:
name : access_log_processor
rule : /nginx/access_log
---
# 基础字段提取
user_id = read(user_id) ;
request_uri = read(uri) ;
status_code : digit = read(status) ;
# 时间处理
event_time : time = read(timestamp) ;
event_date : digit = Now::date() ;
# 条件转换(状态码分类)
status_level = match read(status_code) {
in (digit(200), digit(299)) => chars(success) ;
in (digit(400), digit(499)) => chars(client_error) ;
in (digit(500), digit(599)) => chars(server_error) ;
_ => chars(other) ;
} ;
# 数据聚合
log_entry : obj = object {
user : chars = read(user_id) ;
uri : chars = read(request_uri) ;
status : digit = read(status_code) ;
level : chars = read(status_level) ;
time : time = read(event_time) ;
} ;
输出结果:
{
"log_entry": {
"user": "user123",
"uri": "/api/users",
"status": 200,
"level": "success",
"time": "2024-01-15 14:30:00"
}
}
关键点:
rule : /nginx/access_log匹配 WPL 的 package/rule 值match表达式实现条件分类object聚合多个字段为结构化输出- 类型自动转换(
status从字符串转为整数)
📚 完整类型系统与功能
OML 支持 8 种数据类型和丰富的函数库,涵盖数据提取、转换、聚合、条件处理等。
👉 查看完整示例: 07-complete-example.md
该文档包含:
- ✅ 所有核心功能的完整示例代码
- ✅ 可运行的原始数据、WPL 规则和 OML 配置
- ✅ 每个功能的详细说明和使用建议
- ✅ 基础操作、内置函数、管道函数、模式匹配等
快速预览主要功能:
- 基础操作:字面量赋值、取值、默认值、通配符批量操作
- 内置函数:
Now::time()、Now::date()、Now::hour() - 管道函数:Base64 编解码、HTML 转义、时间转换、URL 解析
- 模式匹配:单源/多源 match、范围判断、否定条件、OR 条件
- 数据聚合:对象创建、数组收集
- SQL 集成:数据库查询和富化
下一步学习
理解概念
- 核心概念 - 深入理解 OML 的设计理念
- WPL 与 OML 协作关系
- read vs take 读取语义
- 类型系统和表达式
实战应用
- 实战指南 - 按任务查找解决方案
- 数据提取、转换、聚合
- 条件处理、SQL 查询
- 复杂场景示例
查阅参考
快速提示
- 从简单开始:先使用基本的 read 操作,熟悉后再使用高级特性
- 显式类型:对于重要字段,建议显式声明类型避免意外转换
- 提供默认值:对于可能缺失的字段,使用
{ _ : <默认值> }语法 - 使用对象组织数据:复杂数据用
object聚合,便于理解和维护 - 分号不能省:每个配置条目必须以分号结束
相关资源
- 完整功能示例:07-complete-example.md
- WPL 规则语言:../03-wpl/README.md
- 配置指南:../02-config/README.md
OML 核心概念
本文档介绍 OML 的核心设计理念和基础概念,帮助你深入理解 OML 的工作原理。
📚 文档导航
快速导航
| 主题 | 内容 |
|---|---|
| 设计理念 | WPL 协作关系、声明式语法、不可变数据流 |
| 类型系统 | 8 种基本类型、自动推断、类型转换 |
| 读取语义 | read vs take、破坏性与非破坏性、读取优先级 |
| 表达式类型 | 值表达式、函数调用、管道、条件、聚合 |
| 数值表达式 | 算术语法、类型规则、失败行为 |
| 默认值机制 | 默认值语法、函数默认值、限制说明 |
| 通配符 | 通配符语法、批量目标、使用限制 |
| 参数化读取 | option 优先级、keys 收集、JSON 路径 |
| 表达式组合 | 嵌套对象、管道链、复杂 match |
| 作用域规则 | 目标字段作用域、全局字段 |
| 最佳实践 | 读取模式选择、类型声明、默认值、通配符使用 |
OML 设计理念
WPL 与 OML 的协作关系
OML 不是独立工作的,它与 WPL 紧密配合:
1. WPL 解析原始数据
↓
2. 生成结构化数据 + rule 标识(如 /nginx/access_log)
↓
3. 系统查找匹配的 OML 配置(通过 rule 字段)
↓
4. 执行 OML 转换
↓
5. 输出到 Sink
关键点:
- 每个 OML 配置通过
rule字段声明它处理哪些 WPL 规则的数据 - 一个 WPL 规则可以对应多个 OML 配置
- 支持通配符匹配,如
rule : /nginx/*匹配所有 nginx 相关规则
示例:
name : nginx_access_handler
rule : /nginx/access_log # 只处理这个 WPL 规则的数据
---
# 转换逻辑...
声明式而非命令式
OML 采用声明式语法,你只需要描述想要什么结果,而不是如何实现:
# 声明式:描述结果
user_info : obj = object {
id : chars = read(user_id) ;
name : chars = read(username) ;
} ;
对比命令式伪代码:
user_info = new Object()
user_info.id = get_field("user_id")
user_info.name = get_field("username")
convert_to_chars(user_info.id)
convert_to_chars(user_info.name)
不可变数据流
OML 中的数据转换是单向流动的:
输入数据 → OML 转换 → 输出数据
- 输入数据不会被修改(除非使用
take) - 每个转换步骤都产生新的值
- 便于理解和调试
类型系统
基本类型
OML 提供 8 种基本数据类型:
name : types_example
---
# 字符串
text : chars = chars(hello) ;
# 整数
count : digit = digit(42) ;
# 浮点数
ratio : float = float(3.14) ;
# IP 地址
address : ip = ip(192.168.1.1) ;
# 时间
timestamp : time = Now::time() ;
# 布尔值
flag : bool = bool(true) ;
# 对象
info : obj = object { ... } ;
# 数组
items : array = collect read(keys:[...]) ;
自动类型推断
当不指定类型时,OML 会自动推断:
name : auto_type
---
# 自动推断为 chars
name = read(name) ;
# 自动推断为 digit
count = digit(100) ;
# 显式指定类型(推荐)
port : digit = read(port) ;
最佳实践:对于重要字段,建议显式声明类型以避免意外。
类型转换
OML 会在必要时自动进行类型转换:
name : type_cast
---
# 从字符串 "8080" 转换为整数 8080
port : digit = read(port) ;
# 从字符串 "192.168.1.1" 转换为 IP
ip_addr : ip = read(src_ip) ;
# 从字符串转换为时间
event_time : time = read(timestamp) ;
读取语义:read vs take
这是 OML 中最重要的概念之一。
read:非破坏性读取
特性:
- 从源数据克隆值到目标
- 源数据保持不变
- 可以多次读取同一字段
使用场景:
- 字段需要在多处使用
- 需要保留原始数据
示例:
name : read_example
---
# 假设输入:data = "hello"
field1 = read(data) ; # field1 = "hello",src.data 仍存在
field2 = read(data) ; # field2 = "hello",可以再次读取
field3 = read(data) ; # field3 = "hello",仍然可以读取
take:破坏性读取
特性:
- 从源数据移走值到目标
- 源数据中该字段被删除
- 只能读取一次
使用场景:
- 字段只需要使用一次
- 需要确保字段不被重复使用
- 优化性能(避免数据复制)
示例:
name : take_example
---
# 假设输入:data = "hello"
field1 = take(data) ; # field1 = "hello",src.data 被移除
field2 = take(data) ; # 失败!data 已经不存在
读取优先级
read 和 take 都遵循以下查找顺序:
- 先查找目标记录(dst)
- 如果未找到,再查找源记录(src)
name : lookup_priority
---
# 假设:src.value = "A"
field1 = read(value) ; # "A" (从 src 读取)
field2 = read(field1) ; # "A" (从 dst 读取,field1 已在目标中)
表达式类型
值表达式
直接构造常量值:
name : value_expr
---
# 字符串
text = chars(hello) ;
# 整数
count = digit(100) ;
# IP
ip_addr = ip(192.168.1.1) ;
函数调用
调用内置函数:
name : function_call
---
# 时间函数
now = Now::time() ;
today = Now::date() ;
hour = Now::hour() ;
管道表达式
链式处理数据:
name : pipe_expr
---
# 读取 → 转 JSON → Base64 编码
encoded = pipe read(data) | to_json | base64_encode ;
# 也可以省略 pipe 关键字
encoded2 = read(data) | to_json | base64_encode ;
数值表达式
使用 calc(...) 显式执行算术表达式:
name : calc_expr
---
risk_score : float = calc(read(cpu) * 0.7 + read(mem) * 0.3) ;
bucket : digit = calc(read(uid) % 16) ;
distance : float = calc(abs(read(actual) - read(expect))) ;
数值表达式:calc(...)
支持范围:
- 运算符:
+ - * / % - 函数:
abs(...)、round(...)、floor(...)、ceil(...) - 操作数:数值字面量、
read(...)、take(...)、@field
类型规则:
digit op digit在+ - *下返回digit- 只要任一操作数是浮点,
+ - *返回float /始终返回float%仅支持digit % digit
失败行为:
- 除零、缺失字段、非数值输入返回
ignore - 整数溢出返回
ignore NaN/inf输入或结果返回ignore
这意味着 calc(...) 不会隐式兜底为 0,也不会把非法结果继续传给后续步骤。
条件表达式
基于条件选择值:
name : match_expr
---
level = match read(status) {
in (digit(200), digit(299)) => chars(success) ;
in (digit(400), digit(499)) => chars(error) ;
_ => chars(other) ;
} ;
match 分支值仍然使用既有子表达式集合,不直接写 calc(...)。如果需要先算再匹配,建议先绑定到临时字段:
__risk_score : float = calc(read(cpu) * 0.7 + read(mem) * 0.3) ;
level = match read(__risk_score) {
gt(80) => chars(high) ;
_ => chars(normal) ;
} ;
支持 OR 语法(| 分隔多个备选条件):
name : match_or_expr
---
tier = match read(city) {
chars(bj) | chars(sh) | chars(gz) => chars(tier1) ;
chars(cd) | chars(wh) => chars(tier2) ;
_ => chars(other) ;
} ;
聚合表达式
创建复合数据结构:
name : aggregate_expr
---
# 对象聚合
info : obj = object {
name = read(name) ;
age = read(age) ;
} ;
# 数组聚合
items : array = collect read(keys:[a, b, c]) ;
默认值机制
默认值语法
当字段不存在或读取失败时,使用默认值:
name : default_value
---
# 语法:read(...) { _ : <默认值> }
country = read(country) { _ : chars(CN) } ;
version = read(version) { _ : chars(1.0.0) } ;
port = read(port) { _ : digit(8080) } ;
默认值可以是函数调用
name : default_with_function
---
# 如果 timestamp 不存在,使用当前时间
event_time = read(timestamp) { _ : Now::time() } ;
默认值可以是读取
name : default_with_read
---
# 如果 id 不存在,尝试读取 user_id
user_id = read(id) { _ : read(user_id) } ;
限制
@ref语法糖不支持默认值- 默认值表达式不能是
match、object、collect等复杂表达式
通配符与批量处理
通配符语法
使用 * 匹配多个字段:
name : wildcard
---
# 收集所有以 cpu_ 开头的字段
cpu_metrics = collect read(keys:[cpu_*]) ;
# 收集所有以 /path 结尾的字段
paths = collect read(keys:[*/path]) ;
批量目标
目标字段名包含 * 时进入批量模式:
name : batch_target
---
# 取走所有字段
* = take() ;
# 取走所有以 alert_ 开头的字段
alert* = take() ;
# 取走所有以 _log 结尾的字段
*_log = take() ;
限制:批量模式只支持 read 和 take,不支持其他表达式。
参数化读取
option:按优先级尝试
name : option_param
---
# 按顺序尝试读取 id、uid、user_id
user_id = read(option:[id, uid, user_id]) ;
行为:
- 从左到右尝试每个字段
- 返回第一个存在的字段值
- 如果都不存在,返回失败(可配合默认值)
keys:收集多个字段
name : keys_param
---
# 收集多个字段为数组
ports = collect read(keys:[sport, dport]) ;
行为:
- 读取所有指定的字段
- 支持通配符
* - 返回数组
JSON 路径
读取嵌套数据:
name : json_path
---
# 读取 /user/info/name
username = read(/user/info/name) ;
# 读取数组元素 /items[0]/id
first_id = read(/items[0]/id) ;
表达式组合
嵌套对象
name : nested_objects
---
deployment : obj = object {
app : obj = object {
name = read(app_name) ;
version = read(app_version) ;
} ;
env : obj = object {
region = read(region) ;
zone = read(zone) ;
} ;
} ;
管道链
name : pipe_chain
---
# 多级转换
result = read(data) | to_json | base64_encode | html_escape ;
# 数组操作
first_user = read(users) | nth(0) | get(name) ;
match 中的复杂表达式
name : complex_match
---
# 单源 match + collect
status = match read(code) {
in (digit(200), digit(299)) => collect read(keys:[a, b]) ;
_ => read(default_value) ;
} ;
# 多源 match(支持任意数量源字段)
zone = match (read(city), read(region), read(country)) {
(chars(bj), chars(north), chars(cn)) => chars(zone1) ;
_ => chars(unknown) ;
} ;
# OR + 多源 match
priority = match (read(city), read(level)) {
(chars(bj) | chars(sh), chars(high)) => chars(priority) ;
(chars(gz), chars(low) | chars(mid)) => chars(normal) ;
_ => chars(default) ;
} ;
作用域规则
目标字段作用域
在 object 内部创建的字段,只在对象内可见:
name : scope_example
---
info : obj = object {
name = read(username) ; # name 只在 info 对象内
} ;
# 这里无法访问 name
other = read(name) ; # 失败!name 不在外部作用域
全局目标字段
顶层定义的字段可以被后续读取:
name : global_scope
---
# 定义全局字段
temp = read(data) ;
# 后续可以读取
result = read(temp) ;
易错提醒
- 分号必需:每个顶层条目必须以
;结束 - 类型不匹配:显式类型声明与实际值不符会导致转换错误
- take 后再读:使用
take后该字段被移除,无法再次读取 - @ref 限制:
@ref只能在特定位置使用,不支持默认值 - 批量模式限制:目标名含
*时,右值只能是read或take
最佳实践
1. 选择合适的读取模式
# 推荐:字段复用时用 read
temp = read(data) ;
result1 = pipe read(temp) | to_json ;
result2 = pipe read(temp) | base64_encode ;
# 推荐:一次性使用时用 take
final = take(data) | to_json ;
2. 显式类型声明
# 推荐:明确类型
port : digit = read(port) ;
ip_addr : ip = read(src_ip) ;
# 可接受:简单场景自动推断
name = read(name) ;
3. 提供默认值
# 推荐:关键字段提供默认值
version = read(version) { _ : chars(1.0.0) } ;
timeout = read(timeout) { _ : digit(30) } ;
4. 合理使用通配符
# 推荐:明确的通配符模式
cpu_metrics = collect read(keys:[cpu_*]) ;
# 避免:过于宽泛的通配符
all = collect read(keys:[*]) ; # 可能包含不需要的字段
下一步
OML 实战指南
按任务导向组织的实用指南,帮助你快速找到解决方案。
📚 任务导航
| 任务类型 | 跳转 |
|---|---|
| WPL 与 OML 关联 | 理解关联机制、一对一/一对多关联 |
| 数据提取 | 字段提取的各种方式 |
| 数据转换 | 类型转换、时间、URL、Base64 等 |
| 数值计算 | 比例、差值、取整、分桶 |
| 忽略大小写匹配 | iequals / iequals_any(...) |
| 静态字典查表 | lookup_nocase(...) |
| 数据聚合 | 创建对象、数组 |
| 条件处理 | 状态码分类、端口识别、IP 范围等 |
| 数据富化 | SQL 查询、多表关联 |
| 复杂场景 | Web 日志、系统监控完整处理 |
WPL 与 OML 关联
任务:理解关联机制
核心概念:OML 通过 rule 字段匹配 WPL 的 package/rule 路径来建立关联。
WPL 规则:
package nginx {
rule access_log {
(ip:client_ip, time:timestamp, chars:request_uri, digit:status)
}
}
完整路径:/nginx/access_log(格式:/package/rule)
OML 配置:
name : nginx_processor
rule : /nginx/access_log # 匹配 WPL 的 package/rule
---
client : ip = read(client_ip) ;
time : time = read(timestamp) ;
uri = read(request_uri) ;
status : digit = read(status) ;
说明:只有 WPL rule 为 /nginx/access_log 的数据会被这个 OML 处理。
任务:一对多关联(通配符匹配)
场景:一个 WPL 规则可以被多个 OML 配置处理
WPL 规则:
package : nginx
rule : access_log
# 完整路径:/nginx/access_log
OML 配置 1(基础处理):
name : nginx_basic
rule : /nginx/* # 匹配所有 nginx 相关规则
---
timestamp : time = Now::time() ;
source = chars(nginx) ;
OML 配置 2(访问日志专用):
name : nginx_access_detail
rule : /nginx/access_log # 精确匹配访问日志
---
user_id = read(user_id) ;
uri = read(request_uri) ;
status : digit = read(status) ;
说明:同一条数据可以被多个 OML 配置处理(如果在不同的 Sink Group 中)。
任务:通配符模式匹配
场景:使用通配符处理多种类型的数据
支持的通配符模式:
| OML rule | 匹配的 WPL rule | 说明 |
|---|---|---|
/nginx/* | /nginx/access_log/nginx/error_log | 前缀匹配 |
*/access_log | /nginx/access_log/apache/access_log | 后缀匹配 |
/nginx/access* | /nginx/access_log/nginx/access_v2 | 部分匹配 |
* | 任意规则 | 全匹配 |
示例:处理所有访问日志
name : all_access_logs
rule : */access_log # 匹配所有 access_log
---
timestamp : time = Now::time() ;
uri = read(request_uri) ;
status : digit = read(status) ;
任务:多个 WPL 规则共享一个 OML
场景:不同来源的数据使用相同的转换逻辑
WPL 规则 1:
package : nginx
rule : access_log
# 路径:/nginx/access_log
WPL 规则 2:
package : apache
rule : access_log
# 路径:/apache/access_log
共享的 OML 配置:
name : web_access_handler
rule : */access_log # 匹配所有 access_log
---
# 统一的字段映射
timestamp : time = read(time) ;
client_ip : ip = read(option:[remote_addr, client_ip]) ;
uri = read(option:[request_uri, request]) ;
status : digit = read(option:[status, status_code]) ;
# 统一的输出格式
access : obj = object {
time : time = read(timestamp) ;
ip : ip = read(client_ip) ;
uri : chars = read(uri) ;
status : digit = read(status) ;
} ;
说明:使用 option 参数处理不同来源的字段名差异。
数据提取
综合示例:字段提取的各种方式
name : data_extraction
rule : /app/data
---
# 1. 简单提取
user_id = read(user_id) ;
# 2. 提供默认值
country = read(country) { _ : chars(CN) } ;
# 3. 按优先级尝试多个字段
user_id = read(option:[id, user_id, uid]) ;
# 4. 提取嵌套数据
username = read(/user/info/name) ;
# 5. 批量提取匹配模式
cpu_metrics = collect read(keys:[cpu_*]) ;
数据转换
综合示例:常用类型转换
name : type_conversion
rule : /app/data
---
# 字符串转各种类型
port : digit = read(port) ; # 转整数
ip : ip = read(ip_addr) ; # 转 IP
cpu : float = read(cpu_usage) ; # 转浮点数
active : bool = read(is_active) ; # 转布尔值
# 时间转时间戳
ts_sec = read(event_time) | Time::to_ts_zone(0, s) ; # 秒
ts_ms = read(event_time) | Time::to_ts_zone(8, ms) ; # 毫秒(UTC+8)
# URL 解析
domain = read(url) | url(domain) ;
path = read(url) | url(path) ;
params = read(url) | url(params) ;
# Base64 编解码
decoded = read(encoded) | base64_decode(Utf8) ;
encoded = read(message) | base64_encode ;
# IP 转整数
ip_int = read(src_ip) | ip4_to_int ;
数值计算
任务:计算风险分数
name : risk_score
rule : /system/metrics
---
risk_score : float = calc(read(cpu) * 0.7 + read(mem) * 0.3) ;
任务:计算差值和比例
name : calc_delta_ratio
rule : /app/stats
---
delta : digit = calc(read(cur) - read(prev)) ;
ratio : float = calc(read(ok_cnt) / read(total_cnt)) ;
任务:分桶和百分比取整
name : calc_bucket_pct
rule : /user/metrics
---
bucket : digit = calc(read(uid) % 16) ;
error_pct : digit = calc(round((read(err_cnt) * 100) / read(total_cnt))) ;
任务:处理算术失败
name : calc_safe
rule : /app/stats
---
raw_ratio : float = calc(read(ok_cnt) / read(total_cnt)) ;
safe_ratio : float = read(raw_ratio) { _ : float(0.0) } ;
说明:
calc(...)失败时不会抛错,也不会返回0- 除零、字段缺失、非数值输入、整数溢出、
NaN/inf都会得到ignore - 如果业务上需要兜底值,请再配合
read(...) { _ : ... }
忽略大小写匹配
任务:状态归类时忽略大小写
name : status_class
rule : /app/status
---
status_class = match read(status) {
iequals_any('success', 'ok', 'done') => chars(good) ;
iequals_any('error', 'failed', 'timeout') => chars(bad) ;
_ => chars(other) ;
} ;
说明:
- 适合处理
SUCCESS/Success/success这类不稳定大小写输入 - 如果只有一个候选值,用
iequals('value')
静态字典查表
任务:把状态映射成分值
name : status_score
rule : /app/status
---
static {
score_map = object {
error = float(90.0);
warning = float(70.0);
success = float(20.0);
};
}
risk_score : float = lookup_nocase(score_map, read(status), 40.0) ;
说明:
lookup_nocase(...)只查static中定义的 object- key 会先做忽略大小写归一化
- 未命中时返回第三个参数
数据聚合
任务:创建对象
name : create_object
rule : /system/metrics
---
system_info : obj = object {
host : chars = read(hostname) ;
cpu : float = read(cpu_usage) ;
memory : float = read(mem_usage) ;
} ;
任务:创建嵌套对象
name : nested_object
rule : /app/deployment
---
deployment : obj = object {
application : obj = object {
name : chars = read(app_name) ;
version : chars = read(version) ;
} ;
infrastructure : obj = object {
region : chars = read(region) ;
instance_id : chars = read(instance_id) ;
} ;
} ;
任务:创建数组
name : create_array
rule : /network/ports
---
# 收集多个端口
ports : array = collect read(keys:[sport, dport]) ;
# 转换为 JSON 字符串
ports_json = read(ports) | to_json ;
# 获取数组元素
first_port = read(ports) | nth(0) ;
条件处理
任务:状态码分类
name : status_classification
rule : /http/response
---
status_level = match read(status_code) {
in (digit(200), digit(299)) => chars(success) ;
in (digit(400), digit(499)) => chars(client_error) ;
in (digit(500), digit(599)) => chars(server_error) ;
_ => chars(unknown) ;
} ;
任务:端口服务识别
name : port_service
rule : /network/traffic
---
service = match read(port) {
digit(22) => chars(SSH) ;
digit(80) => chars(HTTP) ;
digit(443) => chars(HTTPS) ;
digit(3306) => chars(MySQL) ;
_ => chars(Unknown) ;
} ;
任务:IP 地址范围匹配
name : ip_zone_match
rule : /network/connection
---
zone = match read(src_ip) {
in (ip(10.0.0.0), ip(10.255.255.255)) => chars(Private) ;
in (ip(172.16.0.0), ip(172.31.255.255)) => chars(Private) ;
in (ip(192.168.0.0), ip(192.168.255.255)) => chars(Private) ;
_ => chars(Public) ;
} ;
任务:多条件组合判断
name : multi_condition
rule : /firewall/rule
---
traffic_type = match (read(protocol), read(port)) {
(chars(tcp), digit(22)) => chars(SSH) ;
(chars(tcp), digit(443)) => chars(HTTPS) ;
(chars(udp), digit(53)) => chars(DNS) ;
_ => chars(Other) ;
} ;
任务:OR 条件匹配
场景:在 match 分支中使用 | 表示多个备选条件
name : or_match
rule : /network/traffic
---
# 单源 OR:城市归类
tier = match read(city) {
chars(bj) | chars(sh) | chars(gz) => chars(tier1) ;
chars(cd) | chars(wh) => chars(tier2) ;
_ => chars(other) ;
} ;
任务:多源 + OR 条件组合
场景:同时匹配多个字段,每个条件位置支持 OR 备选
name : multi_or_match
rule : /network/traffic
---
# 多源 + OR
priority = match (read(city), read(level)) {
(chars(bj) | chars(sh), chars(high)) => chars(priority) ;
(chars(gz), chars(low) | chars(mid)) => chars(normal) ;
_ => chars(default) ;
} ;
任务:多源匹配(三源及以上)
场景:需要同时匹配三个或更多字段
name : triple_match
rule : /firewall/rule
---
# 三源 match
action = match (read(protocol), read(port), read(zone)) {
(chars(tcp), digit(22), chars(internal)) => chars(allow) ;
(chars(tcp), digit(443), chars(external)) => chars(inspect) ;
_ => chars(deny) ;
} ;
数据富化(SQL 查询)
任务:用户信息查询
场景:根据 user_id 查询用户详细信息
输入:
user_id = "1001"
数据库表 (users):
| id | name | department | |
|---|---|---|---|
| 1001 | 张三 | zhangsan@example.com | 研发部 |
OML:
name : user_lookup
---
user_name, user_email, user_dept =
select name, email, department
from users
where id = read(user_id) ;
输出:
user_name = "张三"
user_email = "zhangsan@example.com"
user_dept = "研发部"
任务:IP 地理位置查询
场景:查询 IP 地址的地理位置信息
输入:
src_ip = "203.0.113.1"
数据库表 (ip_geo):
| ip_start_int | ip_end_int | country | city |
|---|---|---|---|
| 3405803776 | 3405804031 | US | Los Angeles |
OML:
name : ip_geolocation
---
# 先将 IP 转为整数
ip_int = pipe read(src_ip) | ip4_to_int ;
# 查询地理位置
country, city =
select country, city
from ip_geo
where ip_start_int <= read(ip_int)
and ip_end_int >= read(ip_int) ;
输出:
ip_int = 3405803777
country = "US"
city = "Los Angeles"
任务:多表关联查询
场景:通过多次查询关联多个表的数据
输入:
order_id = "ORD-2024-001"
OML:
name : multi_table_lookup
---
# 第一步:查询订单信息
user_id, amount =
select user_id, amount
from orders
where id = read(order_id) ;
# 第二步:查询用户信息
user_name, level =
select name, level
from users
where id = read(user_id) ;
# 第三步:查询折扣信息
discount =
select discount
from user_levels
where level = read(level) ;
输出:
user_id = "U1001"
amount = "199.99"
user_name = "王五"
level = "VIP"
discount = "0.9"
复杂场景
场景:Web 访问日志完整处理
任务:处理 Web 访问日志,包含字段提取、类型转换、条件判断、数据聚合
输入:
timestamp = "15/Jan/2024:14:30:00 +0800"
src_ip = "203.0.113.1"
method = "GET"
url = "/api/users?page=1"
status = "200"
size = "1234"
OML:
name : web_log_processing
---
# 时间处理
event_ts = pipe read(timestamp) | Time::to_ts_zone(0, s) ;
# 字段提取
source_ip : ip = read(src_ip) ;
http_method = read(method) ;
status_code : digit = read(status) ;
response_size : digit = read(size) ;
# URL 解析
request_path = pipe read(url) | url(path) ;
query_params = pipe read(url) | url(params) ;
# 状态码分类
status_category = match read(status_code) {
in (digit(200), digit(299)) => chars(Success) ;
in (digit(400), digit(499)) => chars(Client_Error) ;
in (digit(500), digit(599)) => chars(Server_Error) ;
_ => chars(Unknown) ;
} ;
# 数据聚合
access_log : obj = object {
timestamp : digit = read(event_ts) ;
client : obj = object {
ip : ip = read(source_ip) ;
} ;
request : obj = object {
method : chars = read(http_method) ;
path : chars = read(request_path) ;
query : chars = read(query_params) ;
} ;
response : obj = object {
status : digit = read(status_code) ;
category : chars = read(status_category) ;
size : digit = read(response_size) ;
} ;
} ;
输出:
{
"access_log": {
"timestamp": 1705318200,
"client": {
"ip": "203.0.113.1"
},
"request": {
"method": "GET",
"path": "/api/users",
"query": "page=1"
},
"response": {
"status": 200,
"category": "Success",
"size": 1234
}
}
}
场景:系统监控数据处理
任务:处理系统监控数据,包含数据提取、告警判断、嵌套对象创建
输入:
hostname = "prod-web-01"
cpu_user = "65.5"
cpu_system = "15.2"
mem_used = "6144"
mem_total = "8192"
OML:
name : system_monitoring
---
# 时间戳
event_time = Now::time() ;
# 告警判断
cpu_alert = match read(cpu_user) {
in (digit(0), digit(60)) => chars(Normal) ;
in (digit(60), digit(80)) => chars(Warning) ;
_ => chars(Critical) ;
} ;
mem_alert = match read(mem_used) {
in (digit(0), digit(6000)) => chars(Normal) ;
in (digit(6000), digit(7000)) => chars(Warning) ;
_ => chars(Critical) ;
} ;
# 数据聚合
metrics : obj = object {
host : obj = object {
name : chars = read(hostname) ;
timestamp : time = read(event_time) ;
} ;
cpu : obj = object {
user : float = read(cpu_user) ;
system : float = read(cpu_system) ;
alert : chars = read(cpu_alert) ;
} ;
memory : obj = object {
used : digit = read(mem_used) ;
total : digit = read(mem_total) ;
alert : chars = read(mem_alert) ;
} ;
} ;
输出:
{
"metrics": {
"host": {
"name": "prod-web-01",
"timestamp": "2024-01-15 14:30:00"
},
"cpu": {
"user": 65.5,
"system": 15.2,
"alert": "Warning"
},
"memory": {
"used": 6144,
"total": 8192,
"alert": "Warning"
}
}
}
下一步
OML 函数参考
本文档提供所有内置函数和管道函数的完整参考,采用标准化格式便于查找。
📚 详细文档导航
📋 OML 所有函数速查
内置函数
| 函数 | 说明 | 示例 |
|---|---|---|
calc(...) | 执行显式算术表达式 | score = calc(read(cpu) * 0.7 + read(mem) * 0.3) ; |
lookup_nocase(...) | 对静态 object 做忽略大小写查表 | score = lookup_nocase(status_score, read(status), 40.0) ; |
Now::time() | 获取当前时间 | event_time = Now::time() ; |
Now::date() | 获取当前日期(YYYYMMDD) | today = Now::date() ; |
Now::hour() | 获取当前小时(YYYYMMDDHH) | current_hour = Now::hour() ; |
管道函数
| 功能分类 | 函数 | 说明 | 示例 |
|---|---|---|---|
| 编码 | base64_encode | Base64 编码 | read(data) | base64_encode |
base64_decode | Base64 解码(支持 Utf8/Gbk) | read(data) | base64_decode(Utf8) | |
| 转义 | html_escape | HTML 转义 | read(text) | html_escape |
html_unescape | HTML 反转义 | read(html) | html_unescape | |
json_escape | JSON 转义 | read(text) | json_escape | |
json_unescape | JSON 反转义 | read(json) | json_unescape | |
str_escape | 字符串转义 | read(str) | str_escape | |
| 时间 | Time::to_ts | 转时间戳(秒,UTC+8) | read(time) | Time::to_ts |
Time::to_ts_ms | 转时间戳(毫秒,UTC+8) | read(time) | Time::to_ts_ms | |
Time::to_ts_us | 转时间戳(微秒,UTC+8) | read(time) | Time::to_ts_us | |
Time::to_ts_zone | 转指定时区时间戳 | read(time) | Time::to_ts_zone(0, ms) | |
| 数据访问 | nth(index) | 获取数组元素 | read(arr) | nth(0) |
get(key) | 获取对象字段 | read(obj) | get(name) | |
path(part) | 提取文件路径(name/path) | read(path) | path(name) | |
url(part) | 提取 URL(domain/host/path/params/uri) | read(url) | url(domain) | |
sxf_get(field) | 提取特殊格式字段 | read(log) | sxf_get(status) | |
| 转换 | to_str | 转换为字符串 | read(ip) | to_str |
to_json | 转换为 JSON | read(arr) | to_json | |
ip4_to_int | IPv4 转整数 | read(ip) | ip4_to_int | |
| 控制 | skip_empty | 跳过空值 | read(field) | skip_empty |
常用场景速查
| 我想做什么 | 使用方法 |
|---|---|
| 获取当前时间 | event_time = Now::time() ; |
| 时间转时间戳 | ts = read(time) | Time::to_ts_zone(0, ms) ; |
| Base64 解码 | decoded = read(data) | base64_decode(Utf8) ; |
| HTML 转义 | escaped = read(text) | html_escape ; |
| 解析 URL | domain = read(url) | url(domain) ; |
| 提取文件名 | filename = read(path) | path(name) ; |
| 获取数组第一个元素 | first = read(arr) | nth(0) ; |
| 获取对象字段 | name = read(obj) | get(name) ; |
| IP 转整数 | ip_int = read(ip) | ip4_to_int ; |
| 跳过空值 | result = read(field) | skip_empty ; |
| 链式处理 | result = read(data) | to_json | base64_encode ; |
| 字符串格式化 | msg = fmt("{}:{}", @ip, @port) ; |
| 条件匹配 | level = match read(status) { ... } ; |
| 忽略大小写多值匹配 | iequals_any('success', 'ok', 'done') => chars(good) |
| 静态字典查表 | lookup_nocase(status_score, read(status), 40.0) |
| 创建对象 | info : obj = object { ... } ; |
| 创建数组 | items : array = collect read(keys:[...]) ; |
| 提供默认值 | country = read(country) { _ : chars(CN) } ; |
| 选择性读取 | id = read(option:[id, uid, user_id]) ; |
| 批量收集 | metrics = collect read(keys:[cpu_*]) ; |
| 算术计算 | risk = calc(read(cpu) * 0.7 + read(mem) * 0.3) ; |
内置函数
内置函数可以直接在赋值表达式中使用,无需 pipe 关键字。
calc(…)
执行显式算术表达式。
语法:
calc(<expr>)
支持能力:
- 运算符:
+ - * / % - 函数:
abs(...)、round(...)、floor(...)、ceil(...) - 操作数:数值字面量、
read(...)、take(...)、@field
返回类型:
+ - *:若存在浮点操作数则返回float,否则返回digit/:始终返回float%:仅支持整数取模,返回digit
失败行为:
- 除零、字段缺失、非数值输入、浮点
%、整数溢出、NaN/inf都返回ignore
示例:
risk_score : float = calc(read(cpu) * 0.7 + read(mem) * 0.3) ;
delta : digit = calc(read(cur) - read(prev)) ;
distance : float = calc(abs(read(actual) - read(expect))) ;
error_pct : digit = calc(round((read(err_cnt) * 100) / read(total_cnt))) ;
lookup_nocase(…)
基于 static 中定义的 object 做忽略大小写查表。
语法:
lookup_nocase(<dict_symbol>, <key_expr>, <default_expr>)
参数:
dict_symbol:static中定义的 object 符号key_expr:待查 key,通常是read(...)default_expr:未命中时返回的默认值
查表规则:
- key 会先做
trim + lowercase - 命中后返回字典中的对应值
- 未命中或 key 不是字符串时,返回
default_expr
示例:
static {
status_score = object {
error = float(90.0);
warning = float(70.0);
success = float(20.0);
};
}
risk_score : float = lookup_nocase(status_score, read(status), 40.0) ;
更多说明:
iequals_any(...)详见 functions/match_functions.mdlookup_nocase(...)详见 functions/lookup_nocase.md
Now::time()
获取当前时间。
语法:
Now::time()
参数:无
返回类型:time
示例:
event_time : time = Now::time() ;
# 输出:2024-01-15 14:30:45
Now::date()
获取当前日期,格式为 YYYYMMDD 的整数。
语法:
Now::date()
参数:无
返回类型:digit
示例:
today : digit = Now::date() ;
# 输出:20240115
Now::hour()
获取当前时间精确到小时,格式为 YYYYMMDDHH 的整数。
语法:
Now::hour()
参数:无
返回类型:digit
示例:
current_hour : digit = Now::hour() ;
# 输出:2024011514
管道函数
管道函数通过 pipe 关键字和 | 操作符链式调用(pipe 关键字可省略)。
基本语法:
# 使用 pipe 关键字
result = pipe read(field) | function1 | function2(param) ;
# 省略 pipe 关键字
result = read(field) | function1 | function2(param) ;
编码函数
base64_encode
将字符串进行 Base64 编码。
语法:
| base64_encode
参数:无
输入类型:chars
输出类型:chars
示例:
encoded = read(payload) | base64_encode ;
# 输入:"Hello, OML!"
# 输出:"SGVsbG8sIE9NTCE="
base64_decode
将 Base64 编码的字符串解码。
语法:
| base64_decode
| base64_decode(<encoding>)
参数:
encoding(可选):字符编码类型,默认为Utf8
支持的编码:
Utf8- UTF-8 编码(默认)Gbk- GBK 中文编码Imap- IMAP Base64 变体(将非 ASCII 字节转义为\xNN格式)- 更多编码请参阅源码文档
输入类型:chars
输出类型:chars
示例:
# 标准 UTF-8 解码
decoded = read(data) | base64_decode ;
# 输入:"SGVsbG8sIE9NTCE="
# 输出:"Hello, OML!"
# GBK 中文解码
gbk_text = read(gbk_data) | base64_decode(Gbk) ;
# IMAP 变体解码(处理二进制数据)
raw = read(binary_data) | base64_decode(Imap) ;
转义函数
html_escape
对 HTML 特殊字符进行转义。
语法:
| html_escape
参数:无
转义规则:
<→<>→>&→&"→"'→'
输入类型:chars
输出类型:chars
示例:
safe_html = read(user_input) | html_escape ;
# 输入:"<script>alert('xss')</script>"
# 输出:"<script>alert('xss')</script>"
html_unescape
将 HTML 实体还原为原始字符。
语法:
| html_unescape
参数:无
输入类型:chars
输出类型:chars
示例:
original = read(escaped_html) | html_unescape ;
# 输入:"<div>Hello</div>"
# 输出:"<div>Hello</div>"
json_escape
对 JSON 字符串中的特殊字符进行转义。
语法:
| json_escape
参数:无
输入类型:chars
输出类型:chars
示例:
json_safe = read(text) | json_escape ;
# 转义引号、反斜杠、换行符等 JSON 特殊字符
json_unescape
将 JSON 转义序列还原为原始字符。
语法:
| json_unescape
参数:无
输入类型:chars
输出类型:chars
示例:
original = read(escaped_json) | json_unescape ;
# 还原 \n、\t、\"等转义序列
str_escape
对字符串中的特殊字符进行转义(主要是引号和反斜杠)。
语法:
| str_escape
参数:无
输入类型:chars
输出类型:chars
示例:
escaped = read(raw_string) | str_escape ;
# 输入:'hello"world'
# 输出:'hello\"world'
时间函数
Time::to_ts
将时间转换为 Unix 时间戳(秒),使用 UTC+8 时区。
语法:
| Time::to_ts
参数:无
输入类型:time
输出类型:digit
示例:
timestamp = read(occur_time) | Time::to_ts ;
# 输入:2024-01-15 14:30:00
# 输出:1705304400(UTC+8)
Time::to_ts_ms
将时间转换为 Unix 时间戳(毫秒),使用 UTC+8 时区。
语法:
| Time::to_ts_ms
参数:无
输入类型:time
输出类型:digit
示例:
timestamp_ms = read(occur_time) | Time::to_ts_ms ;
# 输入:2024-01-15 14:30:00
# 输出:1705304400000
Time::to_ts_us
将时间转换为 Unix 时间戳(微秒),使用 UTC+8 时区。
语法:
| Time::to_ts_us
参数:无
输入类型:time
输出类型:digit
示例:
timestamp_us = read(occur_time) | Time::to_ts_us ;
# 输入:2024-01-15 14:30:00
# 输出:1705304400000000
Time::to_ts_zone
将时间转换为指定时区的 Unix 时间戳。
语法:
| Time::to_ts_zone(<timezone_offset>, <unit>)
参数:
timezone_offset:时区偏移(小时)0:UTC8:UTC+8(北京时间)-5:UTC-5(美东时间)
unit:时间戳单位s或ss:秒ms:毫秒us:微秒
输入类型:time
输出类型:digit
示例:
# UTC 时间戳(秒)
utc_ts = read(occur_time) | Time::to_ts_zone(0, s) ;
# UTC+8 时间戳(毫秒)
beijing_ts_ms = read(occur_time) | Time::to_ts_zone(8, ms) ;
# UTC-5 时间戳(秒)
eastern_ts = read(occur_time) | Time::to_ts_zone(-5, ss) ;
# UTC 时间戳(微秒)
utc_ts_us = read(occur_time) | Time::to_ts_zone(0, us) ;
数据访问函数
nth
获取数组中指定索引的元素。
语法:
| nth(<index>)
参数:
index:数组索引(从 0 开始)
输入类型:array
输出类型:元素类型
示例:
first_item = read(items) | nth(0) ;
second_item = read(items) | nth(1) ;
# 输入:[10, 20, 30]
# nth(0) 输出:10
# nth(1) 输出:20
get
获取对象中指定键的值。
语法:
| get(<key>)
参数:
key:对象的字段名
输入类型:obj
输出类型:字段值类型
示例:
# 获取对象的字段
name = read(user) | get(name) ;
# 链式调用
first_name = read(users) | nth(0) | get(name) ;
# 输入:[{"name": "John", "age": 30}, {"name": "Jane", "age": 25}]
# 输出:"John"
path
从文件路径中提取指定部分。
语法:
| path(<part>)
参数:
part:要提取的部分name:文件名(含扩展名)path:目录路径
输入类型:chars
输出类型:chars
示例:
# 输入:"C:\Users\test\file.txt"
filename = read(file_path) | path(name) ;
# 输出:"file.txt"
parent = read(file_path) | path(path) ;
# 输出:"C:/Users/test"
url
从 URL 中提取指定部分。
语法:
| url(<part>)
参数:
part:要提取的部分domain:域名(不含端口)host:主机(含端口)path:路径uri:完整 URI(路径 + 查询 + 片段)params:查询参数
输入类型:chars
输出类型:chars
示例:
# 输入:"https://api.example.com:8080/v1/users?id=1&type=admin#section"
domain = read(http_url) | url(domain) ;
# 输出:"api.example.com"
host = read(http_url) | url(host) ;
# 输出:"api.example.com:8080"
path = read(http_url) | url(path) ;
# 输出:"/v1/users"
uri = read(http_url) | url(uri) ;
# 输出:"/v1/users?id=1&type=admin#section"
params = read(http_url) | url(params) ;
# 输出:"id=1&type=admin"
sxf_get
从特殊格式的文本中提取字段值。
语法:
| sxf_get(<field_name>)
参数:
field_name:要提取的字段名
输入类型:chars
输出类型:chars
示例:
# 从格式化文本中提取字段
status = read(log_line) | sxf_get(statusCode) ;
username = read(log_line) | sxf_get(username) ;
转换函数
to_str
将值转换为字符串。
语法:
| to_str
参数:无
输入类型:任意类型
输出类型:chars
示例:
ip_str = read(src_ip) | to_str ;
# 输入:192.168.1.100(IP 类型)
# 输出:"192.168.1.100"
num_str = read(count) | to_str ;
# 输入:42(digit 类型)
# 输出:"42"
to_json
将值转换为 JSON 字符串。
语法:
| to_json
参数:无
输入类型:任意类型
输出类型:chars
示例:
# 数组转 JSON
ports_json = read(ports) | to_json ;
# 输入:[80, 443]
# 输出:"[80,443]"
# 对象转 JSON
user_json = read(user) | to_json ;
# 输入:{name: "John", age: 30}
# 输出:'{"name":"John","age":30}'
ip4_to_int
将 IPv4 地址转换为整数。
语法:
| ip4_to_int
参数:无
输入类型:ip 或 chars
输出类型:digit
示例:
ip_int = read(src_ip) | ip4_to_int ;
# 输入:192.168.1.100
# 输出:3232235876
# 用于 IP 范围比较
ip_int = read(src_ip) | ip4_to_int ;
in_range = match read(ip_int) {
in (digit(3232235776), digit(3232236031)) => chars(True) ;
_ => chars(False) ;
} ;
控制函数
skip_empty
如果输入值为空,则跳过该字段的输出。
语法:
| skip_empty
参数:无
输入类型:任意类型 输出类型:原类型或跳过
何时被视为“空“:
- 空字符串
"" - 空数组
[] - 数值
0 - 空对象
{}
示例:
# 如果 optional_field 为空,则不输出 result 字段
result = read(optional_field) | skip_empty ;
# 常用于过滤空数组
items = read(items_array) | skip_empty ;
下一步
OML 集成指南
本文档介绍如何将 OML 集成到数据处理流水线中,包括配置关联、数据流向和路由规则。
目录
数据流概览
在 WP Engine 数据处理流水线中,数据的完整流向如下:
原始日志/数据
↓
[WPL 解析]
↓
结构化数据(携带 Rule 标识)
↓
[OML 转换](可选)
↓
目标格式数据
↓
[Sink 输出]
↓
目标存储(文件/数据库/消息队列等)
关键概念
- WPL Rule:标识数据来源和类型的路径,如
/nginx/access_log - OML Model:定义数据转换逻辑的 OML 配置文件
- Sink Group:输出组,定义数据的输出目标集合
- Connector:连接器,定义具体的输出方式(文件、Kafka、数据库等)
OML 在数据流中的位置
OML 作为数据转换引擎,位于 WPL 解析和 Sink 输出之间:
graph LR
A[原始数据] --> B[WPL 解析]
B --> C[结构化数据<br/>rule: /nginx/access_log]
C --> D{查找匹配的<br/>OML 模型}
D -->|找到匹配| E[OML 转换]
D -->|未找到| F[数据透传]
E --> G[转换后的数据]
F --> G
G --> H[Sink 输出]
style C fill:#e1f5ff
style E fill:#fff4e1
style G fill:#e8f5e9
工作原理:
- WPL 解析器处理原始数据,生成结构化数据并附带 Rule 标识
- 系统根据 Sink Group 配置查找匹配的 OML 模型
- 如果找到匹配的 OML 模型,执行转换;否则数据透传
- 转换后的数据发送到 Sink 进行输出
配置文件结构
项目目录结构
project/
├── oml/ # OML 模型目录
│ ├── nginx_access.oml # Nginx 访问日志转换
│ ├── nginx_error.oml # Nginx 错误日志转换
│ └── system_metrics.oml # 系统监控数据转换
├── topology/
│ └── sinks/ # Sink 配置目录
│ ├── web_logs.toml # Web 日志输出组
│ └── metrics.toml # 监控数据输出组
└── connectors/ # 连接器定义
├── file_sink.toml
├── kafka_sink.toml
└── mysql_sink.toml
OML 模型文件
OML 模型文件位于 oml/ 目录,使用 .oml 扩展名。
文件格式:
name : <模型名称>
rule : <WPL 规则模式>
---
<字段转换定义>
示例:oml/nginx_access.oml
name : nginx_access
rule : /nginx/access*
---
user_id = read(user_id) ;
timestamp : time = read(time) ;
status : digit = read(status_code) ;
uri = read(request_uri) ;
# 创建结构化输出
log : obj = object {
user : chars = read(user_id) ;
time : time = read(timestamp) ;
status : digit = read(status) ;
uri : chars = read(uri) ;
} ;
Sink Group 配置文件
Sink Group 配置文件位于 topology/sinks/ 目录,使用 TOML 格式。
文件格式:
version = "2.0"
[sink_group]
name = "输出组名称"
oml = ["<OML 模型名称>", ...] # 关联的 OML 模型
rule = ["<WPL 规则模式>", ...] # 可选:限定处理的规则
parallel = 1 # 可选:并行度
tags = ["key:value", ...] # 可选:标签
[[sink_group.sinks]]
name = "输出目标名称"
connect = "<连接器 ID>"
tags = ["key:value", ...]
[sink_group.sinks.params]
# 连接器特定的参数
示例:topology/sinks/web_logs.toml
version = "2.0"
[sink_group]
name = "web_logs"
oml = ["*"] # 使用所有匹配的 OML 模型
rule = [] # 不限定规则
parallel = 1
[[sink_group.sinks]]
name = "access_logs"
connect = "file_json_sink"
[sink_group.sinks.params]
file = "access.json"
[[sink_group.sinks]]
name = "error_logs"
connect = "file_json_sink"
[sink_group.sinks.params]
file = "error.json"
OML 与 Sink 关联
关联方式
Sink Group 通过 oml 字段与 OML 模型建立关联,支持三种模式:
1. 通配符模式(推荐)
使用 ["*"] 自动匹配所有符合条件的 OML 模型。
[sink_group]
name = "all_logs"
oml = ["*"] # 自动匹配所有 OML 模型
工作原理:
- 数据携带 WPL Rule(如
/nginx/access_log) - 系统遍历所有 OML 模型
- 找到
rule字段匹配的 OML 模型 - 执行转换
适用场景:
- 需要处理多种类型的数据
- OML 模型经常变动
- 希望自动发现新的 OML 模型
2. 指定模型名称
明确列出需要使用的 OML 模型。
[sink_group]
name = "nginx_logs"
oml = ["nginx_access", "nginx_error"]
工作原理:
- 只在指定的 OML 模型列表中查找匹配
- 其他 OML 模型会被忽略
适用场景:
- 明确知道需要哪些 OML 模型
- 需要精确控制转换逻辑
- 避免意外使用其他 OML 模型
3. 空列表(数据透传)
不使用任何 OML 转换,数据直接输出。
[sink_group]
name = "raw_logs"
oml = [] # 不使用 OML 转换
适用场景:
- 不需要数据转换
- 直接输出 WPL 解析后的原始数据
路由规则
OML 模型匹配规则
OML 模型通过 rule 字段定义匹配的 WPL Rule 模式,支持通配符。
匹配逻辑:
数据的 WPL Rule 是否匹配 OML 模型的 rule 字段
通配符规则:
*匹配任意字符(包括/)- 支持前缀匹配、后缀匹配、完全匹配
示例:
| OML rule 字段 | 数据 WPL Rule | 是否匹配 |
|---|---|---|
/nginx/* | /nginx/access_log | ✅ 匹配 |
/nginx/* | /nginx/error_log | ✅ 匹配 |
/nginx/access* | /nginx/access_log | ✅ 匹配 |
/nginx/access* | /nginx/error_log | ❌ 不匹配 |
* | 任意规则 | ✅ 匹配 |
/apache/* | /nginx/access_log | ❌ 不匹配 |
Sink Group 规则过滤
Sink Group 可以通过 rule 字段进一步限定处理的数据。
[sink_group]
name = "filtered_logs"
oml = ["*"]
rule = ["/nginx/*", "/apache/*"] # 只处理 Nginx 和 Apache 日志
工作流程:
1. 数据的 WPL Rule 是否匹配 Sink Group 的 rule?
├─ 是 → 继续
└─ 否 → 跳过此 Sink Group
2. 查找匹配的 OML 模型
├─ 找到 → 执行转换
└─ 未找到 → 数据透传(如果 oml=["*"] 或 oml=[])
3. 输出到 Sink
配置示例
示例 1:基础配置
处理 Nginx 访问日志并输出到文件。
OML 模型:oml/nginx_access.oml
name : nginx_access
rule : /nginx/access_log
---
user_id = read(user_id) ;
timestamp : time = read(time) ;
status : digit = read(status_code) ;
uri = read(request_uri) ;
access_log : obj = object {
user : chars = read(user_id) ;
time : time = read(timestamp) ;
status : digit = read(status) ;
uri : chars = read(uri) ;
} ;
Sink Group 配置:topology/sinks/nginx_logs.toml
version = "2.0"
[sink_group]
name = "nginx_access_logs"
oml = ["nginx_access"]
[[sink_group.sinks]]
name = "file_output"
connect = "file_json_sink"
[sink_group.sinks.params]
file = "nginx_access.json"
示例 2:多 OML 模型配置
处理多种类型的日志。
OML 模型 1:oml/nginx_access.oml
name : nginx_access
rule : /nginx/access*
---
user_id = read(user_id) ;
uri = read(request_uri) ;
status : digit = read(status_code) ;
OML 模型 2:oml/apache_access.oml
name : apache_access
rule : /apache/access*
---
user = read(remote_user) ;
path = read(request) ;
code : digit = read(status) ;
Sink Group 配置:topology/sinks/web_logs.toml
version = "2.0"
[sink_group]
name = "all_web_logs"
oml = ["*"] # 自动匹配所有 OML 模型
[[sink_group.sinks]]
name = "unified_output"
connect = "file_json_sink"
[sink_group.sinks.params]
file = "web_logs.json"
示例 3:条件路由
根据数据类型输出到不同目标。
Sink Group 1:topology/sinks/error_logs.toml
version = "2.0"
[sink_group]
name = "error_logs"
oml = ["*"]
rule = ["*/error*"] # 只处理错误日志
[[sink_group.sinks]]
name = "error_file"
connect = "file_json_sink"
[sink_group.sinks.params]
file = "errors.json"
Sink Group 2:topology/sinks/access_logs.toml
version = "2.0"
[sink_group]
name = "access_logs"
oml = ["*"]
rule = ["*/access*"] # 只处理访问日志
[[sink_group.sinks]]
name = "access_file"
connect = "file_json_sink"
[sink_group.sinks.params]
file = "access.json"
示例 4:数据富化(SQL 集成)
从数据库查询额外信息。
OML 模型:oml/user_activity.oml
name : user_activity
rule : /app/user_activity
---
user_id = read(user_id) ;
action = read(action) ;
timestamp : time = Now::time() ;
# 从数据库查询用户信息
user_name, user_level =
select name, level
from users
where id = read(user_id) ;
# 聚合输出
activity : obj = object {
user : obj = object {
id : chars = read(user_id) ;
name : chars = read(user_name) ;
level : chars = read(user_level) ;
} ;
action : chars = read(action) ;
time : time = read(timestamp) ;
} ;
Sink Group 配置:topology/sinks/user_activities.toml
version = "2.0"
[sink_group]
name = "user_activities"
oml = ["user_activity"]
[[sink_group.sinks]]
name = "kafka_output"
connect = "kafka_sink"
[sink_group.sinks.params]
topic = "user-activities"
brokers = ["localhost:9092"]
工作流程
完整处理流程
1. 数据到达
↓
2. WPL 解析
├─ 生成结构化数据
└─ 附加 Rule 标识(如 /nginx/access_log)
↓
3. Sink Group 匹配
├─ 检查 Sink Group 的 rule 字段
└─ 匹配 → 继续;不匹配 → 跳过
↓
4. OML 模型查找
├─ 根据 Sink Group 的 oml 字段
├─ 查找匹配的 OML 模型
└─ 找到 → 转换;未找到 → 透传
↓
5. 数据转换(如果有 OML)
├─ 执行 OML 转换逻辑
└─ 生成目标格式数据
↓
6. Sink 输出
├─ 根据 Connector 配置
└─ 输出到目标存储
多 Sink Group 并行处理
一条数据可以被多个 Sink Group 同时处理:
数据(rule: /nginx/access_log)
|
+---------------+---------------+
| |
Sink Group 1 Sink Group 2
(rule: ["/nginx/*"]) (rule: ["/nginx/access*"])
| |
OML 转换 A OML 转换 B
| |
输出到文件 输出到 Kafka
最佳实践
1. OML 模型命名
使用清晰的命名规则:
<数据源>_<数据类型>.oml
示例:
- nginx_access.oml
- apache_error.oml
- system_metrics.oml
2. Rule 模式设计
使用有意义的层次结构:
# 好的示例
rule : /nginx/access_log
rule : /apache/access_log
rule : /system/cpu_metrics
# 避免过于宽泛
rule : * # 会匹配所有数据
3. Sink Group 组织
按业务逻辑组织 Sink Group:
topology/sinks/
├── web_logs.toml # Web 日志
├── system_metrics.toml # 系统监控
├── application_logs.toml # 应用日志
└── security_events.toml # 安全事件
4. 使用通配符模式
对于灵活的配置,推荐使用通配符:
[sink_group]
oml = ["*"] # 自动发现所有 OML 模型
5. 数据透传场景
不需要转换时,明确使用空列表:
[sink_group]
oml = [] # 明确表示不使用 OML
6. 测试配置
在部署前测试配置:
- 验证 OML 语法
- 检查 Rule 匹配逻辑
- 确认 Sink 连接
- 测试数据流向
故障排查
问题 1:数据未经过 OML 转换
可能原因:
- OML 模型的
rule不匹配数据的 WPL Rule - Sink Group 的
oml配置错误
排查步骤:
- 检查数据的 WPL Rule
- 检查 OML 模型的
rule字段 - 验证通配符匹配逻辑
- 检查 Sink Group 的
oml配置
示例:
# OML 模型
rule : /nginx/access_log
# 数据 Rule
/nginx/access # ❌ 不匹配(缺少 _log)
# 修正
rule : /nginx/access* # ✅ 匹配
问题 2:数据被重复处理
可能原因:
- 多个 Sink Group 匹配同一数据
- 多个 OML 模型匹配同一 Rule
排查步骤:
- 检查所有 Sink Group 的
rule配置 - 确认是否需要并行处理
- 调整 Rule 模式避免重复
问题 3:OML 转换失败
可能原因:
- OML 语法错误
- 字段不存在
- 类型转换失败
排查步骤:
- 检查 OML 语法
- 验证输入数据结构
- 使用默认值处理缺失字段
- 检查类型转换逻辑
示例:
# 容错处理
port : digit = read(port) { _ : digit(80) } ;
user_id = read(user_id) { _ : chars(unknown) } ;
问题 4:Sink 输出失败
可能原因:
- Connector 配置错误
- 目标存储不可用
- 权限问题
排查步骤:
- 检查 Connector 配置
- 验证目标存储连接
- 检查权限和凭证
- 查看错误日志
下一步
OML 语法参考
本文档提供 OML 的完整语法定义(EBNF 格式),用于精确理解语法规则。
基于源码
crates/wp-oml的解析实现,词法细节复用wp_parser与wpl的既有解析能力。
📚 文档导航
| 章节 | 内容 |
|---|---|
| EBNF 符号说明 | 语法符号含义 |
| 顶层结构 | OML 文件结构 |
| 求值表达式 | 表达式类型、值表达式、函数调用等 |
| 高级表达式 | 格式化字符串、管道、match、聚合 |
| SQL 表达式 | SQL 查询语法 |
| 静态绑定 | static 常量定义与引用 |
| 临时字段 | __ 前缀中间字段 |
| 隐私段 | 数据脱敏语法 |
| 词法与约定 | 标识符、字面量、注释 |
| 数据类型 | 数据类型 |
| 完整示例 | 综合示例 |
| 管道函数速查 | 常用管道函数 |
| 语法要点 | 必需元素、可选元素、注意事项 |
EBNF 符号说明
=: 定义,: 连接(序列)|: 或(选择)[ ]: 可选(0 或 1 次){ }: 重复(0 或多次)( ): 分组"text": 字面量(* ... *): 注释
顶层结构
oml = header, sep_line, [ static_blocks ], aggregate_items,
[ sep_line, privacy_items ] ;
header = "name", ":", name, eol,
[ "rule", ":", rule_path, { rule_path }, eol ],
[ "enable", ":", ("true" | "false"), eol ] ;
sep_line = "---" ;
static_blocks = { "static", "{", static_item, { static_item }, "}" } ;
static_item = target, "=", eval, ";" ;
name = path ; (* 例如: test *)
rule_path = wild_path ; (* 例如: wpx/abc, wpx/efg *)
aggregate_items = aggregate_item, { aggregate_item } ;
aggregate_item = target_list, "=", eval, ";" ;
target_list = target, { ",", target } ;
target = target_name, [ ":", data_type ] ;
target_name = wild_key | "_" ; (* 允许带通配符 '*';'_' 表示匿名/丢弃 *)
data_type = type_ident ; (* auto|ip|chars|digit|float|time|bool|obj|array 等 *)
说明:
name : <配置名称>- 必需的配置名称声明rule : <规则路径>- 可选的规则关联,支持空格或换行分隔多个规则enable : true|false- 可选的启用开关(默认true);rule与enable的顺序不限static { ... }- 可选的静态绑定块,位于---分隔线之后、主绑定之前---- 分隔符,区分声明区和配置区- 每个配置条目必须以
;结束
求值表达式
表达式类型
eval = take_expr
| read_expr
| fmt_expr
| pipe_expr
| map_expr
| collect_expr
| calc_expr
| match_expr
| sql_expr
| value_expr
| fun_call
| static_ref ;
读取表达式
(* 变量获取:take/read 支持统一参数形态;可跟缺省体 *)
take_expr = "take", "(", [ arg_list ], ")", [ default_body ] ;
read_expr = "read", "(", [ arg_list ], ")", [ default_body ] ;
arg_list = arg, { ",", arg } ;
arg = "option", ":", "[", key, { ",", key }, "]"
| ("in"|"keys"), ":", "[", key, { ",", key }, "]"
| "get", ":", simple
| json_path ; (* 见 wp_parser::atom::take_json_path *)
default_body = "{", "_", ":", gen_acq, [ ";" ], "}" ;
gen_acq = take_expr | read_expr | value_expr | fun_call | static_ref ;
说明:
@仅作为变量获取语法糖用于 fmt/pipe/collect 的 var_get 位置@ref等价于read(ref),但不支持缺省体- 不作为独立求值表达式
示例:
# 基本读取
value = read(field) ;
# 带默认值
value = read(field) { _ : chars(default) } ;
# option 参数
value = read(option:[id, uid, user_id]) ;
# keys 参数
values = collect read(keys:[field1, field2]) ;
# JSON 路径
name = read(/user/info/name) ;
item = read(/data/[0]/name) ;
值表达式
(* 常量值:类型名+括号包裹的字面量 *)
value_expr = data_type, "(", literal, ")" ;
示例:
text = chars(hello) ;
text2 = chars('hello world') ;
count = digit(42) ;
ratio = float(3.14) ;
address = ip(192.168.1.1) ;
flag = bool(true) ;
ts = time(2020-10-01 12:30:30) ;
函数调用
(* 内置函数(零参占位):Now::* 家族 *)
fun_call = ("Now::time"
|"Now::date"
|"Now::hour"), "(", ")" ;
示例:
now = Now::time() ;
today = Now::date() ;
hour = Now::hour() ;
静态符号引用
(* 引用 static 块中定义的常量,直接使用标识符 *)
static_ref = ident ; (* 必须在 static { } 中已定义 *)
示例:
static {
tpl = object { id = chars(E1) ; } ;
}
target = tpl ; # 引用 static 中的 tpl
高级表达式
格式化字符串
(* 字符串格式化,至少 1 个参数 *)
fmt_expr = "fmt", "(", string, ",", var_get, { ",", var_get }, ")" ;
var_get = ("read" | "take"), "(", [ arg_list ], ")"
| "@", ident ; (* '@ref' 等价 read(ref),不支持缺省体 *)
示例:
message = fmt("{}-{}", @user, read(city)) ;
id = fmt("{}:{}", read(host), read(port)) ;
管道表达式
(* 管道:可省略 pipe 关键字 *)
pipe_expr = ["pipe"], var_get, "|", pipe_fun, { "|", pipe_fun } ;
pipe_fun = "nth", "(", unsigned, ")"
| "get", "(", ident, ")"
| "base64_decode", "(", [ encode_type ], ")"
| "path", "(", ("name"|"path"), ")"
| "url", "(", ("domain"|"host"|"uri"|"path"|"params"), ")"
| "Time::to_ts_zone", "(", [ "-" ], unsigned, ",", ("ms"|"us"|"ss"|"s"), ")"
| "starts_with", "(", string, ")"
| "map_to", "(", (string | number | bool), ")"
| "base64_encode" | "html_escape" | "html_unescape"
| "str_escape" | "json_escape" | "json_unescape"
| "Time::to_ts" | "Time::to_ts_ms" | "Time::to_ts_us"
| "to_json" | "to_str" | "skip_empty" | "ip4_to_int"
| "extract_main_word" | "extract_subject_object" ;
encode_type = ident ; (* 例如: Utf8/Gbk/Imap/... *)
示例:
# 使用 pipe 关键字
result = pipe read(data) | to_json | base64_encode ;
# 省略 pipe 关键字
result = read(data) | to_json | base64_encode ;
# 时间转换
ts = read(time) | Time::to_ts_zone(0, ms) ;
# URL 解析
host = read(url) | url(host) ;
# 字符串前缀检查
is_http = read(url) | starts_with('http://') ;
# 映射到常量值
status = read(code) | map_to(200) ;
# 提取主要单词
keyword = read(message) | extract_main_word ;
# 提取主客体结构
log_struct = read(message) | extract_subject_object ;
对象聚合
(* 聚合到对象:object 内部为子赋值序列;分号可选但推荐 *)
map_expr = "object", "{", map_item, { map_item }, "}" ;
map_item = map_targets, "=", sub_acq, [ ";" ] ;
map_targets = ident, { ",", ident }, [ ":", data_type ] ;
sub_acq = take_expr | read_expr | value_expr | fun_call | static_ref ;
示例:
info : obj = object {
name : chars = read(name) ;
age : digit = read(age) ;
city : chars = read(city) ;
} ;
数组聚合
(* 聚合到数组:从 VarGet 收集(支持 keys/option 通配) *)
collect_expr = "collect", var_get ;
示例:
# 收集多个字段
ports = collect read(keys:[sport, dport]) ;
# 使用通配符
metrics = collect read(keys:[cpu_*]) ;
算术表达式
calc_expr = "calc", "(", calc_add_expr, ")" ;
calc_add_expr = calc_mul_expr, { ("+" | "-"), calc_mul_expr } ;
calc_mul_expr = calc_unary_expr, { ("*" | "/" | "%"), calc_unary_expr } ;
calc_unary_expr = [ "-" ], calc_primary_expr ;
calc_primary_expr = number
| var_get
| calc_fun_expr
| "(", calc_add_expr, ")" ;
calc_fun_expr = calc_fun, "(", calc_add_expr, ")" ;
calc_fun = "abs" | "round" | "floor" | "ceil" ;
说明:
var_get支持read(...)、take(...),也支持@field语法糖- 操作数仅接受数值字面量或数值字段;
/始终返回float %仅支持整数取模;除零、字段缺失、非数值输入、非法%都会返回ignore- 当前
match分支值仍沿用既有子表达式,不直接接受calc(...);如需复用,先绑定到临时字段
示例:
risk_score : float = calc(read(cpu) * 0.7 + read(mem) * 0.3) ;
delta : digit = calc(read(cur) - read(prev)) ;
ratio : float = calc(read(ok_cnt) / read(total_cnt)) ;
bucket : digit = calc(read(uid) % 16) ;
error_pct : digit = calc(round((read(err_cnt) * 100) / read(total_cnt))) ;
模式匹配
(* 模式匹配:单源/多源两种形态,支持 in/!=/OR/函数匹配 与缺省分支 *)
match_expr = "match", match_source, "{", case1, { case1 }, [ default_case ], "}"
| "match", "(", var_get, ",", var_get, { ",", var_get }, ")", "{", case_multi, { case_multi }, [ default_case ], "}" ;
match_source = var_get ;
case1 = cond1, "=>", match_value, [ "," ], [ ";" ] ;
case_multi = "(", cond1, ",", cond1, { ",", cond1 }, ")", "=>", match_value, [ "," ], [ ";" ] ;
default_case = "_", "=>", match_value, [ "," ], [ ";" ] ;
match_value = read_expr | take_expr | value_expr | collect_expr | static_ref ;
cond1 = cond1_atom, { "|", cond1_atom } (* OR:多个条件用 | 分隔 *)
cond1_atom = "in", "(", value_expr, ",", value_expr, ")"
| "!", value_expr
| match_fun (* 函数匹配 *)
| value_expr ; (* 省略运算符表示等于 *)
match_fun = "starts_with", "(", string, ")" (* 前缀匹配 *)
| "ends_with", "(", string, ")" (* 后缀匹配 *)
| "contains", "(", string, ")" (* 子串匹配 *)
| "regex_match", "(", string, ")" (* 正则匹配 *)
| "iequals", "(", string, ")" (* 忽略大小写等于 *)
| "is_empty", "(", ")" (* 空值判断 *)
| "gt", "(", number, ")" (* 大于 *)
| "lt", "(", number, ")" (* 小于 *)
| "eq", "(", number, ")" (* 等于(浮点容差) *)
| "in_range", "(", number, ",", number, ")" ; (* 范围判断 *)
说明:
- 多源匹配:
match (src1, src2, ...)支持任意数量的源字段(≥2),不再限于双源 - OR 语法:在条件位置使用
|分隔多个备选条件,任一匹配即成功 - 函数匹配:支持 11 种内置匹配函数,用于字符串、数值的灵活判断
示例:
# 单源匹配
level = match read(status) {
in (digit(200), digit(299)) => chars(success) ;
in (digit(400), digit(499)) => chars(error) ;
_ => chars(other) ;
} ;
# 单源 OR 匹配
tier = match read(city) {
chars(bj) | chars(sh) | chars(gz) => chars(tier1) ;
chars(cd) | chars(wh) => chars(tier2) ;
_ => chars(other) ;
} ;
# 多源匹配(双源)
result = match (read(a), read(b)) {
(digit(1), digit(2)) => chars(case1) ;
_ => chars(default) ;
} ;
# 多源匹配(三源)
zone = match (read(city), read(region), read(country)) {
(chars(bj), chars(north), chars(cn)) => chars(result1) ;
_ => chars(default) ;
} ;
# 多源 + OR 匹配
priority = match (read(city), read(level)) {
(chars(bj) | chars(sh), chars(high)) => chars(priority) ;
(chars(gz), chars(low) | chars(mid)) => chars(normal) ;
_ => chars(default) ;
} ;
# 函数匹配
event = match read(Content) {
starts_with('[ERROR]') => chars(error) ;
starts_with('[WARN]') => chars(warning) ;
contains('timeout') => chars(timeout) ;
ends_with('.failed') => chars(failure) ;
regex_match('^\d{4}-\d{2}-\d{2}') => chars(dated) ;
is_empty() => chars(empty) ;
_ => chars(other) ;
} ;
# 数值函数匹配
grade = match read(score) {
gt(90) => chars(excellent) ;
in_range(60, 90) => chars(pass) ;
lt(60) => chars(fail) ;
_ => chars(unknown) ;
} ;
# 忽略大小写匹配
status = match read(result) {
iequals('success') => chars(ok) ;
iequals('error') => chars(fail) ;
_ => chars(other) ;
} ;
# 忽略大小写多值匹配
status_class = match read(status) {
iequals_any('success', 'ok', 'done') => chars(good) ;
iequals_any('error', 'failed', 'timeout') => chars(bad) ;
_ => chars(other) ;
} ;
lookup_nocase
lookup_nocase(dict_symbol, key_expr, default_expr) 用于基于静态 object 做忽略大小写查表。
static {
status_score = object {
error = float(90.0);
warning = float(70.0);
success = float(20.0);
};
}
risk_score : float = lookup_nocase(status_score, read(status), 40.0) ;
dict_symbol必须引用static中定义的 objectkey_expr会按trim + lowercase归一化后查表- 未命中或 key 不是字符串时,返回
default_expr
calc(...)
calc(expr) 用于显式执行数值算术表达式。
risk_score : float = calc(read(cpu) * 0.7 + read(mem) * 0.3) ;
bucket : digit = calc(read(uid) % 16) ;
distance : float = calc(abs(read(actual) - read(expect))) ;
error_pct : digit = calc(round((read(err_cnt) * 100) / read(total_cnt))) ;
- 支持运算符:
+ - * / % - 支持函数:
abs(...)、round(...)、floor(...)、ceil(...) - 支持字段访问:
read(...)、take(...)、@field - 除零、字段缺失、非数值输入、浮点
%都返回ignore
SQL 表达式
sql_expr = "select", sql_body, "where", sql_cond, ";" ;
sql_body = sql_safe_body ; (* 源码对白名单化:仅 [A-Za-z0-9_.] 与 '*' *)
sql_cond = cond_expr ;
cond_expr = cmp, { ("and" | "or"), cmp }
| "not", cond_expr
| "(", cond_expr, ")" ;
cmp = ident, sql_op, cond_rhs ;
sql_op = sql_cmp_op ; (* 见 wp_parser::sql_symbol::symbol_sql_cmp *)
cond_rhs = read_expr | take_expr | fun_call | sql_literal ;
sql_literal = number | string ;
严格模式说明
- 严格模式(默认开启):当主体
<cols from table>不满足白名单规则时,解析报错 - 兼容模式:设置环境变量
OML_SQL_STRICT=0,若主体非法则回退原文(不推荐) - 白名单规则:
- 列清单:
*或由[A-Za-z0-9_.]+组成的列名(允许点号作限定) - 表名:
[A-Za-z0-9_.]+(单表,不支持 join/子查询) from大小写不敏感;多余空白允许
- 列清单:
示例:
# 正确示例
name, email = select name, email from users where id = read(user_id) ;
# 使用字符串常量
data = select * from table where type = 'admin' ;
# IP 范围查询
zone = select zone from ip_geo
where ip_start_int <= ip4_int(read(src_ip))
and ip_end_int >= ip4_int(read(src_ip)) ;
错误示例(严格模式):
# ❌ 表名含非法字符
data = select a, b from table-1 where ... ;
# ❌ 列清单含函数
data = select sum(a) from t where ... ;
# ❌ 不支持 join
data = select a from t1 join t2 ... ;
静态绑定
static 块用于定义编译期常量,可在主绑定和 match 表达式中引用。
static_blocks = { "static", "{", static_item, { static_item }, "}" } ;
static_item = target, "=", eval, ";" ;
说明:
static块位于---分隔线之后、主绑定之前- 块内每个绑定会在编译期求值为
DataField - 主绑定中通过标识符直接引用:
result = symbol_name ; - 支持在
match的条件和结果、object子绑定、read/take的缺省体中引用 - 同名符号不允许重复定义
示例:
name : model_with_static
---
static {
tpl = object {
id = chars(E1) ;
type = chars(default) ;
} ;
fallback = chars(N/A) ;
}
# 直接引用 static 符号
template = tpl ;
# 在 match 结果中引用
target = match read(Content) {
starts_with('foo') => tpl ;
_ => tpl ;
} ;
# 在缺省体中引用
value = take(Value) { _ : fallback } ;
# 在 object 子绑定中引用
result = object {
clone = tpl ;
} ;
临时字段
以 __(双下划线)开头的字段名被标记为临时字段,在输出时自动转换为 Ignore 类型(不出现在最终数据中)。
用途:中间计算结果,不希望出现在输出记录中。
示例:
name : temp_example
---
# 临时字段:参与中间计算,不输出
__temp_type = chars(error) ;
# 引用临时字段进行匹配
result = match read(__temp_type) {
chars(error) => chars(failed) ;
_ => chars(ok) ;
} ;
输出记录中 result 正常输出,__temp_type 被自动忽略。
隐私段
注:引擎默认不启用运行期隐私/脱敏处理;以下为 DSL 语法能力说明,供需要的场景参考。
privacy_items = privacy_item, { privacy_item } ;
privacy_item = ident, ":", privacy_type ;
privacy_type = "privacy_ip"
| "privacy_specify_ip"
| "privacy_id_card"
| "privacy_mobile"
| "privacy_mail"
| "privacy_domain"
| "privacy_specify_name"
| "privacy_specify_domain"
| "privacy_specify_address"
| "privacy_specify_company"
| "privacy_keymsg" ;
示例:
name : privacy_example
---
field = read() ;
---
src_ip : privacy_ip
pos_sn : privacy_keymsg
词法与约定
path = ident, { ("/" | "."), ident } ;
wild_path = path | path, "*" ; (* 允许通配 *)
wild_key = ident, { ident | "*" } ; (* 允许 '*' 出现在键名中 *)
type_ident = ident ; (* 如 auto/ip/chars/digit/float/time/bool/obj/array *)
ident = letter, { letter | digit | "_" } ;
key = ident ;
string = "\"", { any-but-quote }, "\""
| "'", { any-but-quote }, "'" ;
literal = string | number | ip | bool | datetime | ... ;
json_path = "/" , ... ; (* 如 /a/b/[0]/1 *)
simple = ident | number | string ;
unsigned = digit, { digit } ;
eol = { " " | "\t" | "\r" | "\n" } ;
letter = "A" | ... | "Z" | "a" | ... | "z" ;
digit = "0" | ... | "9" ;
alnum = letter | digit ;
数据类型
OML 类型注解支持以下值(由 DataType::from() 解析):
常用类型
| 类型 | 说明 | 示例 |
|---|---|---|
auto | 自动推断(默认) | field = read() ; |
chars | 字符串 | name : chars = read() ; |
digit | 整数 | count : digit = read() ; |
float | 浮点数 | ratio : float = read() ; |
ip | IP 地址 | addr : ip = read() ; |
time | 时间 | timestamp : time = Now::time() ; |
bool | 布尔值 | flag : bool = read() ; |
obj | 对象 | info : obj = object { ... } ; |
array | 数组 | items : array = collect read(...) ; |
扩展类型
| 类型 | 说明 |
|---|---|
time_iso | ISO 格式时间 |
time_3339 | RFC 3339 时间 |
time_2822 | RFC 2822 时间 |
time_timestamp | Unix 时间戳 |
time_clf | CLF 日志时间(Apache/Nginx) |
time/apache | CLF 别名 |
time/timestamp | 时间戳别名 |
time/rfc3339 | RFC 3339 别名 |
url | URL |
domain | 域名 |
ip_net | 网段 |
kv | Key-Value 文本 |
json | JSON 文本 |
base64 | Base64 编码文本 |
array/<sub> | 带子类型的数组(如 array/digit) |
完整示例
name : csv_example
rule : /csv/data
enable : true
---
static {
ERROR_TPL = object {
type = chars(error) ;
level = digit(0) ;
} ;
}
# 基本取值与缺省
version : chars = Now::time() ;
pos_sn = read() { _ : chars(FALLBACK) } ;
# 临时字段(不出现在输出中)
__raw_type = read(type) ;
# object 聚合
values : obj = object {
cpu_free, memory_free : digit = read() ;
} ;
# collect 数组聚合 + 管道
ports : array = collect read(keys:[sport, dport]) ;
ports_json = pipe read(ports) | to_json ;
first_port = pipe read(ports) | nth(0) ;
# 省略 pipe 关键字的管道写法
url_host = read(http_url) | url(host) ;
# match
quarter : chars = match read(month) {
in (digit(1), digit(3)) => chars(Q1) ;
in (digit(4), digit(6)) => chars(Q2) ;
in (digit(7), digit(9)) => chars(Q3) ;
in (digit(10), digit(12)) => chars(Q4) ;
_ => chars(QX) ;
} ;
# 双源 match
X : chars = match (read(city1), read(city2)) {
(ip(127.0.0.1), ip(127.0.0.100)) => chars(bj) ;
_ => chars(sz) ;
} ;
# 三源 match
zone : chars = match (read(city), read(region), read(country)) {
(chars(bj), chars(north), chars(cn)) => chars(zone1) ;
(chars(sh), chars(east), chars(cn)) => chars(zone2) ;
_ => chars(unknown) ;
} ;
# OR 匹配(单源)
tier : chars = match read(city) {
chars(bj) | chars(sh) | chars(gz) => chars(tier1) ;
chars(cd) | chars(wh) => chars(tier2) ;
_ => chars(other) ;
} ;
# OR 匹配(多源)
priority : chars = match (read(city), read(level)) {
(chars(bj) | chars(sh), chars(high)) => chars(priority) ;
(chars(gz), chars(low) | chars(mid)) => chars(normal) ;
_ => chars(default) ;
} ;
# 函数匹配
event = match read(log_line) {
starts_with('[ERROR]') => chars(error) ;
ends_with('.failed') => chars(failure) ;
contains('timeout') => chars(timeout) ;
regex_match('^\d{4}-\d{2}-\d{2}') => chars(dated) ;
is_empty() => chars(empty) ;
_ => chars(other) ;
} ;
# 数值函数匹配
grade = match read(score) {
gt(90) => chars(excellent) ;
in_range(60, 90) => chars(pass) ;
lt(60) => chars(fail) ;
_ => chars(unknown) ;
} ;
# 忽略大小写匹配
result = match read(status) {
iequals('success') => chars(ok) ;
_ => chars(fail) ;
} ;
# static 引用
error_info = match read(__raw_type) {
chars(error) => ERROR_TPL ;
_ => chars(normal) ;
} ;
# SQL(where 中可混用 read/take/Now::time/常量)
name, pinying = select name, pinying from example where pinying = read(py) ;
_, _ = select name, pinying from example where pinying = 'xiaolongnu' ;
---
# 隐私配置(按键绑定处理器枚举)
src_ip : privacy_ip
pos_sn : privacy_keymsg
管道函数速查
| 函数 | 语法 | 说明 |
|---|---|---|
base64_encode | base64_encode | Base64 编码 |
base64_decode | base64_decode / base64_decode(编码) | Base64 解码 |
html_escape | html_escape | HTML 转义 |
html_unescape | html_unescape | HTML 反转义 |
json_escape | json_escape | JSON 转义 |
json_unescape | json_unescape | JSON 反转义 |
str_escape | str_escape | 字符串转义 |
Time::to_ts | Time::to_ts | 时间转时间戳(秒,UTC+8) |
Time::to_ts_ms | Time::to_ts_ms | 时间转时间戳(毫秒,UTC+8) |
Time::to_ts_us | Time::to_ts_us | 时间转时间戳(微秒,UTC+8) |
Time::to_ts_zone | Time::to_ts_zone(时区,单位) | 时间转指定时区时间戳 |
nth | nth(索引) | 获取数组元素 |
get | get(字段名) | 获取对象字段 |
path | path(name|path) | 提取文件路径部分 |
url | url(domain|host|uri|path|params) | 提取 URL 部分 |
starts_with | starts_with('前缀') | 检查字符串是否以指定前缀开始 |
map_to | map_to(值) | 映射到指定常量值(字符串/数字/布尔) |
extract_main_word | extract_main_word | 提取主要单词(第一个非空单词) |
extract_subject_object | extract_subject_object | 提取日志主客体结构(subject/action/object/status) |
to_str | to_str | 转换为字符串 |
to_json | to_json | 转换为 JSON |
ip4_to_int | ip4_to_int | IPv4 转整数 |
skip_empty | skip_empty | 跳过空值 |
匹配函数速查(用于 match 条件)
| 函数 | 语法 | 说明 |
|---|---|---|
starts_with | starts_with('前缀') | 前缀匹配 |
ends_with | ends_with('后缀') | 后缀匹配 |
contains | contains('子串') | 子串匹配 |
regex_match | regex_match('正则') | 正则表达式匹配 |
iequals | iequals('值') | 忽略大小写等于 |
is_empty | is_empty() | 值为空判断 |
gt | gt(数值) | 大于 |
lt | lt(数值) | 小于 |
eq | eq(数值) | 等于(浮点容差) |
in_range | in_range(最小值, 最大值) | 范围判断(闭区间) |
语法要点
必需元素
- 配置名称:
name : <名称> - 分隔符:
--- - 分号:每个顶层条目必须以
;结束
可选元素
- 类型声明:
field : <type> = ...(默认为auto) - rule 字段:
rule : <规则路径> - enable 字段:
enable : true|false(默认为true) - static 块:
static { ... } - 默认值:
read() { _ : <默认值> } - pipe 关键字:
pipe read() | func可简写为read() | func
注释
# 单行注释(使用 # 或 //)
// 也支持 C++ 风格注释
目标通配
* = take() ; # 取走所有字段
alert* = take() ; # 取走所有以 alert 开头的字段
*_log = take() ; # 取走所有以 _log 结尾的字段
临时字段
__temp = chars(value) ; # 以 __ 开头,输出时自动忽略
result = read(__temp) ; # 可在其他表达式中引用
读取语义
- read:非破坏性(可反复读取,不从 src 移除)
- take:破坏性(取走后从 src 移除,后续不可再取)
下一步
OML 完整功能示例
一个完整的示例,展示 OML 的所有核心功能
本文档提供一个全面的 OML 示例,涵盖所有核心功能,包括基础操作、内置函数、管道函数、高级匹配等。这是学习和参考 OML 功能的最佳起点。
📚 快速导航
原始数据
222.133.52.20 simple_chars 80 192.168.1.10 select_one left 2025-12-29 12:00:00 {"msg":"hello"} "" aGVsbG8gd29ybGQ= ["val1","val2","val3"] /home/user/file.txt http://example.com/path/to/resource?foo=1&bar=2 [{"one":{"two":"nested"}}] foo bar baz qux 500 ext_value_1 ext_value_2 http://localhost:8080/bua/sync/health?a=test 525tab beijing shanghai 10.0.0.1 10.0.0.100 success enabled true sport:8080 dport:9090 details[0]/process_name:proc1 details[1]/process_name:proc2 optional_field:exists source_field:data another_field:value
WPL 解析规则
package T4 {
rule case {
(
ip:sip,
chars:simple_chars,
digit:simple_port,
ip:simple_ip,
chars:select_one,
chars:match_chars,
time:timestamp_zone,
json(chars@msg: json_msg),
chars:empty_chars,
base64 | (chars:base64),
array/chars:array_str,
chars:path,
chars:url,
array:obj,
chars:one,
chars:two,
chars:three,
chars:four,
digit:num_range,
chars:extend1,
chars:extend2,
chars:html,
chars:str,
chars:city1,
chars:city2,
ip:src_ip,
ip:dst_ip,
chars:status,
chars:enabled,
bool:enabled
)
}
}
说明:WPL 规则将原始数据解析为结构化字段,并附加 rule = T4/case 标识。
OML 配置
name : T4
rule : T4/case
---
// ==================== 1. 基础操作 ====================
// 1.1 直接赋值字面量
direct_chars = chars(13);
direct_digit = digit(13);
// 1.2 简单取值
simple_chars = read(simple_chars);
simple_port : digit = read(simple_port);
simple_ip : ip = read(simple_ip);
// 1.3 选择取值(按顺序尝试多个字段)
select_chars = read(option:[select_one, select_two]);
// 1.4 默认值处理(字段不存在时使用默认值)
field_with_default = read(optional_field) { _ : chars(DEFAULT_VALUE) };
version_fallback : chars = read(version) { _ : chars(v1.0.0) };
// 1.5 多目标同时赋值
target1, target2 : chars = read();
name_alias, name_copy = read(name);
// 1.6 匿名目标(丢弃不需要的返回值)
_, useful_field = read(option:[field1, field2]);
// 1.7 take vs read 区别(破坏性 vs 非破坏性)
field_taken = take(source_field); // take 会移除源字段
field_taken_again = take(source_field) { _ : chars(already_taken) }; // 再次 take 失败
field_read1 = read(another_field); // read 不移除
field_read2 = read(another_field); // 可重复读取
// 1.8 通配符批量操作
all_fields = take(); // 取所有字段
path_fields = take(keys:[*/path]); // 批量匹配:所有以 /path 结尾
a_name_fields = read(keys:[A*/name]); // 前缀匹配:A 开头、/name 结尾
// ==================== 2. 内置函数 ====================
// 2.1 时间函数
current_time = Now::time(); // 获取当前完整时间
current_date = Now::date(); // 获取当前日期(YYYYMMDD)
current_hour = Now::hour(); // 获取当前小时(YYYYMMDDHH)
// ==================== 3. 数值表达式 ====================
// 3.1 风险分数
risk_score : float = calc(read(simple_port) * 0.1 + digit(5));
// 3.2 取整百分比
status_pct : digit = calc(round((read(num_range) * 100) / digit(1000)));
// 3.3 分桶
bucket : digit = calc(read(simple_port) % 16);
// ==================== 4. 静态字典与查表 ====================
static {
status_score = object {
success = float(20.0);
warning = float(70.0);
error = float(90.0);
};
}
status_score_v2 : float = lookup_nocase(status_score, read(status), 40.0);
// ==================== 5. 模式匹配 ====================
// 5.1 单源 match(简单匹配)
match_chars = match read(option:[match_chars]) {
chars(left) => chars(1);
chars(middle) => chars(2);
chars(right) => chars(3);
};
// 5.2 范围判断(in 操作符)
num_range = match read(option:[num_range]) {
in (digit(0), digit(1000)) => read(num_range);
_ => digit(0);
};
// 5.3 多源 match(匹配多个字段的组合)
location : chars = match (read(city1), read(city2)) {
(chars(beijing), chars(shanghai)) => chars(east_region);
(chars(chengdu), chars(chongqing)) => chars(west_region);
_ => chars(unknown_region);
};
region_by_ip : chars = match (read(src_ip), read(dst_ip)) {
(ip(10.0.0.1), ip(10.0.0.100)) => chars(internal);
_ => chars(external);
};
// 5.4 match 否定条件(! 操作符)
valid_status = match read(status) {
!chars(error) => chars(ok);
!chars(failed) => chars(success);
_ => chars(unknown);
};
// 5.5 布尔类型 match
is_enabled : digit = match read(enabled) {
bool(true) => digit(1);
bool(false) => digit(0);
_ => digit(-1);
};
// 5.6 OR 条件匹配(使用 | 表示备选条件)
city_tier : chars = match read(city1) {
chars(beijing) | chars(shanghai) | chars(guangzhou) => chars(tier1);
chars(chengdu) | chars(wuhan) => chars(tier2);
_ => chars(other);
};
// 5.7 多源 + OR 组合匹配
priority : chars = match (read(city1), read(status)) {
(chars(beijing) | chars(shanghai), chars(success)) => chars(high);
(chars(chengdu), chars(success) | chars(pending)) => chars(medium);
_ => chars(low);
};
// 5.8 忽略大小写多值匹配
status_class = match read(status) {
iequals_any('success', 'ok', 'done') => chars(good);
iequals_any('error', 'failed', 'timeout') => chars(bad);
_ => chars(other);
};
// ==================== 6. 管道函数 ====================
// 6.1 时间转换
timestamp_zone = pipe read(timestamp_zone) | Time::to_ts_zone(0, ms); // 修改时区
timestamp_s = pipe read(timestamp_zone) | Time::to_ts; // 转秒级时间戳
timestamp_ms = pipe @current_time | Time::to_ts_ms; // 转毫秒级时间戳
timestamp_us = pipe @current_time | Time::to_ts_us; // 转微秒级时间戳
timestamp_zone_8 = pipe @current_time | Time::to_ts_zone(8, s); // UTC+8 时区
// 6.2 编码/解码
base64_decoded = pipe read(base64) | base64_decode(Utf8); // Base64 解码
base64_encoded = pipe read(base64) | base64_encode; // Base64 编码
// 6.3 转义/反转义
html_escaped = pipe read(html) | html_escape; // HTML 转义
html_unescaped = pipe read(html) | html_unescape; // HTML 反转义
json_escaped = pipe read(json_escape) | json_escape; // JSON 转义
json_unescaped = pipe @json_escaped | json_unescape; // JSON 反转义
str_escaped = pipe read(str) | str_escape; // 字符串转义
// 6.4 数据转换
to_str_result = pipe read(str) | to_str; // 转为字符串
array_json = pipe read(array_str) | to_json; // 数组转 JSON
ip_to_int = pipe read(simple_ip) | ip4_to_int; // IPv4 转整数
// 6.5 集合操作
array_first = pipe read(array_str) | nth(0); // 获取数组第 0 个元素
obj_nested = pipe read(obj) | nth(0) | get(one/two); // 对象嵌套取值
// 6.6 数据提取
file_name = pipe read(path) | path(name); // 提取文件名
file_path = pipe read(path) | path(path); // 提取文件路径
url_domain = pipe read(url) | url(domain); // 提取 URL domain
url_host = pipe read(url) | url(host); // 提取 URL host
url_uri = pipe read(url) | url(uri); // 提取 URL uri
url_path = pipe read(url) | url(path); // 提取 URL path
url_params = pipe read(url) | url(params); // 提取 URL params
// 6.7 其他管道函数
skip_empty_result = pipe read(empty_chars) | skip_empty; // 跳过空值
// 6.8 省略 pipe 关键字(新语法)
simple_transform = read(data) | to_json; // 直接省略 pipe
chained_ops = read(array_data) | nth(0) | to_str; // 链式调用
url_extract = read(url_field) | url(domain); // 简化写法
// 6.9 链式管道操作
nested_extract = pipe read(complex_obj) | nth(0) | get(level1/level2/level3);
multi_transform = pipe read(raw_data) | base64_decode(Utf8) | to_json;
// ==================== 7. 字符串操作 ====================
// 7.1 字符串格式化(fmt 函数)
splice = fmt("{one}:{two}|{three}:{four}", read(one), read(two), read(three), read(four));
// ==================== 8. 对象与数组 ====================
// 8.1 对象创建(聚合多个字段)
extends = object {
extend1, extend2 = read();
};
// 8.2 数组收集(collect)
collected_ports : array = collect read(keys:[sport, dport, extra_port]);
wildcard_items : array = collect take(keys:[details[*]/process_name]); // 支持通配符收集
功能详解
1. 基础操作
1.1 字面量赋值
直接创建常量值:
direct_chars = chars(13);
direct_digit = digit(13);
1.2 简单取值
从输入数据读取字段:
simple_chars = read(simple_chars);
simple_port : digit = read(simple_port); // 显式类型转换
simple_ip : ip = read(simple_ip);
1.3 选择取值
按优先级尝试多个字段:
select_chars = read(option:[select_one, select_two]);
// 先尝试 select_one,不存在则尝试 select_two
1.4 默认值处理
字段不存在时使用默认值:
field_with_default = read(optional_field) { _ : chars(DEFAULT_VALUE) };
version_fallback : chars = read(version) { _ : chars(v1.0.0) };
1.5 多目标赋值
一次赋值给多个目标:
target1, target2 : chars = read();
name_alias, name_copy = read(name);
1.6 匿名目标
丢弃不需要的返回值:
_, useful_field = read(option:[field1, field2]);
// 第一个返回值被丢弃
1.7 take vs read
take:破坏性读取,移除源字段read:非破坏性读取,保留源字段
field_taken = take(source_field); // 源字段被移除
field_taken_again = take(source_field) { _ : chars(already_taken) }; // 失败
field_read1 = read(another_field); // 源字段保留
field_read2 = read(another_field); // 可以再次读取
1.8 通配符批量操作
使用通配符匹配多个字段:
all_fields = take(); // 取所有字段
path_fields = take(keys:[*/path]); // 所有以 /path 结尾
a_name_fields = read(keys:[A*/name]); // A 开头、/name 结尾
2. 内置函数
时间相关函数:
current_time = Now::time(); // 2025-12-29 12:00:00
current_date = Now::date(); // 20251229
current_hour = Now::hour(); // 2025122912
3. 数值表达式
使用 calc(...) 直接做算术:
risk_score : float = calc(read(simple_port) * 0.1 + digit(5));
status_pct : digit = calc(round((read(num_range) * 100) / digit(1000)));
bucket : digit = calc(read(simple_port) % 16);
说明:
- 支持
+ - * / %与abs/round/floor/ceil - 可以混合字段和常量
/返回float,%仅支持整数- 除零、字段缺失、非数值输入、整数溢出、
NaN/inf都会得到ignore
4. 静态字典与查表
static {
status_score = object {
success = float(20.0);
warning = float(70.0);
error = float(90.0);
};
}
status_score_v2 : float = lookup_nocase(status_score, read(status), 40.0);
这适合把状态、等级等字符串映射到固定分值,且不区分大小写。
5. 模式匹配
5.1 单源 match
基于单个字段的值进行匹配:
match_chars = match read(option:[match_chars]) {
chars(left) => chars(1);
chars(middle) => chars(2);
chars(right) => chars(3);
};
5.2 范围判断
使用 in 操作符判断范围:
num_range = match read(option:[num_range]) {
in (digit(0), digit(1000)) => read(num_range);
_ => digit(0);
};
5.3 多源 match
匹配多个字段的组合(支持 2 个及以上源字段):
location : chars = match (read(city1), read(city2)) {
(chars(beijing), chars(shanghai)) => chars(east_region);
(chars(chengdu), chars(chongqing)) => chars(west_region);
_ => chars(unknown_region);
};
5.4 否定条件
使用 ! 操作符进行否定匹配:
valid_status = match read(status) {
!chars(error) => chars(ok);
!chars(failed) => chars(success);
_ => chars(unknown);
};
5.5 布尔类型 match
匹配布尔值:
is_enabled : digit = match read(enabled) {
bool(true) => digit(1);
bool(false) => digit(0);
_ => digit(-1);
};
5.6 OR 条件匹配
使用 | 分隔多个备选条件,任一匹配即成功:
city_tier : chars = match read(city1) {
chars(beijing) | chars(shanghai) | chars(guangzhou) => chars(tier1);
chars(chengdu) | chars(wuhan) => chars(tier2);
_ => chars(other);
};
5.7 多源 + OR 组合匹配
多源 match 的每个条件位置都支持 OR:
priority : chars = match (read(city1), read(status)) {
(chars(beijing) | chars(shanghai), chars(success)) => chars(high);
(chars(chengdu), chars(success) | chars(pending)) => chars(medium);
_ => chars(low);
};
5.8 忽略大小写多值匹配
status_class = match read(status) {
iequals_any('success', 'ok', 'done') => chars(good);
iequals_any('error', 'failed', 'timeout') => chars(bad);
_ => chars(other);
};
6. 管道函数
6.1 时间转换
timestamp_zone = pipe read(timestamp_zone) | Time::to_ts_zone(0, ms); // UTC 毫秒
timestamp_s = pipe read(timestamp_zone) | Time::to_ts; // 秒级
timestamp_ms = pipe @current_time | Time::to_ts_ms; // 毫秒级
timestamp_us = pipe @current_time | Time::to_ts_us; // 微秒级
timestamp_zone_8 = pipe @current_time | Time::to_ts_zone(8, s); // UTC+8
6.2 编码/解码
base64_decoded = pipe read(base64) | base64_decode(Utf8);
base64_encoded = pipe read(base64) | base64_encode;
6.3 转义/反转义
html_escaped = pipe read(html) | html_escape;
html_unescaped = pipe read(html) | html_unescape;
json_escaped = pipe read(json_escape) | json_escape;
json_unescaped = pipe @json_escaped | json_unescape;
str_escaped = pipe read(str) | str_escape;
6.4 数据转换
to_str_result = pipe read(str) | to_str;
array_json = pipe read(array_str) | to_json;
ip_to_int = pipe read(simple_ip) | ip4_to_int;
6.5 集合操作
array_first = pipe read(array_str) | nth(0); // 获取第 0 个元素
obj_nested = pipe read(obj) | nth(0) | get(one/two); // 嵌套取值
6.6 数据提取
file_name = pipe read(path) | path(name); // file.txt
file_path = pipe read(path) | path(path); // /home/user
url_domain = pipe read(url) | url(domain); // example.com
url_host = pipe read(url) | url(host); // example.com
url_uri = pipe read(url) | url(uri); // /path/to/resource?foo=1&bar=2
url_path = pipe read(url) | url(path); // /path/to/resource
url_params = pipe read(url) | url(params); // foo=1&bar=2
6.7 控制函数
skip_empty_result = pipe read(empty_chars) | skip_empty; // 跳过空值
6.8 简化语法
省略 pipe 关键字:
simple_transform = read(data) | to_json;
chained_ops = read(array_data) | nth(0) | to_str;
url_extract = read(url_field) | url(domain);
6.9 链式操作
nested_extract = pipe read(complex_obj) | nth(0) | get(level1/level2/level3);
multi_transform = pipe read(raw_data) | base64_decode(Utf8) | to_json;
7. 字符串操作
格式化字符串:
splice = fmt("{one}:{two}|{three}:{four}", read(one), read(two), read(three), read(four));
// 输出:foo:bar|baz:qux
8. 对象与数组
8.1 对象创建
聚合多个字段为对象:
extends = object {
extend1, extend2 = read();
};
8.2 数组收集
收集多个字段为数组:
collected_ports : array = collect read(keys:[sport, dport, extra_port]);
// 输出:[8080, 9090, ...]
wildcard_items : array = collect take(keys:[details[*]/process_name]);
// 输出:["proc1", "proc2"]
关键要点
WPL 与 OML 关联
原始数据
↓
[WPL 解析] → 生成结构化数据 + rule 标识
↓
数据携带: rule = "T4/case"
↓
[查找匹配的 OML] → 匹配 rule 字段
↓
[执行 OML 转换] → 应用本示例的转换逻辑
↓
输出到 Sink
关键:OML 的 rule : T4/case 与 WPL 的 package T4 { rule case { ... } } 对应。
功能覆盖清单
- ✅ 基础操作:字面量、取值、默认值、通配符
- ✅ 内置函数:时间函数
- ✅ 数值表达式:
calc(...)、取整、分桶、比例计算 - ✅ 静态字典查表:
lookup_nocase(...) - ✅ 模式匹配:单源、多源(任意数量)、范围、否定、布尔、OR 条件、
iequals_any(...) - ✅ 管道函数:时间、编解码、转义、转换、集合、提取
- ✅ 字符串操作:格式化
- ✅ 对象与数组:聚合、收集
下一步
提示:这个示例是学习 OML 的最佳参考,建议收藏并在实际使用时对照查阅。
OML Function
calc(...):显式数值表达式
calc(expr) 用于在 OML 中执行显式算术表达式,适合比例、差值、分桶、取整百分比等场景。
语法
calc(<expr>)
支持能力
- 运算符:
+ - * / % - 函数:
abs(...)、round(...)、floor(...)、ceil(...) - 操作数:
- 数值字面量
read(...)take(...)@field
示例
risk_score : float = calc(read(cpu) * 0.7 + read(mem) * 0.3) ;
delta : digit = calc(read(cur) - read(prev)) ;
ratio : float = calc(read(ok_cnt) / read(total_cnt)) ;
bucket : digit = calc(read(uid) % 16) ;
distance : float = calc(abs(read(actual) - read(expect))) ;
error_pct : digit = calc(round((read(err_cnt) * 100) / read(total_cnt))) ;
类型规则
+ - *digit op digit -> digit- 只要任一操作数是
float,结果就是float
/- 始终返回
float
- 始终返回
%- 仅支持
digit % digit -> digit
- 仅支持
round/floor/ceil- 返回
digit
- 返回
absabs(digit) -> digitabs(float) -> float
失败行为
以下情况都会返回 ignore:
- 除零
- 字段缺失
- 非数值输入
- 整数溢出
NaN/inf输入或结果- 对浮点数使用
%
这意味着 calc(...) 不会隐式返回 0,也不会把非法结果继续传下去。
如果业务需要兜底值,可以再显式加默认值:
raw_ratio : float = calc(read(ok_cnt) / read(total_cnt)) ;
safe_ratio : float = read(raw_ratio) { _ : float(0.0) } ;
使用建议
- 适合放在顶层绑定中,先把结果算成字段,再给后续
match/object/pipe使用 - 如果表达式失败后仍需要业务默认值,配合
read(...) { _ : ... } %仅用于整数分桶,不要拿浮点做取模
extract_main_word PipeFun 使用指南
概述
extract_main_word 是一个基于 jieba-rs 中文分词的 PipeFun,用于从文本中提取第一个主要词(核心词)。它支持中英文混合文本,并针对日志分析场景进行了优化。
功能特性
1. 智能分词
使用 jieba-rs 对中英文文本统一分词,无需区分语言:
name: extract_word_example
---
main_word = pipe read(message) | extract_main_word ;
2. 词性标注筛选
基于词性(POS)标注筛选核心词,优先返回:
- 名词类:n(普通名词)、nr(人名)、ns(地名)、nt(机构名)、nz(专名)、ng(名词性语素)
- 动词类:v(动词)、vn(名动词)、vd(副动词)
- 形容词类:a(形容词)、ad(副形词)、an(名形词)
- 其他:eng(英文)、m(数词)、x(字符串/代码)
3. 停用词过滤
自动过滤常见停用词:
- 中文停用词:的、了、在、是、我、有、和、就、不、都、一、上、也、很、到、说、要、去、你、会、着、没有、看、好、自己、这
- 英文停用词:the、a、an、is、are、was、were、be、been、being、of、at、in、to、for、and、or、but
4. 日志领域词优先
优先识别并返回日志领域关键词(最高优先级):
- 日志级别:error、warn、info、debug、fatal、trace
- 系统相关:exception、failure、timeout、connection、database、server、client、request、response、login、logout、auth、authentication、permission、access
- 网络相关:http、https、tcp、udp、ip、port、socket
- 安全相关:attack、virus、malware、threat、alert、blocked、denied
使用示例
示例 1:英文文本
name: english_example
---
# 输入: "hello world test"
main_word = pipe read(message) | extract_main_word ;
# 输出: "hello"
示例 2:中文文本
name: chinese_example
---
# 输入: "中文分词测试"
main_word = pipe read(message) | extract_main_word ;
# 输出: "中文" (名词)
# 输入: "我们中出了一个叛徒"
main_word = pipe read(message) | extract_main_word ;
# 输出: "出" (动词)
示例 3:日志分析(领域词优先)
name: log_analysis
---
# 输入: "error: connection timeout"
keyword = pipe read(log_message) | extract_main_word ;
# 输出: "error" (领域关键词,优先级最高)
# 输入: "database connection failed"
keyword = pipe read(log_message) | extract_main_word ;
# 输出: "database" (领域关键词)
# 输入: "用户登录失败异常"
keyword = pipe read(log_message) | extract_main_word ;
# 输出: "用户" (名词)
示例 4:混合文本
name: mixed_text
---
# 输入: "HTTP请求超时"
keyword = pipe read(message) | extract_main_word ;
# 输出: "HTTP" (英文 + 中文混合)
示例 5:链式处理
name: pipe_chain
---
# 从日志中提取主要词,转为小写
keyword = pipe read(log) | extract_main_word | to_str ;
# 提取主要词后进行条件判断
is_error = match keyword {
"error" => true,
"exception" => true,
_ => false
};
工作原理
处理流程
输入文本
↓
清洗文本(trim)
↓
jieba 分词 + 词性标注
↓
规则筛选:
1. 领域关键词?→ 直接返回
2. 核心词性 + 非停用词?→ 返回
3. 回退:返回第一个非空词
↓
输出结果
规则优先级
- 最高优先级:日志领域关键词(LOG_DOMAIN)
- 中等优先级:核心词性(CORE_POS)+ 非停用词(!LOG_STOP)
- 回退策略:第一个非空分词结果
性能优化
全局单例
jieba 分词器使用 lazy_static! 实现全局单例,只初始化一次,提高性能:
#![allow(unused)]
fn main() {
lazy_static! {
static ref JIEBA: Jieba = Jieba::new();
}
}词典缓存
jieba-rs 内部会缓存词典,多次调用分词不会重复加载。
边界情况处理
| 输入 | 输出 | 说明 |
|---|---|---|
空字符串 "" | "" | 返回空字符串 |
全空格 " " | "" | trim 后为空 |
全停用词 "的是在了不" | "的" | 回退到第一个词 |
单个词 "测试" | "测试" | 直接返回 |
英文大小写 "Error Message" | "error" | 识别领域词(不区分大小写) |
扩展与定制
添加自定义领域词
修改 LOG_DOMAIN 集合添加新的领域关键词:
#![allow(unused)]
fn main() {
static ref LOG_DOMAIN: HashSet<&'static str> = {
let mut set = HashSet::new();
set.insert("error");
set.insert("custom_keyword"); // 添加自定义词
// ...
set
};
}调整停用词
修改 LOG_STOP 集合添加或删除停用词:
#![allow(unused)]
fn main() {
static ref LOG_STOP: HashSet<&'static str> = {
let mut set = HashSet::new();
set.insert("的");
// set.insert("是"); // 注释掉不需要过滤的词
// ...
set
};
}调整核心词性
修改 CORE_POS 集合调整关注的词性:
#![allow(unused)]
fn main() {
static ref CORE_POS: HashSet<&'static str> = {
let mut set = HashSet::new();
set.insert("n"); // 名词
set.insert("v"); // 动词
// 添加或删除词性标签
set
};
}与其他 PipeFun 组合
与 to_str 组合
result = pipe read(text) | extract_main_word | to_str ;
与 skip_empty 组合
result = pipe read(text) | extract_main_word | skip_empty ;
与 base64_encode 组合
encoded = pipe read(text) | extract_main_word | base64_encode ;
注意事项
- 词性依赖:分词结果依赖 jieba-rs 的词性标注准确性
- 领域词更新:根据实际日志场景定期更新领域关键词列表
- 性能考虑:首次调用会初始化 jieba 词典,后续调用性能稳定
- 编码要求:输入必须是有效的 UTF-8 字符串
相关资源
更新时间:2026-01-31
extract_subject_object PipeFun 使用指南
概述
extract_subject_object 是一个基于 jieba-rs 中文分词和词性标注的 NLP PipeFun,用于从日志文本中提取主客体结构(Subject-Action-Object-Status)。支持中英文混合文本,针对日志分析场景优化,可自动识别日志中的主体、动作、对象和状态。
功能特性
1. 主客体结构识别
自动将日志文本分解为四个核心要素:
- Subject(主体):执行动作的主体(谁/什么)
- Action(动作):执行的动作(做什么)
- Object(对象):动作作用的对象(作用于谁/什么)
- Status(状态):结果状态(结果如何)
2. 智能词角色分类
基于词性和词缀规则自动分类:
英文分类规则
-
动作词 (Action)
- 词典匹配:connect, login, process, send, receive 等
-ing后缀:connecting, running, processing-ed后缀:failed, connected, started-tion/-sion后缀:authentication, connection(除非在实体白名单)
-
状态词 (Status)
- failed, success, timeout, exception, crashed 等
- 表示终态/结果的词
-
实体词 (Entity)
- 实体名词白名单:connection(作为实体), session, transaction
- 领域关键词:database, server, client, request, response
- 默认分类
中文分类规则
- 动作词:v(动词)、vn(名动词)、vd(副动词)
- 实体词:n(名词)、nr(人名)、ns(地名)、nt(机构名)等
- 状态词:失败、成功、超时、异常、错误等
3. Debug 模式
可选的 debug 模式输出详细分析信息:
- 分词结果
- 词性标注
- 匹配规则
- 置信度评分
使用示例
示例 1:基本用法
name: basic_extract
---
log_message : chars = take() ;
# 提取主客体结构
structure = pipe read(log_message) | extract_subject_object ;
# 输入: "database connection failed"
# 输出:
# structure = {
# "subject": "database",
# "action": "",
# "object": "",
# "status": "failed"
# }
示例 2:提取各个字段
name: extract_fields
---
log : chars = take() ;
# 提取结构
structure = pipe read(log) | extract_subject_object ;
# 分别提取各字段
subject = structure.subject ;
action = structure.action ;
object = structure.object ;
status = structure.status ;
# 输入: "Server failed to connect database"
# 输出:
# subject: "Server"
# action: "connect"
# object: "database"
# status: "failed"
示例 3:与条件判断结合
name: conditional_analysis
---
log_message : chars = take() ;
structure = pipe read(log_message) | extract_subject_object ;
# 判断是否为失败状态
is_failed = match structure.status {
"failed" => true,
"失败" => true,
"exception" => true,
"异常" => true,
_ => false
};
# 判断是否为连接相关操作
is_connection = match structure.action {
"connect" => true,
"连接" => true,
_ => false
};
示例 4:英文日志
name: english_log
---
# 测试用例 1: 主体 + 状态
log1 : chars = chars(database connection failed) ;
result1 = pipe read(log1) | extract_subject_object ;
# subject="database", status="failed"
# 测试用例 2: 主体 + 动作 + 状态
log2 : chars = chars(User authentication failed) ;
result2 = pipe read(log2) | extract_subject_object ;
# subject="User", action="authentication", status="failed"
# 测试用例 3: 状态 + 动作 + 对象
log3 : chars = chars(Failed to connect database) ;
result3 = pipe read(log3) | extract_subject_object ;
# subject="database", action="connect", status="Failed"
# 测试用例 4: 完整结构
log4 : chars = chars(Server failed to connect database) ;
result4 = pipe read(log4) | extract_subject_object ;
# subject="Server", action="connect", object="database", status="failed"
# 测试用例 5: 主体 + 动作 + 状态
log5 : chars = chars(Request processing timeout) ;
result5 = pipe read(log5) | extract_subject_object ;
# subject="Request", action="processing", status="timeout"
示例 5:中文日志
name: chinese_log
---
# 测试用例 1: 主体 + 动作 + 状态
log1 : chars = chars(数据库连接失败) ;
result1 = pipe read(log1) | extract_subject_object ;
# subject="数据库", action="连接", status="失败"
# 测试用例 2: 主体 + 动作 + 状态
log2 : chars = chars(用户登录失败) ;
result2 = pipe read(log2) | extract_subject_object ;
# subject="用户", action="登录", status="失败"
# 测试用例 3: 完整结构
log3 : chars = chars(服务器连接数据库超时) ;
result3 = pipe read(log3) | extract_subject_object ;
# subject="服务器", action="连接", object="数据库", status="超时"
示例 6:混合语言日志
name: mixed_language
---
log : chars = chars(HTTP请求超时) ;
structure = pipe read(log) | extract_subject_object ;
# 输出:
# subject: "HTTP"
# action: "请求"
# object: ""
# status: "超时"
示例 7:复杂日志场景
name: complex_scenario
---
log : chars = chars(The server is running) ;
structure = pipe read(log) | extract_subject_object ;
# 输出:
# subject: "server"
# action: "running" # -ing 后缀识别为动作
# object: ""
# status: ""
工作原理
处理流程
输入日志文本
↓
jieba 分词 + 词性标注
↓
遍历每个词:
↓
跳过停用词(的、了、the、a 等)
↓
词角色分类:
- 英文词 → classify_eng()
- 中文词 → classify_cn()
↓
角色分配规则:
1. Status → 第一个状态词
2. Action → 第一个动作词(标记 action_seen)
3. Entity →
- 第一个实体词 → Subject
- action_seen 后的第一个实体词 → Object
↓
输出结构化结果
词角色分类详解
classify_eng (英文词分类)
优先级从高到低:
-
领域词典匹配
STATUS_WORDS: failed, success, timeout → StatusACTION_VERBS: connect, login, process → Action
-
实体名词白名单
ENTITY_NOUNS: connection, session, transaction → Entity- 覆盖词缀规则(避免 connection 被识别为动作)
-
词缀规则
-ing结尾 (len > 4) → Action (connecting, running)-ed结尾 (len > 3) → Action (failed, connected)-tion/-sion结尾 (len > 5) → Action (authentication)
-
默认
- 其他词 → Entity
classify_cn (中文词分类)
根据词性标注(POS):
-
词典匹配
STATUS_WORDS: 失败、成功、超时 → StatusACTION_VERBS: 连接、登录、处理 → Action
-
词性规则
v/vn/vd→ Action(动词类)n/nr/ns/nt/nz/ng→ Entity(名词类)
-
领域词回退
- 其他词性但在
LOG_DOMAIN→ Entity
- 其他词性但在
分配规则
#![allow(unused)]
fn main() {
// 伪代码
for word in tokens:
if is_stopword(word):
continue
role = classify(word)
match role:
Status =>
if status.is_empty():
status = word
Action =>
if action.is_empty():
action = word
action_seen = true
Entity =>
if subject.is_empty():
subject = word // 第一个实体 → 主体
elif action_seen and object.is_empty():
object = word // action 后的第一个实体 → 对象
}Debug 模式
启用方式
Debug 模式在代码中通过 ExtractSubjectObject 结构体的 debug 字段控制:
#![allow(unused)]
fn main() {
// 在 Rust 代码中
pub struct ExtractSubjectObject {
pub debug: bool, // 设置为 true 启用 debug
}
}Debug 输出结构
启用 debug 后,输出对象会包含 debug 字段,内容为 JSON 格式:
{
"tokenization": ["Server", "failed", "to", "connect", "database"],
"pos_tags": [
["Server", "eng"],
["failed", "eng"],
["to", "eng"],
["connect", "eng"],
["database", "eng"]
],
"rules_matched": {
"subject": "rule2: core_pos(eng) + non_stopword",
"action": "rule1: action_verb_match",
"object": "rule1: domain_entity_match (after_action)",
"status": "rule1: status_word_match"
},
"confidence": {
"subject": 0.8,
"action": 1.0,
"object": 1.0,
"status": 1.0
}
}
Debug 字段说明
- tokenization: 分词结果(所有词)
- pos_tags: 词性标注(词 + 词性)
- rules_matched: 每个字段匹配的规则
rule1: 优先级高(词典匹配)rule2: 优先级中(词缀规则、词性规则)rule3: 优先级低(回退规则)
- confidence: 置信度(0.0-1.0)
- 1.0:词典直接匹配
- 0.7-0.8:规则推断
准确率测试
代码中包含完整的准确率测试框架(见 extract_word.rs:1045-1337):
测试数据集
12 个标注测试用例,覆盖:
- 英文:主体+状态、主体+动作+状态、状态+动作+对象、完整结构
- 中文:主体+动作+状态、完整结构
- 混合:中英文混合场景
准确率指标
Subject Accuracy: >= 70%
Action Accuracy: >= 70%
Object Accuracy: >= 70%
Status Accuracy: >= 80%
运行测试
cd crates/wp-oml
cargo test test_accuracy -- --nocapture
输出示例:
======= Accuracy Test Report =======
Test Case Subject Action Object Status Full
------------------------------------------------------------------------------------------------
EN: entity + status ✓ ✓ ✓ ✓ ✓
EN: entity + action + status ✓ ✓ ✓ ✓ ✓
EN: status + action + object ✓ ✓ ✓ ✓ ✓
...
===== Accuracy Statistics =====
Subject Accuracy: 12/12 = 100.0%
Action Accuracy: 11/12 = 91.7%
Object Accuracy: 12/12 = 100.0%
Status Accuracy: 12/12 = 100.0%
Full Match Rate: 11/12 = 91.7%
领域词典
STATUS_WORDS (状态词)
#![allow(unused)]
fn main() {
// 英文
"failed", "failure", "success", "succeeded", "timeout", "exception",
"crashed", "disconnected", "stopped", "completed", "pending",
"refused", "dropped", "rejected", "expired", "closed"
// 中文
"失败", "成功", "超时", "异常", "错误", "崩溃",
"断开", "拒绝", "丢失"
}ACTION_VERBS (动作词)
#![allow(unused)]
fn main() {
// 英文
"connect", "login", "logout", "respond", "start", "stop", "fail",
"run", "process", "send", "receive", "read", "write", "open",
"close", "bind", "listen", "authenticate", "authorize", "create",
"delete", "update", "upload", "download", "retry", "handle",
"load", "fetch", "parse", "resolve", "block", "deny"
// 中文
"连接", "登录", "登出", "请求", "响应", "启动", "停止",
"处理", "发送", "接收", "读取", "写入", "认证", "访问",
"创建", "删除", "更新", "下载", "上传", "重试"
}ENTITY_NOUNS (实体名词)
#![allow(unused)]
fn main() {
// 英文(-tion 结尾但作为实体)
"connection", "transaction", "session", "application",
"configuration", "permission", "operation", "exception"
// 中文
"连接", "会话", "事务", "应用", "配置", "权限"
}LOG_DOMAIN (日志领域词)
#![allow(unused)]
fn main() {
// 日志级别
"error", "warn", "info", "debug", "fatal", "trace"
// 系统相关
"exception", "failure", "timeout", "connection", "database",
"server", "client", "request", "response", "login", "logout",
"auth", "authentication", "permission", "access"
// 网络相关
"http", "https", "tcp", "udp", "ip", "port", "socket"
// 安全相关
"attack", "virus", "malware", "threat", "alert", "blocked", "denied"
}LOG_STOP (停用词)
#![allow(unused)]
fn main() {
// 中文停用词
"的", "了", "在", "是", "我", "有", "和", "就", "不", "人",
"都", "一", "一个", "上", "也", "很", "到", "说", "要", "去",
"你", "会", "着", "没有", "看", "好", "自己", "这"
// 英文停用词
"the", "a", "an", "is", "are", "was", "were", "be", "been",
"being", "of", "at", "in", "to", "for", "and", "or", "but"
}边界情况处理
| 输入 | 输出 | 说明 |
|---|---|---|
空字符串 "" | 全空对象 | {subject:"", action:"", object:"", status:""} |
全空格 " " | 全空对象 | trim 后为空 |
全停用词 "的是在了不" | 全空对象 | 所有词都被过滤 |
只有一个词 "error" | 部分填充 | 根据词角色填充对应字段 |
无动作词 "database failed" | action 为空 | subject=“database”, status=“failed” |
性能优化
全局单例
jieba 分词器使用 lazy_static! 实现全局单例:
#![allow(unused)]
fn main() {
lazy_static! {
static ref JIEBA: Jieba = Jieba::new();
}
}优点:
- 只初始化一次
- 词典加载一次,常驻内存
- 多次调用复用实例
词典查找
使用 HashSet 存储词典:
#![allow(unused)]
fn main() {
static ref STATUS_WORDS: HashSet<&'static str> = { ... };
static ref ACTION_VERBS: HashSet<&'static str> = { ... };
}性能:O(1) 查找时间
扩展与定制
添加自定义状态词
修改 STATUS_WORDS 集合:
#![allow(unused)]
fn main() {
static ref STATUS_WORDS: HashSet<&'static str> = {
let mut set = HashSet::new();
set.insert("failed");
set.insert("custom_status"); // 添加自定义状态词
// ...
set
};
}添加自定义动作词
修改 ACTION_VERBS 集合:
#![allow(unused)]
fn main() {
static ref ACTION_VERBS: HashSet<&'static str> = {
let mut set = HashSet::new();
set.insert("connect");
set.insert("custom_action"); // 添加自定义动作词
// ...
set
};
}添加自定义实体词
修改 ENTITY_NOUNS 集合(覆盖词缀规则):
#![allow(unused)]
fn main() {
static ref ENTITY_NOUNS: HashSet<&'static str> = {
let mut set = HashSet::new();
set.insert("connection");
set.insert("custom_entity"); // 添加自定义实体
// ...
set
};
}调整停用词
修改 LOG_STOP 集合:
#![allow(unused)]
fn main() {
static ref LOG_STOP: HashSet<&'static str> = {
let mut set = HashSet::new();
set.insert("的");
// set.insert("是"); // 注释掉不需要过滤的词
// ...
set
};
}与其他 PipeFun 组合
与 extract_main_word 组合
name: combined_nlp
---
log : chars = take() ;
# 提取主要词(快速)
keyword = pipe read(log) | extract_main_word ;
# 提取完整结构(详细)
structure = pipe read(log) | extract_subject_object ;
# 使用两者结果
is_error_by_keyword = match keyword {
"error" => true,
_ => false
};
is_error_by_status = match structure.status {
"failed" => true,
"exception" => true,
_ => false
};
与 to_json 组合
name: json_output
---
log : chars = take() ;
structure = pipe read(log) | extract_subject_object ;
# 转换为 JSON 字符串用于存储/传输
json_output = pipe read(structure) | to_json ;
# 输出: {"subject":"Server","action":"connect","object":"database","status":"failed"}
与条件判断组合
name: conditional_routing
---
log : chars = take() ;
structure = pipe read(log) | extract_subject_object ;
# 根据状态路由
severity = match structure.status {
"failed" => digit(3),
"timeout" => digit(3),
"exception" => digit(3),
"成功" => digit(1),
"success" => digit(1),
_ => digit(2)
};
注意事项
- 词性依赖:分词和词性标注依赖 jieba-rs,中文准确率较高,英文通过词缀规则补充
- 领域适配:词典针对日志场景优化,其他领域可能需要调整
- 性能考虑:首次调用会初始化 jieba 词典(~50ms),后续调用快速
- 编码要求:输入必须是有效的 UTF-8 字符串
- 调试模式:debug 模式会输出额外字段,生产环境建议关闭
相关资源
- extract_main_word 使用指南 - 关键词提取
- OML 管道函数参考 - 所有 PipeFun 文档
- OML PipeFun 开发指南 - 开发新函数
- jieba-rs GitHub
- jieba-rs 文档
源代码位置
- 定义:
crates/wp-oml/src/language/syntax/functions/pipe/extract_word.rs - 实现:
crates/wp-oml/src/core/evaluator/transform/pipe/extract_word.rs - 测试:
crates/wp-oml/src/core/evaluator/transform/pipe/extract_word.rs:649-1374
更新时间:2026-02-01
OML Functions 函数索引
本文档列出了 docs/usage/zh/04-oml/functions/ 目录下的函数与专题文档。
内置表达式 / 内置函数
| 名称 | 语法 | 说明 | 文档 |
|---|---|---|---|
calc(...) | calc(expr) | 显式数值表达式,支持 + - * / % 与 abs/round/floor/ceil | 📖 详细文档 |
lookup_nocase(...) | lookup_nocase(dict, key, default) | 对 static object 做忽略大小写查表 | 📖 详细文档 |
iequals_any(...) | iequals_any(v1, v2, ...) | 忽略大小写的多候选匹配,用于 match 条件 | 📖 详细文档 |
Pipe Functions
以下为可通过管道调用的函数:
字段访问函数 (Field Accessors)
| 函数 | 语法 | 说明 | 文档 |
|---|---|---|---|
take | take(field_name) | 从输入数据中提取指定字段 | - |
get | get(key) | 从嵌套结构中获取指定键的值 | - |
nth | nth(index) | 从数组中获取指定索引的元素 | - |
字符串匹配函数 (String Matching)
| 函数 | 语法 | 说明 | 文档 |
|---|---|---|---|
starts_with | starts_with('prefix') | 检查字符串是否以指定前缀开始,否则转为 ignore | 📖 详细文档 |
值转换函数 (Value Transformation)
| 函数 | 语法 | 说明 | 文档 |
|---|---|---|---|
map_to | map_to(value) | 将非 ignore 字段映射到指定值(支持多种类型) | 📖 详细文档 |
to_str | to_str | 将字段值转换为字符串 | - |
to_json | to_json | 将字段值转换为 JSON 字符串 | - |
编码/解码函数 (Encoding/Decoding)
| 函数 | 语法 | 说明 | 文档 |
|---|---|---|---|
base64_encode | base64_encode | Base64 编码字符串 | - |
base64_decode | base64_decode(encoding) | Base64 解码字符串(可指定编码) | - |
html_escape | html_escape | HTML 转义字符串 | - |
html_unescape | html_unescape | HTML 反转义字符串 | - |
json_escape | json_escape | JSON 转义字符串 | - |
json_unescape | json_unescape | JSON 反转义字符串 | - |
str_escape | str_escape | 通用字符串转义 | - |
时间转换函数 (Time Conversion)
| 函数 | 语法 | 说明 | 文档 |
|---|---|---|---|
Time::to_ts | Time::to_ts | 将时间转换为秒级时间戳 | - |
Time::to_ts_ms | Time::to_ts_ms | 将时间转换为毫秒级时间戳 | - |
Time::to_ts_us | Time::to_ts_us | 将时间转换为微秒级时间戳 | - |
Time::to_ts_zone | Time::to_ts_zone(zone, unit) | 将时间转换为指定时区的时间戳 | - |
网络函数 (Network)
| 函数 | 语法 | 说明 | 文档 |
|---|---|---|---|
ip4_to_int | ip4_to_int | 将 IPv4 地址转换为整数 | - |
URL/路径解析函数 (URL/Path Parsing)
| 函数 | 语法 | 说明 | 文档 |
|---|---|---|---|
path | path(type) | 从路径字符串中提取指定部分 | - |
url | url(type) | 从 URL 字符串中提取指定部分 | - |
控制流函数 (Control Flow)
| 函数 | 语法 | 说明 | 文档 |
|---|---|---|---|
skip_empty | skip_empty | 跳过空值字段 | - |
函数分类总览
按功能分类
1. 数据提取函数
从输入数据或嵌套结构中提取字段。
take(field): 提取顶层字段get(key): 提取嵌套字段nth(index): 提取数组元素
2. 条件过滤函数
检查条件,不满足时转换为 ignore。
starts_with(prefix): 前缀匹配
3. 值映射函数
修改字段值或类型。
map_to(value): 通用值映射to_str: 转字符串to_json: 转 JSON
4. 编码转换函数
在不同编码格式之间转换。
- Base64:
base64_encode,base64_decode - HTML:
html_escape,html_unescape - JSON:
json_escape,json_unescape
5. 时间处理函数
处理时间相关的转换。
- 时间戳转换:
Time::to_ts* - 时区转换:
Time::to_ts_zone
6. 网络处理函数
处理网络相关数据。
- IP 地址:
ip4_to_int - URL 解析:
url(type) - 路径解析:
path(type)
使用示例
基本管道
name : basic_pipeline
---
# 1. 提取字段
result = pipe take(message)
# 2. 过滤条件
| starts_with('ERROR')
# 3. 值映射
| map_to('error_type');
复杂转换
name : complex_transformation
---
# 提取并转换时间
timestamp_ms = pipe take(time_str)
| Time::to_ts_ms;
# Base64 编码
encoded = pipe take(message)
| base64_encode;
# URL 解析
host = pipe take(url)
| url(host);
条件分类
name : conditional_classification
---
# 根据 URL 前缀分类安全级别
high_security = pipe take(url)
| starts_with('https://')
| map_to(3);
low_security = pipe take(url)
| starts_with('http://')
| map_to(1);
数据清洗
name : data_cleaning
---
# 提取并清理数据
clean_message = pipe take(raw_message)
| html_unescape
| json_unescape
| skip_empty;
性能参考
| 函数类型 | 典型性能 | 说明 |
|---|---|---|
| 字段访问 | < 100ns | 基于哈希表查找 |
| 字符串匹配 | < 1μs | 简单前缀比较 |
| 值映射 | < 100ns | 直接值替换 |
| Base64 编码 | 1-10μs | 取决于字符串长度 |
| 时间转换 | 1-5μs | 时间解析和转换 |
| URL 解析 | 1-10μs | URL 结构解析 |
最佳实践
1. 合理使用管道链
# ✅ 推荐:按逻辑顺序组织管道
result = pipe take(field)
| starts_with('prefix') # 先过滤
| map_to('value'); # 再映射
# ⚠️ 避免:不必要的长管道
result = pipe take(field)
| to_str
| to_json
| to_str # 冗余操作
2. 利用 ignore 传播
# ✅ 推荐:利用 ignore 跳过后续处理
secure_flag = pipe take(url)
| starts_with('https://') # 失败返回 ignore
| map_to(true); # ignore 会跳过此步
# 这样可以安全地处理条件逻辑
3. 选择合适的函数
# ✅ 推荐:使用专用函数
result = pipe take(field) | map_to(123); # 自动推断为整数
# ⚠️ 不推荐:手动转换
result = pipe take(field) | to_str | map_to('123'); # 额外开销
4. 避免重复提取
# ✅ 推荐:一次提取,多次使用
url_field = pipe take(url);
host = pipe take(url) | url(host);
path = pipe take(url) | url(path);
# ⚠️ 避免:每次都提取同一字段(性能影响小但不够清晰)
函数对比
starts_with vs 正则表达式
| 特性 | starts_with | 正则表达式 |
|---|---|---|
| 性能 | 极快 | 较慢 |
| 功能 | 前缀匹配 | 复杂模式 |
| 使用难度 | 简单 | 需要学习 |
| 失败行为 | 转为 ignore | - |
map_to vs to_str
| 特性 | map_to | to_str |
|---|---|---|
| 功能 | 值替换 | 类型转换 |
| 类型支持 | 多种 | 仅字符串 |
| ignore 保留 | 是 | 否 |
| 用途 | 条件赋值 | 类型转换 |
相关文档
- 开发指南: OML Pipe Function 开发指南
- 语法参考: OML 语法指南
版本历史
-
1.13.4 (2026-02-03)
- 新增
starts_with函数 - 新增
map_to函数,支持多种类型自动推断 - 完善文档体系
- 新增
-
1.13.3 (2026-02-03)
- 修复编译错误
-
1.13.2 (2026-02-03)
- 完善 pipe 函数支持
提示: OML pipe 函数设计用于数据转换和映射。合理使用 ignore 机制可以实现灵活的条件逻辑。
lookup_nocase(...):忽略大小写静态字典查表
lookup_nocase(dict_symbol, key_expr, default_expr) 用于对 static 中定义的 object 做忽略大小写查表。
语法
lookup_nocase(<dict_symbol>, <key_expr>, <default_expr>)
参数说明
dict_symbol- 必须引用
static中定义的 object
- 必须引用
key_expr- 待查 key,通常是
read(status)这类字符串字段
- 待查 key,通常是
default_expr- 未命中时返回的默认值
示例
static {
status_score = object {
error = float(90.0);
warning = float(70.0);
success = float(20.0);
};
}
risk_score : float = lookup_nocase(status_score, read(status), 40.0) ;
查表规则
- key 会先执行
trim + lowercase - 然后在静态 object 中查找对应字段名
- 命中则返回字典值
- 未命中则返回
default_expr - 如果
key_expr不是字符串,也返回default_expr
适用场景
- 状态值映射为风险分数
- 等级、动作、结果码等固定枚举的标准化
- 输入值大小写不稳定,但映射表希望只维护一份小写键
使用建议
- 字典尽量统一用小写 key,和
lookup_nocase(...)的归一化规则保持一致 - 如果需要在多个地方复用同一映射表,优先放到
static中 - 如果只是二三选一的条件分支,优先考虑
match + iequals_any(...)
map_to 函数使用指南
简介
map_to 是一个 OML pipe 函数,用于在字段存在(非 ignore)时将字段值映射到指定的值。支持多种类型:字符串、整数、浮点数、布尔值。
语法
field_name = pipe take(source_field) | map_to(value);
参数
map_to 支持多种类型的参数,解析器会自动推断类型:
- 字符串: 使用引号包围,如
'text'或"text" - 整数: 直接写数字,如
123或-456 - 浮点数: 带小数点的数字,如
3.14或-2.5 - 布尔值:
true或false
行为
- 如果字段为非 ignore 类型,使用参数值替换字段值(并转换为相应类型)
- 如果字段为 ignore 类型,保持不变
- 自动进行类型转换
类型推断规则
| 输入 | 推断类型 | 结果字段类型 |
|---|---|---|
'text' 或 "text" | 字符串 | Chars |
123 | 整数 | Digit |
3.14 | 浮点数 | Float |
true / false | 布尔值 | Bool |
使用场景
场景 1: 映射到字符串标记
name : classify_status
---
status_label = pipe take(http_code) | map_to('success');
输入: http_code = 200
输出: status_label = "success" (Chars类型)
场景 2: 映射到整数优先级
name : set_priority
---
priority = pipe take(log_level) | map_to(1);
输入: log_level = "ERROR"
输出: priority = 1 (Digit类型)
场景 3: 映射到浮点数阈值
name : set_threshold
---
threshold = pipe take(category) | map_to(0.95);
输入: category = "high"
输出: threshold = 0.95 (Float类型)
场景 4: 映射到布尔标记
name : mark_secure
---
is_secure = pipe take(protocol) | map_to(true);
输入: protocol = "https"
输出: is_secure = true (Bool类型)
场景 5: 与过滤函数组合
name : classify_secure_requests
---
security_level = pipe take(url) | starts_with('https://') | map_to(3);
输入: url = "https://api.example.com"
输出: security_level = 3 (Digit类型)
输入: url = "http://api.example.com"
输出: security_level = (ignore) (因为 starts_with 失败)
场景 6: 多级分类
name : multi_level_classification
---
# 检查 URL 是否为 HTTPS,如果是则设置安全级别为高优先级
priority = pipe take(url)
| starts_with('https://')
| map_to(10);
# 标记为已验证
verified = pipe take(url)
| starts_with('https://')
| map_to(true);
场景 7: 协议分类
name : protocol_classification
---
# HTTP 标记为 1
http_level = pipe take(protocol) | starts_with('http://') | map_to(1);
# HTTPS 标记为 3
https_level = pipe take(protocol) | starts_with('https://') | map_to(3);
# FTP 标记为 2
ftp_level = pipe take(protocol) | starts_with('ftp://') | map_to(2);
场景 8: 状态码分类
name : status_code_classification
---
# 2xx 成功
success_flag = pipe take(status_code) | digit_range(200, 299) | map_to('success');
# 4xx 客户端错误
client_error_flag = pipe take(status_code) | digit_range(400, 499) | map_to('client_error');
# 5xx 服务器错误
server_error_flag = pipe take(status_code) | digit_range(500, 599) | map_to('server_error');
与其他函数的对比
| 函数 | 支持类型 | 用途 | 条件保留 |
|---|---|---|---|
map_to(value) | 字符串、整数、浮点数、布尔值 | 通用映射,自动类型推断 | 保留 ignore |
to_str | - | 类型转换为字符串 | 不保留 |
to_json | - | 转换为 JSON 字符串 | 不保留 |
典型使用模式
1. 条件标记模式
name : conditional_marking
---
# 如果某个条件满足,标记为 true
is_valid = pipe take(field) | some_condition() | map_to(true);
2. 分类映射模式
name : classification_mapping
---
# 根据不同条件映射到不同的分类
category_a = pipe take(value) | condition_a() | map_to('A');
category_b = pipe take(value) | condition_b() | map_to('B');
3. 优先级赋值模式
name : priority_assignment
---
# 根据条件赋予不同优先级
high_priority = pipe take(level) | check_high() | map_to(10);
medium_priority = pipe take(level) | check_medium() | map_to(5);
low_priority = pipe take(level) | check_low() | map_to(1);
实现细节
- 定义位置:
crates/wp-oml/src/language/syntax/functions/pipe/other.rs - 实现位置:
crates/wp-oml/src/core/evaluator/transform/pipe/other.rs - 解析器:
crates/wp-oml/src/parser/pipe_prm.rs - 测试:
crates/wp-oml/src/core/evaluator/transform/pipe/other.rs(tests 模块)
类型推断实现
解析器按以下顺序尝试解析参数:
- 布尔值:
true或false - 数字:
- 如果是整数形式(无小数部分),推断为
Digit - 如果有小数部分,推断为
Float
- 如果是整数形式(无小数部分),推断为
- 字符串: 单引号或双引号包围的文本
注意事项
- 字符串必须加引号:
map_to(text)会报错,应使用map_to('text') - 整数自动识别:
map_to(100)自动识别为整数,map_to(100.0)识别为浮点数 - 布尔值不加引号:
map_to(true)而非map_to('true') - ignore 字段保持不变: 如果输入字段是 ignore,输出也是 ignore
- 类型转换: 无论输入字段的原始类型,输出字段类型由参数决定
性能特性
- O(1) 时间复杂度: 简单的值替换操作
- 类型安全: 编译时类型检查确保类型正确
- 零开销: 直接值替换,无额外分配
调试技巧
1. 验证类型推断
name : debug_type_inference
---
# 测试不同类型
str_field = pipe take(input) | map_to('string'); # Chars
int_field = pipe take(input) | map_to(123); # Digit
float_field = pipe take(input) | map_to(3.14); # Float
bool_field = pipe take(input) | map_to(true); # Bool
2. 检查 ignore 传播
name : debug_ignore_propagation
---
# 如果 starts_with 失败,result 应该是 ignore
result = pipe take(url) | starts_with('https://') | map_to('secure');
相关函数
starts_with(prefix): 检查字符串前缀,失败时返回 ignoreskip_empty: 跳过空值to_str: 转换为字符串to_json: 转换为 JSON 字符串get(name): 从嵌套结构获取字段nth(index): 从数组获取指定索引的元素
OML Match 表达式函数匹配
本文档介绍 OML match 表达式中的函数匹配功能。
概述
从版本 1.13.4 开始,OML 的 match 表达式支持使用函数进行模式匹配,提供比简单值比较更灵活的匹配方式。
基本语法
field_name = match read(source_field) {
function_name(arguments) => result_value,
_ => default_value,
};
与 Pipe Function 的区别
| 特性 | Match 函数 | Pipe 函数 |
|---|---|---|
| 用途 | 多分支条件判断 | 二元过滤(保留/忽略) |
| 返回 | 根据条件返回不同的值 | 匹配返回原值,不匹配返回 ignore |
| 场景 | 分类、路由、决策 | 过滤、清洗 |
示例对比:
# Match: 根据前缀分类到不同结果
EventType = match read(log) {
starts_with('[ERROR]') => chars(error),
starts_with('[WARN]') => chars(warning),
starts_with('[INFO]') => chars(info),
_ => chars(other),
};
# Pipe: 过滤出 ERROR 日志,其他变为 ignore
ErrorLog = pipe take(log) | starts_with('[ERROR]');
支持的函数
字符串匹配函数
starts_with(prefix)
检查字段值是否以指定前缀开始。
语法: starts_with('prefix')
参数:
prefix: 字符串,要匹配的前缀(必须使用引号)
匹配规则:
- 字段值以指定前缀开始 → 匹配成功
- 字段值不以指定前缀开始 → 匹配失败
- 字段不是字符串类型 → 匹配失败
- 大小写敏感
示例:
EventType = match read(log_line) {
starts_with('[ERROR]') => chars(error),
starts_with('[WARN]') => chars(warning),
_ => chars(info),
};
ends_with(suffix)
检查字段值是否以指定后缀结束。
语法: ends_with('suffix')
参数:
suffix: 字符串,要匹配的后缀(必须使用引号)
匹配规则:
- 字段值以指定后缀结束 → 匹配成功
- 字段值不以指定后缀结束 → 匹配失败
- 字段不是字符串类型 → 匹配失败
- 大小写敏感
示例:
FileType = match read(filename) {
ends_with('.json') => chars(json),
ends_with('.xml') => chars(xml),
ends_with('.log') => chars(log),
_ => chars(unknown),
};
contains(substring)
检查字段值是否包含指定子串。
语法: contains('substring')
参数:
substring: 字符串,要匹配的子串(必须使用引号)
匹配规则:
- 字段值包含指定子串 → 匹配成功
- 字段值不包含指定子串 → 匹配失败
- 字段不是字符串类型 → 匹配失败
- 大小写敏感
示例:
ErrorType = match read(message) {
contains('exception') => chars(exception),
contains('timeout') => chars(timeout),
contains('failed') => chars(failure),
_ => chars(normal),
};
regex_match(pattern)
使用正则表达式匹配字段值。
语法: regex_match('pattern')
参数:
pattern: 字符串,正则表达式模式(必须使用引号)
匹配规则:
- 字段值匹配正则表达式 → 匹配成功
- 字段值不匹配正则表达式 → 匹配失败
- 正则表达式语法错误 → 匹配失败并记录警告
- 字段不是字符串类型 → 匹配失败
注意: 使用标准 Rust regex 语法
示例:
EventPattern = match read(log_message) {
regex_match('^\[\d{4}-\d{2}-\d{2}') => chars(timestamped),
regex_match('^ERROR:.*timeout') => chars(error_timeout),
regex_match('^\d{1,3}\.\d{1,3}\.\d{1,3}\.\d{1,3}') => chars(ip_address),
_ => chars(unmatched),
};
is_empty()
检查字段值是否为空字符串。
语法: is_empty()
参数: 无
匹配规则:
- 字段值为空字符串 → 匹配成功
- 字段值非空 → 匹配失败
- 字段不是字符串类型 → 匹配失败
示例:
Status = match read(field_value) {
is_empty() => chars(missing),
_ => chars(present),
};
iequals(value)
忽略大小写比较字段值。
语法: iequals('value')
参数:
value: 字符串,要比较的值(必须使用引号)
匹配规则:
- 字段值与参数值在忽略大小写的情况下相等 → 匹配成功
- 字段值与参数值不相等 → 匹配失败
- 字段不是字符串类型 → 匹配失败
示例:
NormalizedStatus = match read(status) {
iequals('success') => chars(ok),
iequals('error') => chars(fail),
iequals('warning') => chars(warn),
_ => chars(unknown),
};
iequals_any(value1, value2, …)
忽略大小写比较多个候选值,任一命中即匹配成功。
语法: iequals_any('success', 'ok', 'done')
参数:
value1, value2, ...: 一个或多个字符串候选值(必须使用引号)
匹配规则:
- 字段值与任一参数值在忽略大小写的情况下相等 → 匹配成功
- 所有参数都不匹配 → 匹配失败
- 字段不是字符串类型 → 匹配失败
示例:
StatusClass = match read(status) {
iequals_any('success', 'ok', 'done') => chars(good),
iequals_any('error', 'failed', 'timeout') => chars(bad),
_ => chars(other),
};
数值比较函数
gt(value)
检查字段值是否大于指定值。
语法: gt(100) (数值参数不需要引号)
参数:
value: 数值,要比较的阈值
匹配规则:
- 字段值 > 参数值 → 匹配成功
- 字段值 ≤ 参数值 → 匹配失败
- 字段不是数值类型 → 匹配失败
- 支持整数 (digit) 和浮点数 (float)
示例:
Level = match read(count) {
gt(1000) => chars(critical),
gt(500) => chars(high),
gt(100) => chars(medium),
_ => chars(low),
};
lt(value)
检查字段值是否小于指定值。
语法: lt(60) (数值参数不需要引号)
参数:
value: 数值,要比较的阈值
匹配规则:
- 字段值 < 参数值 → 匹配成功
- 字段值 ≥ 参数值 → 匹配失败
- 字段不是数值类型 → 匹配失败
- 支持整数和浮点数
示例:
Grade = match read(score) {
lt(60) => chars(fail),
lt(70) => chars(pass),
lt(85) => chars(good),
_ => chars(excellent),
};
eq(value)
检查字段值是否等于指定数值。
语法: eq(5) (数值参数不需要引号)
参数:
value: 数值,要比较的目标值
匹配规则:
- 字段值等于参数值 → 匹配成功(浮点数比较容差 1e-10)
- 字段值不等于参数值 → 匹配失败
- 字段不是数值类型 → 匹配失败
- 支持整数和浮点数
示例:
Status = match read(level) {
eq(0) => chars(disabled),
eq(5) => chars(max_level),
eq(1) => chars(minimum),
_ => chars(normal),
};
in_range(min, max)
检查字段值是否在指定范围内。
语法: in_range(20, 30) (数值参数不需要引号)
参数:
min: 数值,范围最小值max: 数值,范围最大值
匹配规则:
- min ≤ 字段值 ≤ max → 匹配成功
- 字段值 < min 或 字段值 > max → 匹配失败
- 字段不是数值类型 → 匹配失败
- 支持整数和浮点数
- 区间为闭区间 [min, max]
示例:
TempZone = match read(temperature) {
lt(0) => chars(freezing),
in_range(0, 10) => chars(cold),
in_range(10, 20) => chars(cool),
in_range(20, 30) => chars(comfortable),
gt(30) => chars(warm),
_ => chars(unknown),
};
使用示例
示例 1: 日志级别分类
name : classify_log_event
---
EventType = match read(Content) {
starts_with('[ERROR]') => chars(error),
starts_with('[WARN]') => chars(warning),
starts_with('[INFO]') => chars(info),
_ => chars(debug),
};
示例 2: 文件类型识别
name : file_type_detection
---
FileType = match read(filename) {
ends_with('.json') => chars(json),
ends_with('.xml') => chars(xml),
ends_with('.log') => chars(log),
ends_with('.txt') => chars(text),
_ => chars(unknown),
};
示例 3: 错误类型检测
name : error_type_detection
---
ErrorType = match read(message) {
contains('exception') => chars(exception),
contains('timeout') => chars(timeout),
contains('failed') => chars(failure),
_ => chars(normal),
};
示例 4: 分数等级映射
name : score_grade_mapping
---
Grade = match read(score) {
gt(90) => chars(A),
in_range(80, 90) => chars(B),
in_range(70, 80) => chars(C),
in_range(60, 70) => chars(D),
_ => chars(F),
};
示例 5: 温度区间分类
name : temperature_classification
---
TempZone = match read(temperature) {
lt(0) => chars(freezing),
in_range(0, 10) => chars(cold),
in_range(10, 20) => chars(cool),
in_range(20, 30) => chars(comfortable),
in_range(30, 40) => chars(warm),
gt(40) => chars(hot),
_ => chars(unknown),
};
示例 6: 混合使用多种函数
name : log_classification
---
EventType = match read(log_line) {
starts_with('[ERROR]') => chars(error),
starts_with('[WARN]') => chars(warning),
contains('exception') => chars(exception),
ends_with('failed') => chars(failure),
is_empty() => chars(empty),
_ => chars(other),
};
示例 7: 正则表达式匹配
name : regex_pattern_match
---
EventPattern = match read(log_message) {
regex_match('^\[\d{4}-\d{2}-\d{2}\s\d{2}:\d{2}:\d{2}\]') => chars(timestamped),
regex_match('^ERROR:.*timeout') => chars(error_timeout),
regex_match('^\d{1,3}\.\d{1,3}\.\d{1,3}\.\d{1,3}') => chars(ip_address),
_ => chars(unmatched),
};
示例 8: 大小写不敏感状态匹配
name : case_insensitive_status
---
NormalizedStatus = match read(status) {
iequals('success') => chars(ok),
iequals('error') => chars(fail),
iequals('warning') => chars(warn),
iequals('pending') => chars(wait),
_ => chars(unknown),
};
注意事项
1. 参数引号规则
# ✅ 字符串参数必须加引号
starts_with('prefix')
iequals('value')
# ✅ 数值参数不需要引号
gt(100)
eq(5)
in_range(20, 30)
# ❌ 错误示例
starts_with(prefix) # 缺少引号
gt('100') # 不应该加引号
2. 大小写敏感性
# 大多数字符串函数都是大小写敏感的
starts_with('ERROR') # 不会匹配 'error:'
# 使用 iequals 进行大小写不敏感匹配
iequals('success') # 匹配 'SUCCESS', 'Success', 'success'
3. 匹配顺序
# match 按从上到下的顺序匹配,第一个匹配成功的分支会被执行
Grade = match read(score) {
gt(90) => chars(A), # 先检查 > 90
gt(80) => chars(B), # 再检查 > 80
gt(70) => chars(C), # 然后检查 > 70
_ => chars(F),
};
# 如果 score = 95,只会匹配到第一个分支 (A)
4. 数值类型支持
# 支持多种数值类型
- digit(100) # 整数
- float(3.14) # 浮点数
- chars("123") # 可解析的字符串
# 所有这些都可以用于数值比较函数
count = digit(150);
Level = match read(count) {
gt(100) => chars(high), # 匹配成功
_ => chars(low),
};
5. 范围区间
# in_range 使用闭区间 [min, max]
in_range(10, 20) # 包含 10 和 20
# 示例:score = 20 会匹配成功
Grade = match read(score) {
in_range(10, 20) => chars(pass), # 匹配!
_ => chars(fail),
};
性能参考
| 函数类型 | 典型性能 | 说明 |
|---|---|---|
| 前缀/后缀匹配 | < 1μs | 简单字符串比较 |
| 子串匹配 | 1-5μs | 取决于字符串长度 |
| 正则表达式 | 5-50μs | 取决于模式复杂度 |
| 数值比较 | < 100ns | 直接数值比较 |
| 大小写转换 | 1-2μs | 需要字符串复制 |
函数对比
Match 函数 vs Pipe 函数
| 特性 | Match starts_with | Pipe starts_with |
|---|---|---|
| 返回值 | 根据条件返回不同值 | 匹配返回原值,不匹配返回 ignore |
| 分支数 | 支持多个分支 | 仅二元(匹配/不匹配) |
| 用途 | 分类、决策树 | 过滤、数据清洗 |
| 代码长度 | 多条件时更简洁 | 简单过滤时更简洁 |
示例对比:
# Match: 多分支分类
EventType = match read(log) {
starts_with('[ERROR]') => chars(error),
starts_with('[WARN]') => chars(warning),
starts_with('[INFO]') => chars(info),
_ => chars(debug),
};
# Pipe: 简单过滤
ErrorLog = pipe take(log) | starts_with('[ERROR]');
# 不匹配的变成 ignore,匹配的保留原值
数值函数对比
| 场景 | 推荐函数 | 示例 |
|---|---|---|
| 阈值判断 | gt / lt | gt(100) |
| 精确匹配 | eq | eq(5) |
| 区间判断 | in_range | in_range(10, 20) |
| 分段分类 | 组合使用 | 见温度分类示例 |
最佳实践
1. 优先使用简单函数
# ✅ 推荐:使用简单的 starts_with
match read(url) {
starts_with('https://') => chars(secure),
_ => chars(insecure),
}
# ⚠️ 避免:不必要的正则表达式
match read(url) {
regex_match('^https://') => chars(secure), # 性能更差
_ => chars(insecure),
}
2. 合理组织匹配顺序
# ✅ 推荐:从具体到一般
match read(log) {
starts_with('[ERROR]') => chars(error), # 最具体
starts_with('[WARN]') => chars(warning),
contains('exception') => chars(exception), # 较宽泛
_ => chars(other), # 默认
}
3. 利用数值范围
# ✅ 推荐:使用 in_range 简化多个条件
Grade = match read(score) {
gt(90) => chars(A),
in_range(80, 90) => chars(B),
in_range(70, 80) => chars(C),
_ => chars(D),
};
# ⚠️ 避免:重复的比较
Grade = match read(score) {
gt(90) => chars(A),
gt(80) => chars(B), # 实际上是 80-90
gt(70) => chars(C), # 实际上是 70-80
_ => chars(D),
};
4. 使用 iequals 处理用户输入
# ✅ 推荐:使用 iequals 处理大小写不确定的输入
Status = match read(user_input) {
iequals('yes') => chars(confirmed),
iequals('no') => chars(rejected),
_ => chars(invalid),
};
与传统匹配的对比
传统值匹配
Status = match read(status_code) {
digit(200) => chars(success),
digit(404) => chars(not_found),
digit(500) => chars(error),
_ => chars(unknown),
};
特点: 精确匹配固定值
OR 条件匹配
使用 | 分隔多个备选条件,任一匹配即成功:
# 单源 OR 匹配
tier = match read(city) {
chars(bj) | chars(sh) | chars(gz) => chars(tier1),
chars(cd) | chars(wh) => chars(tier2),
_ => chars(other),
};
特点: 在同一分支中表达“或“的关系,减少重复分支
OR 语法也可以与函数匹配组合使用:
EventType = match read(log_line) {
starts_with('[ERROR]') | starts_with('[FATAL]') => chars(critical),
starts_with('[WARN]') => chars(warning),
_ => chars(info),
};
多源 + OR 匹配
多源 match 中的每个条件位置都支持 OR 语法:
priority = match (read(city), read(level)) {
(chars(bj) | chars(sh), chars(high)) => chars(priority),
(chars(gz), chars(low) | chars(mid)) => chars(normal),
_ => chars(default),
};
函数匹配
EventType = match read(log_line) {
starts_with('ERROR:') => chars(error),
starts_with('WARN:') => chars(warning),
starts_with('INFO:') => chars(info),
_ => chars(debug),
};
特点: 基于模式或条件匹配
相关文档
- OML Pipe Functions 索引 - Pipe 函数完整列表
- starts_with Pipe 函数 - Pipe 版本的 starts_with 详细说明
- map_to 函数 - 值映射函数
- OML 语法参考 - OML 基础语法
版本历史
-
1.16.3 (Unreleased)
- 新增 OR 条件语法:
cond1 | cond2 | ...,在同一分支中表达备选条件 - 多源 match 支持任意数量源字段(不再限于 2/3/4 个)
- 多源 match 条件位置支持 OR 语法
- 新增 OR 条件语法:
-
1.19.1 (2026-03-12)
- 新增
iequals_any(...),用于忽略大小写的多候选值匹配
- 新增
-
1.13.4 (2026-02-04)
- 新增 match 表达式函数匹配支持
- 字符串匹配:
starts_with,ends_with,contains,regex_match,is_empty,iequals - 数值比较:
gt,lt,eq,in_range - 完善函数文档
提示: Match 函数用于多分支条件判断,Pipe 函数用于二元过滤。根据实际场景选择合适的函数类型可以让代码更简洁清晰。
starts_with 函数使用指南
简介
starts_with 是一个 OML pipe 函数,用于检查字符串字段是否以指定的前缀开始。
语法
field_name = pipe take(source_field) | starts_with('prefix');
参数
prefix: 字符串类型,要检查的前缀(需使用引号)
行为
- 如果字段值以指定前缀开始,字段保持不变并继续传递
- 如果字段值不以指定前缀开始,字段转换为 ignore 类型
- 如果字段不是字符串类型,字段转换为 ignore 类型
- 前缀匹配是大小写敏感的
使用场景
场景 1: 过滤 HTTPS URL
name : filter_secure_urls
---
secure_url = pipe take(url) | starts_with('https://');
输入: url = "https://example.com"
输出: secure_url = "https://example.com" (Chars类型)
输入: url = "http://example.com"
输出: secure_url = (ignore)
场景 2: 提取 API 路径
name : extract_api_path
---
api_path = pipe take(request_path) | starts_with('/api/v1/');
输入: request_path = "/api/v1/users"
输出: api_path = "/api/v1/users" (Chars类型)
输入: request_path = "/admin/users"
输出: api_path = (ignore)
场景 3: 分类日志级别
name : classify_error_logs
---
error_message = pipe take(log_message) | starts_with('ERROR');
warning_message = pipe take(log_message) | starts_with('WARN');
输入: log_message = "ERROR: Connection failed"
输出:
error_message = "ERROR: Connection failed"(Chars类型)warning_message = (ignore)
场景 4: 与 map_to 组合使用
name : classify_secure_requests
---
# 如果是 HTTPS,标记为安全
is_secure = pipe take(url) | starts_with('https://') | map_to(true);
# 如果是 HTTPS,设置安全级别
security_level = pipe take(url) | starts_with('https://') | map_to(3);
输入: url = "https://api.example.com"
输出:
is_secure = true(Bool类型)security_level = 3(Digit类型)
输入: url = "http://api.example.com"
输出:
is_secure = (ignore)security_level = (ignore)
场景 5: 多条件过滤
name : extract_specific_prefix
---
# 提取特定前缀的字段
https_url = pipe take(url) | starts_with('https://');
ftp_url = pipe take(url) | starts_with('ftp://');
websocket_url = pipe take(url) | starts_with('wss://');
根据不同的协议前缀,将 URL 分类到不同的字段中。
场景 6: 路径规范化
name : normalize_paths
---
# 只接受绝对路径
absolute_path = pipe take(file_path) | starts_with('/');
# 只接受相对路径
relative_path = pipe take(file_path) | starts_with('./');
与其他函数的对比
| 函数 | 检查位置 | 性能 | 用途 |
|---|---|---|---|
starts_with(prefix) | 字符串开头 | 极快 | 前缀匹配 |
regex_match(pattern) | 任意位置 | 较慢 | 复杂模式匹配 |
to_str | - | 快 | 类型转换 |
常见用例
1. URL 协议过滤
name : url_protocol_filter
---
https_only = pipe take(url) | starts_with('https://');
2. 路径前缀提取
name : api_path_extract
---
v1_api = pipe take(path) | starts_with('/api/v1/');
v2_api = pipe take(path) | starts_with('/api/v2/');
3. 日志级别分类
name : log_level_classify
---
errors = pipe take(message) | starts_with('[ERROR]');
warnings = pipe take(message) | starts_with('[WARN]');
info = pipe take(message) | starts_with('[INFO]');
4. 文件扩展名检查(配合其他字段)
name : file_type_check
---
# 注意:这个示例假设 filename 已经被规范化
json_file = pipe take(filename) | starts_with('data_') | map_to('json');
实现细节
- 定义位置:
crates/wp-oml/src/language/syntax/functions/pipe/other.rs - 实现位置:
crates/wp-oml/src/core/evaluator/transform/pipe/other.rs - 解析器:
crates/wp-oml/src/parser/pipe_prm.rs - 测试:
crates/wp-oml/src/core/evaluator/transform/pipe/other.rs(tests 模块)
注意事项
- 字符串必须加引号:
starts_with('https://')而非starts_with(https://) - 大小写敏感:
starts_with('HTTP')不会匹配http://example.com - ignore 字段传播: 转换为 ignore 的字段在后续管道函数中会保持 ignore 状态
- 与 map_to 配合: 常见模式是先用
starts_with过滤,再用map_to赋值
性能特性
- O(n) 时间复杂度: n 为前缀长度
- 零拷贝: 不修改原始字符串
- 短路优化: 发现不匹配立即返回
相关函数
map_to(value): 条件赋值,支持多种类型skip_empty: 跳过空值to_str: 转换为字符串get(name): 从嵌套结构获取字段
static 块:模型级常量与模板缓存
OML 允许在 --- 分隔线之后声明 static { ... } 区块,将“只初始化一次、在运行时复用”的结构写在这里。解析完成后,static 中的表达式会被执行一次,结果进入模型常量池;随后的所有数据转换都直接引用缓存对象,无需再生成临时字段。
适用场景
- 事件模板、常量字典等纯字面量对象
- 需要在多个转换步骤中复用的结构(例如
match结果)
语法示例
name : /oml/apache_error_e1
rule : apache/error/e1
---
static {
e1_template = object {
id = chars(E1);
tpl = chars("jk2_init() Found child <*> in scoreboard slot <*>")
};
e2_template = object {
id = chars(E2);
tpl = chars("workerEnv.init() ok <*>")
};
}
Content = read(Content);
target_template = match Content {
starts_with("jk2_init() Found child") => e1_template;
starts_with("workerEnv.init() ok") => e2_template;
_ => e1_template;
};
EventId = target_template | get(id);
EventTemplate = target_template | get(tpl);
static { ... }中的赋值可使用任意合法表达式,但不得调用read()/take()等依赖输入数据的函数。- 非
static区块中直接写静态符号名即可引用缓存值,无需read()。
执行模型
- 解析阶段:
- 仅检查
static语句和目标名称是否重复。 - 生成
EvalExpAST 并登记符号名。
- 仅检查
- 构建阶段:
finalize_static_blocks统一执行所有静态表达式,构建常量池const_fields。- 将 DSL 中的
StaticSymbol占位符(如 match 结果、管道参数)重写为真实DataField。
- 运行阶段:
- 静态值来自常量池,不会再次执行 evaluator。
使用建议
- 匹配/管道:
static变量可出现在match ... => symbol、read(symbol)、管道起点等位置,解析器会自动识别。
限制
static语句仅支持单目标赋值,不可批量定义多个字段。- 不允许在
static中调用依赖输入记录的数据访问函数(read()/take()等),否则编译期会报错。 - 静态符号仅在定义所在模型内可见,不会跨模型共享。
连接器管理
本文档介绍 Warp Parse 系统中连接器(Connectors)的定义、结构和使用方法。
连接器概念
什么是连接器
连接器是数据源和数据输出的配置模板,定义了特定类型连接器的默认参数和行为。通过将连接器定义与实例配置分离,实现了配置的复用和统一管理。
连接器的作用
- 配置复用: 多个源可以引用同一个连接器
- 参数标准化: 统一同类数据源的配置规范
- 权限控制: 通过
allow_override控制可覆盖的参数 - 版本管理: 便于连接器配置的版本控制
连接器定义结构
基础结构
# connectors/source.d/{connector_name}.toml
[[connectors]]
id = "unique_connector_id"
type = "connector_type"
allow_override = ["param1", "param2", "param3"]
[connectors.params]
param1 = "default_value1"
param2 = "default_value2"
param3 = "default_value3"
字段说明
id (必需)
- 连接器的唯一标识符
- 在源配置中通过
connect字段引用 - 命名规范:sources 连接器以
_src结尾(如file_src),sinks 连接器以_sink结尾(如file_json_sink)
type (必需)
- 连接器类型,决定使用哪种数据源/输出实现
- Sources 支持的类型:
file,syslog,tcp(kafka暂未实现) - Sinks 支持的类型:
file,syslog,tcp,arrow-ipc,blackhole(其余类型以当前版本实现为准)
allow_override (可选)
- 允许源/sink 配置覆盖的参数列表
- 为空时表示不允许覆盖任何参数
- 提供配置灵活性,同时保证安全性
params (必需)
- 连接器的默认参数配置
- 被
allow_override包含的参数可以在实例配置中覆盖
目录结构
connectors/
├── source.d/ # 源连接器目录
│ ├── 00-file-default.toml # 文件连接器
│ ├── 10-syslog-udp.toml # UDP Syslog 连接器
│ ├── 11-syslog-tcp.toml # TCP Syslog 连接器
│ ├── 12-tcp.toml # TCP 连接器
│ └── 30-kafka.toml # Kafka 连接器
└── sink.d/ # 输出连接器目录
├── 00-blackhole-sink.toml # 黑洞连接器
├── 02-file-json.toml # JSON 文件输出
├── 10-syslog-udp.toml # UDP Syslog 输出
├── 11-syslog-tcp.toml # TCP Syslog 输出
├── 12-tcp.toml # TCP 输出
├── 20-arrow-ipc.toml # Arrow IPC/TCP 输出
├── 30-kafka.toml # Kafka 输出
└── 30-prometheus.toml # Prometheus 输出
连接器类型
Source 连接器
File 连接器
# connectors/source.d/00-file-default.toml
[[connectors]]
id = "file_src"
type = "file"
allow_override = ["base", "file", "encode"]
[connectors.params]
base = "data/in_dat"
file = "gen.dat"
encode = "text"
Kafka 连接器(暂未实现)
# connectors/source.d/30-kafka.toml
[[connectors]]
id = "kafka_src"
type = "kafka"
allow_override = ["topic", "group_id", "config"]
[connectors.params]
brokers = "localhost:9092"
topic = ["access_log"]
group_id = "wparse_default_group"
⚠️ Kafka 连接器当前暂未实现,请勿使用。
Syslog 连接器
# connectors/source.d/11-syslog-tcp.toml
[[connectors]]
id = "syslog_tcp_src"
type = "syslog"
allow_override = ["addr", "port", "protocol", "tcp_recv_bytes", "header_mode", "prefer_newline"]
[connectors.params]
addr = "127.0.0.1"
port = 1514
protocol = "tcp"
header_mode = "strip"
tcp_recv_bytes = 256000
TCP 连接器
# connectors/source.d/12-tcp.toml
[[connectors]]
id = "tcp_src"
type = "tcp"
allow_override = ["addr", "port", "framing", "tcp_recv_bytes", "instances"]
[connectors.params]
addr = "0.0.0.0"
port = 9000
framing = "auto"
tcp_recv_bytes = 256000
Sink 连接器
File 连接器
# connectors/sink.d/02-file-json.toml
[[connectors]]
id = "file_json_sink"
type = "file"
allow_override = ["base", "file"]
[connectors.params]
fmt = "json"
base = "./data/out_dat"
file = "default.json"
Syslog 连接器
# connectors/sink.d/11-syslog-tcp.toml
[[connectors]]
id = "syslog_tcp_sink"
type = "syslog"
allow_override = ["addr", "port", "protocol", "app_name"]
[connectors.params]
addr = "127.0.0.1"
port = 1514
protocol = "tcp"
TCP 连接器
# connectors/sink.d/12-tcp.toml
[[connectors]]
id = "tcp_sink"
type = "tcp"
allow_override = ["addr", "port", "framing"]
[connectors.params]
addr = "127.0.0.1"
port = 9000
framing = "line"
Arrow IPC 连接器
# connectors/sink.d/20-arrow-ipc.toml
[[connectors]]
id = "arrow_ipc_sink"
type = "arrow-ipc"
allow_override = ["target", "tag", "fields"]
[connectors.params]
target = "tcp://127.0.0.1:9800"
tag = "default"
fields = [
{ name = "sip", type = "ip" },
{ name = "dport", type = "digit" }
]
连接器最佳实践
1. 参数覆盖设计
# ✅ 好的设计:明确的覆盖权限
[[connectors]]
id = "file_main"
type = "file"
allow_override = ["base", "file", "encode"]
# ❌ 避免:过度开放覆盖权限
[[connectors]]
id = "file_too_open"
type = "file"
allow_override = ["*"] # 不支持且不安全
2. 默认值设置
# ✅ 好的设计:合理的默认值
[[connectors]]
id = "syslog_secure"
type = "syslog"
allow_override = ["addr", "port", "protocol"]
[connectors.params]
addr = "127.0.0.1" # 安全的默认地址
port = 1514 # 非特权端口
protocol = "tcp" # 可靠的协议
相关文档
Sources 配置指南
本指南介绍如何配置和使用 Warp Parse 系统的各种数据源。
内容概览
快速开始
- 了解 源配置基础概念
- 根据你的数据源类型选择相应的配置指南
- 参考连接器管理文档了解连接器定义
支持的数据源类型
| 类型 | 说明 | 文档 |
|---|---|---|
file | 从本地文件读取数据 | 文件源配置 |
kafka | 从 Kafka 消费消息 | Kafka 源配置 |
syslog | 接收 Syslog 协议数据 (UDP/TCP) | Syslog 源配置 |
tcp | 通过 TCP 接收数据 | TCP 源配置 |
相关文档
Source 基础
本文档介绍 Warp Parse 系统中数据源配置的基础概念和用法。
概述
数据源(Source)是 Warp Parse 系统的数据输入端,负责从各种数据源接收数据并输入到处理流程中。
核心概念
1. 连接器(Connectors)
连接器定义了如何与特定类型的数据源建立连接和通信。系统内置了多种连接器类型:
- File Connector: 从文件读取数据
- Kafka Connector: 从 Kafka 消息队列消费数据
- Syslog Connector: 接收 Syslog 协议数据
- TCP Connector: 通过 TCP 套接字接收数据
2. 连接器定义
连接器定义存储在 connectors/source.d/ 目录下:
# connectors/source.d/kafka_src.toml
[[connectors]]
id = "kafka_src"
type = "kafka"
allow_override = ["topic", "group_id", "config"]
[connectors.params]
brokers = "localhost:9092"
topic = ["access_log"]
group_id = "wparse_default_group"
3. 源配置结构
# wpsrc.toml
[[sources]]
key = "main_source"
enable = true
connect = "kafka_src"
tags = ["env:production"]
[[sources.params]]
topic = "events"
# 或使用 params_override (别名)
配置步骤
- 定义连接器: 在
connectors/source.d/目录下创建连接器配置文件 - 配置源: 在源配置文件中引用连接器并指定参数
- 验证配置: 使用 CLI 工具验证配置正确性
- 启动系统: 启动 Warp Parse 系统开始接收数据
配置字段说明
通用字段
| 字段 | 类型 | 必需 | 说明 |
|---|---|---|---|
key | String | 是 | 源的唯一标识符 |
enable | Boolean | 否 | 是否启用该源(默认 true) |
connect | String | 是 | 引用的连接器 ID |
tags | Array | 否 | 源的标签列表 |
params | Table | 否 | 连接器参数(可覆盖连接器默认值) |
参数覆盖规则
- 只有在连接器的
allow_override列表中的参数才能被覆盖 - 未在列表中的参数使用连接器定义中的默认值
配置示例
基础文件源
# wpsrc.toml
[[sources]]
key = "file_access_log"
enable = true
connect = "file_src"
[sources.params]
base = "/var/log/nginx"
file = "access.log"
Kafka 源配置
# wpsrc.toml
[[sources]]
key = "kafka_access_logs"
enable = true
connect = "kafka_src"
tags = ["env:production", "type:access_log"]
[sources.params]
topic = "nginx_access_log"
Syslog 源配置
# wpsrc.toml
[[sources]]
key = "syslog_tcp_1"
enable = true
connect = "syslog_tcp_src"
tags = ["protocol:tcp", "env:production"]
[sources.params]
addr = "127.0.0.1"
port = 1514
protocol = "tcp"
相关文档
File Source
本文档详细介绍如何配置和使用 Warp Parse 系统的文件数据源。
概述
文件源用于从本地文件系统读取数据,支持多种编码格式和灵活的路径配置。
连接器定义
基础文件连接器
# connectors/source.d/00-file-default.toml
[[connectors]]
id = "file_src"
type = "file"
allow_override = ["base", "file", "encode"]
[connectors.params]
base = "data/in_dat"
file = "gen.dat"
encode = "text"
支持的参数
路径配置
base + file 组合(推荐)
[[sources]]
key = "file_composed"
connect = "file_src"
[[sources.params]]
base = "/var/log"
file = "access.log"
instances(多实例并行读取)
[[sources.params]]
instances = 4 # 1-32,默认为 1
当
instances > 1时,文件会被按行边界分割为多个范围,由多个实例并行读取。多实例命名规则:当
instances > 1时,每个实例的 key 会自动添加后缀,如file_src-1、file_src-2等。
编码格式
text 编码(默认)
[[sources.params]]
encode = "text"
配置示例
基础文件读取
# wpsrc.toml
[[sources]]
enable = true
key = "access_log"
connect = "file_src"
[[sources.params]]
base = "/var/log/nginx"
file = "access.log"
多文件源配置
# wpsrc.toml
[[sources]]
enable = true
key = "nginx_access"
connect = "file_src"
[[sources.params]]
base = "/var/log/nginx"
file = "access.log"
[[sources]]
enable = true
key = "nginx_error"
connect = "file_src"
[[sources.params]]
base = "/var/log/nginx"
file = "error.log"
不同编码格式
# Base64 编码的文件
[[sources]]
key = "base64_data"
connect = "file_src"
[[sources.params]]
base = "./data"
file = "encoded.b64"
encode = "base64"
# 十六进制编码的文件
[[sources]]
key = "hex_data"
connect = "file_src"
[[sources.params]]
base = "./data"
file = "encoded.hex"
encode = "hex"
数据处理特性
1. 逐行读取
文件源采用逐行读取模式,每行作为独立的数据包处理。
2. 编码处理
- text: 直接读取文本内容
示例:
{
"data": "原始日志内容",
"tags": {
"access_source": "/var/log/nginx/access.log",
"env": "production"
}
}
相关文档
Kafka 源配置
本文档详细介绍如何配置和使用 Warp Parse 系统的 Kafka 数据源。
概述
Kafka 源用于从 Apache Kafka 消息队列消费数据,支持消费单个主题和灵活的配置选项。
注意:系统会自动创建配置的主题(如果不存在),消费者组 ID 可以通过
group_id参数配置,默认为wparse_default_group。
连接器定义
基础 Kafka 连接器
# connectors/source.d/30-kafka.toml
[[connectors]]
id = "kafka_src"
type = "kafka"
allow_override = ["topic", "group_id", "config"]
[connectors.params]
brokers = "localhost:9092"
topic = ["access_log"]
group_id = "wparse_default_group"
支持的参数
基础连接参数
brokers (必需)
Kafka 集群地址,支持字符串格式
[[sources.params]]
brokers = "localhost:9092"
topic (必需)
消费的主题名称(数组形式)
[[sources.params]]
topic = ["access_log"]
group_id (可选)
消费者组 ID
[[sources.params]]
group_id = "my_consumer_group"
安全配置
所有安全相关参数必须通过 config 数组配置,格式为 key=value 字符串。
SSL/TLS 配置
[[sources.params]]
config = [
"security_protocol=SSL",
"ssl_ca_location=/path/to/ca.pem",
"ssl_certificate_location=/path/to/client.pem",
"ssl_key_location=/path/to/client.key",
"ssl_key_password=key_password"
]
SASL 认证
[[sources.params]]
config = [
"security_protocol=SASL_PLAINTEXT",
"sasl_mechanisms=PLAIN",
"sasl_username=consumer_user",
"sasl_password=consumer_pass"
]
SASL/SCRAM 认证
[[sources.params]]
config = [
"security_protocol=SASL_SSL",
"sasl_mechanisms=SCRAM-SHA-256",
"sasl_username=consumer_user",
"sasl_password=consumer_pass"
]
高级配置
消费策略
[[sources.params]]
config = [
"auto_offset_reset=earliest",
"enable_auto_commit=false",
"auto_commit_interval_ms=5000"
]
会话和心跳配置
[[sources.params]]
config = [
"session_timeout_ms=30000",
"heartbeat_interval_ms=3000",
"max_poll_interval_ms=300000"
]
批量消费配置
[[sources.params]]
config = [
"max_poll_records=500",
"fetch_min_bytes=1",
"fetch_max_wait_ms=500"
]
配置示例
基础配置
# wpsrc.toml
[[sources]]
enable = true
key = "kafka_access_logs"
connect = "kafka_src"
[[sources.params]]
topic = ["nginx_access_log"]
高级配置
# wpsrc.toml
[[sources]]
enable = true
key = "kafka_advanced"
connect = "kafka_src"
[[sources.params]]
topic = ["access_log"]
config = [
"auto_offset_reset=earliest",
"enable_auto_commit=false"
]
安全集群配置
# wpsrc.toml
[[sources]]
enable = true
key = "kafka_secure_logs"
connect = "kafka_src"
tags = ["env:production", "security:tls"]
[[sources.params]]
topic = ["secure_events"]
config = [
"auto_offset_reset=latest",
"enable_auto_commit=true",
"auto_commit_interval_ms=1000"
]
数据处理特性
1. 消息结构
每个 Kafka 消息被转换为数据包,包含:
- 消息体: 消息的实际内容(payload)
示例:
{
"data": "原始消息内容",
"tags": {
"access_source": "access_log",
"env": "production",
"type": "access_log"
}
}
3. 消费语义
- 消费者组 ID: 通过
group_id参数配置 - Topic 自动创建: 配置的主题不存在时会自动创建(1 个分区,复制因子为 1)
- 偏移量提交: 由底层 rdkafka 库处理,可通过 config 参数配置
性能优化
1. 批量消费
[[sources.params]]
config = [
"max_poll_records=1000",
"fetch_min_bytes=1024",
"fetch_max_wait_ms=100"
]
2. 连接优化
[[sources.params]]
config = [
"session_timeout_ms=60000",
"heartbeat_interval_ms=5000",
"max_poll_interval_ms=600000"
]
相关文档
Syslog 源配置
本文档详细介绍如何配置和使用 Warp Parse 系统的 Syslog 数据源。
概述
Syslog 源用于接收和解析标准的 Syslog 协议消息,支持 UDP 和 TCP 两种传输协议,以及多种 Syslog 格式。
连接器定义
UDP Syslog 连接器
# connectors/source.d/10-syslog-udp.toml
[[connectors]]
id = "syslog_udp_src"
type = "syslog"
allow_override = ["addr", "port", "protocol", "tcp_recv_bytes", "header_mode", "fast_strip"]
[connectors.params]
addr = "0.0.0.0"
port = 1514
protocol = "udp"
header_mode = "strip"
tcp_recv_bytes = 256000
TCP Syslog 连接器
# connectors/source.d/11-syslog-tcp.toml
[[connectors]]
id = "syslog_tcp_src"
type = "syslog"
allow_override = ["addr", "port", "protocol", "tcp_recv_bytes", "header_mode", "fast_strip"]
[connectors.params]
addr = "127.0.0.1"
port = 1514
protocol = "tcp"
header_mode = "strip"
tcp_recv_bytes = 256000
支持的参数
基础网络参数
addr (必需)
监听地址
[[sources.params]]
addr = "0.0.0.0" # 监听所有接口
addr = "127.0.0.1" # 仅本地接口
addr = "10.0.0.100" # 特定接口
port (必需)
监听端口
[[sources.params]]
port = 514 # 标准 syslog 端口 (需要 root 权限)
protocol (必需)
传输协议
[[sources.params]]
protocol = "tcp" # TCP 协议 (可靠传输)
消息处理参数
header_mode
头部处理模式
[[sources.params]]
header_mode = "strip" # 仅剥离头部,不注入标签
header_mode = "parse" # 解析+注入标签+剥离头部(默认)
header_mode = "keep" # 保留头部,原样透传
fast_strip
快速剥离模式(性能优化)
[[sources.params]]
fast_strip = true # 启用快速剥离(性能更好)
TCP 专用参数
tcp_recv_bytes
TCP 接收缓冲区大小
[[sources.params]]
tcp_recv_bytes = 256000 # 256KB (默认)
tcp_recv_bytes = 10485760 # 10MB
tcp_recv_bytes = 104857600 # 100MB (高性能)
配置示例
基础 UDP 配置
# wpsrc.toml
[[sources]]
enable = true
key = "syslog_udp_1"
connect = "syslog_udp_src"
tags = ["protocol:udp", "env:production"]
[[sources.params]]
addr = "0.0.0.0"
port = 1514
protocol = "udp"
基础 TCP 配置
# wpsrc.toml
[[sources]]
enable = true
key = "syslog_tcp_1"
connect = "syslog_tcp_src"
tags = ["protocol:tcp", "env:production"]
[[sources.params]]
addr = "127.0.0.1"
port = 1514
protocol = "tcp"
双协议配置
# wpsrc.toml
[[sources]]
enable = true
key = "syslog_udp_collector"
connect = "syslog_udp_src"
[[sources.params]]
addr = "0.0.0.0"
port = 1514
protocol = "udp"
header_mode = "strip"
[[sources]]
enable = true
key = "syslog_tcp_aggregator"
connect = "syslog_tcp_src"
[[sources.params]]
addr = "127.0.0.1"
port = 1515
protocol = "tcp"
header_mode = "parse"
tcp_recv_bytes = 1048576
数据处理特性
1. Syslog 格式支持
RFC3164 格式 (传统 BSD Syslog)
<34>Oct 11 22:14:15 mymachine su: 'su root' failed for lonvick on /dev/pts/8
RFC5424 格式 (现代 Syslog)
<165>1 2003-10-11T22:14:15.003Z mymachine.example.com evntslog - ID47 [exampleSDID@32473 iut="3" eventSource="Application" eventID="1011"] BOMAn application event log entry
2. 解析字段
当 header_mode = "parse" 时,系统会解析并添加以下标签:
{
"data": "原始消息内容",
"tags": {
"source_type": "syslog",
"syslog_priority": 34, // 数值优先级
"syslog_facility": 4, // 设施代码
"syslog_severity": 2, // 严重性级别
"syslog_hostname": "mymachine",
"syslog_app_name": "su",
"syslog_proc_id": "1234", // 进程ID (RFC5424)
"syslog_msg_id": "ID47", // 消息ID (RFC5424)
"syslog_timestamp": "Oct 11 22:14:15"
}
}
3. 分帧/头部处理优化
# 高性能场景:
header_mode = "strip" # 仅去头,减少解析与标签注入
fast_strip = true # 启用快速剥离
# 分析场景:
header_mode = "parse" # 解析并注入协议相关元信息
相关文档
TCP 源配置
本文档介绍通用 TCP 源(kind=tcp)的使用方式、分帧模式与与 TCP Sink 的联动示例。
功能概览
- 支持三种分帧模式:
line:按换行符分帧;行末的 CR/空格/Tab 会被去除len:长度前缀(RFC 6587 octet-counting):<len><SP><payload>auto(默认):自动选择;默认优先len,当prefer_newline=true时优先按行
连接器定义(source.d)
# connectors/source.d/12-tcp.toml
[[connectors]]
id = "tcp_src"
type = "tcp"
# 允许覆写的键,兼容 syslog 的常见命名
allow_override = ["addr", "port", "framing", "tcp_recv_bytes", "instances"]
[connectors.params]
addr = "0.0.0.0"
port = 9000
framing = "auto" # auto|line|len
tcp_recv_bytes = 256000 # 256KB
# instances = 1 # 可选:多实例并行,默认 1,最大 16
源配置(wpsrc.toml)
[[sources]]
key = "tcp_in"
connect = "tcp_src"
enable = true
tags = ["source:tcp", "type:raw"]
[[sources.params]]
port = 19000
framing = "auto"
instances = 2
分帧模式详解
line(换行)
- 适用:文本日志、人工/脚本推送、简单工具(nc/tail)链路
- 行尾会去掉
\r/空格/Tab;建议发送端每条以\n结尾
len(长度前缀)
- 形如:
5 hello→ 表示下一条 payload 长度为 5 字节(不包含前缀中的空格) - 适用:payload 可能包含换行/二进制的场景(例如多行日志、堆栈、压缩片段)
- 接收端约束:长度最大 10MB、前缀最多 10 位十进制,异常时丢弃当前尝试,避免内存膨胀
auto(自动)
- 默认优先尝试
len,若解析失败则回退按行 - 若已检测到“长度前缀进行中“(读到
<digits><SP>但 payload 未到齐),会继续等待,而不会回退按行,避免误切分
与 TCP Sink 联动(回环链路)
为了便于端到端联调,本项目提供了通用 TCP Sink(kind=tcp):
- sink connectors:
connectors/sink.d/12-tcp.toml - sink 参数:
addr/port/framing(line|len) - 示例:
wpgen输出到tcp_sink,wparse以tcp_src监听同端口,实现本机回环
示例 wpgen(conf/wpgen.toml)
[generator]
mode = "sample"
count = 10000
[output]
connect = "tcp_sink"
[output.params]
addr = "127.0.0.1"
port = 19000
framing = "line" # 或 "len"
完整用例(usecase/core/tcp_roundtrip)
目录:usecase/core/tcp_roundtrip
- 启动:
./case_verify.sh - 步骤:启动 wparse(tcp 源)→ wpgen 推送(tcp sink)→ 校验文件输出
常见问题(FAQ)
- 问:文本以“数字+空格“开头会不会被误判为长度前缀?
- 答:在
auto模式下,确有可能;可通过framing="line"避免
- 答:在
- 问:为什么推荐生产中用
len?- 答:边界明确、对二进制/多行更稳健;很多 syslog/TCP 等生产链路推荐/默认使用 octet‑counting
最佳实践
- 仅文本:
framing="line" - 多行/二进制:
framing="len"(或auto默认) - 快速联调:
framing="line",配合nc -lk <port>
相关文档
Source Meta
概述
Warp Parse 系统在解析数据时,会自动向 DataRecord 追加一些机制数据字段,用于追踪数据的来源和处理路径。这些机制数据字段以 wp_ 前缀标识,为系统提供了数据溯源和调试能力。
机制数据字段列表
1. wp_event_id
- 字段类型: 字符串 (String)
- 描述: 事件的唯一标识符
- 来源: 从 SourceEvent.event_id 获取 -用途: 追踪单个事件在系统中的完整处理流程
2. wp_src_key
- 字段类型: 字符串 (String)
- 描述: 数据源的标识符
- 来源: 从 SourceEvent.src_key 获取
- 用途: 标识数据来源于哪个数据源(如 “syslog_1”, “file_reader” 等)
3. wp_src_ip
- 字段类型: IP 地址 (IP)
- 描述: 数据源的客户端 IP 地址
- 来源: 从 SourceEvent.ups_ip 获取
- 用途: 记录发送数据的客户端 IP 地址,用于审计和定位
Sinks 配置指南
本指南介绍如何配置和使用 Warp Parse 系统的各种数据输出(Sink)。
支持的 Sink 类型
| 类型 | 说明 | 文档 |
|---|---|---|
blackhole | 黑洞输出(用于测试) | - |
file | 输出到本地文件 | 文件 Sink 配置 |
syslog | 输出到 Syslog 服务器 (UDP/TCP) | Syslog Sink 配置 |
tcp | 输出到 TCP 服务端 | TCP Sink 配置 |
arrow-ipc | 输出为 Arrow IPC 帧(TCP) | Arrow IPC Sink 配置 |
arrow-file | 输出 Arrow IPC 帧到本地文件 | Arrow File Sink |
kafka | 输出到 Kafka | Kafka Sink 配置 |
mysql | 输出到 MySQL | MySQL Sink 配置 |
doris | 输出到 Doris | Doris Sink 配置 |
prometheus | Prometheus 指标暴露 | Prometheus Sink 配置 |
Sink 基础
本文档介绍 warpparse 系统中数据输出端 (Sink) 的基础概念和配置结构。
概述
Sink 是 warpparse 系统的数据输出端,负责将处理后的数据发送到各种目标系统。系统支持多种输出类型,包括文件、Syslog、Arrow IPC、Prometheus 等。
核心概念
1. 配置层次结构
warpparse 系统采用分层配置架构:
全局默认配置 (defaults.toml)
↓
路由组配置 (business.d/**/*.toml, infra.d/**/*.toml)
↓
连接器定义 (connectors/sink.d/*.toml)
↓
解析后的 Sink 实例 (ResolvedSinkSpec)
2. 核心数据结构
配置文件结构
1. 连接器定义 (connectors.toml)
# connectors/sink.d/file_raw_sink.toml
[[connectors]]
id = "file_raw_sink"
type = "file"
allow_override = ["base", "file", "fmt"]
[connectors.params]
base = "./data/out_dat"
file = "default.dat"
fmt = "json"
关键字段说明:
id: 连接器唯一标识符type: 连接器类型 (file, syslog, prometheus 等)allow_override: 允许源配置覆盖的参数列表params: 连接器默认参数
2. 路由配置 (business.d//*.toml, infra.d//*.toml)
# business.d/example.toml
version = "2.0"
[sink_group]
name = "/sink/example"
oml = ["example_pattern"]
parallel = 2
tags = ["env:production"]
[[sink_group.sinks]]
name = "example_sink"
connect = "file_raw_sink"
params = {
base = "./output",
file = "example.dat"
}
filter = "./filter.wpl"
tags = ["type:example"]
[sink_group.sinks.expect]
ratio = 1.0
tol = 0.01
3. 全局默认配置 (defaults.toml)
# defaults.toml
version = "2.0"
[defaults]
tags = ["env:default"]
[defaults.expect]
basis = "total_input"
min_samples = 100
mode = "error"
基础配置示例
1. 简单文件输出
# infra.d/simple_file.toml
version = "2.0"
[sink_group]
name = "simple_output"
oml = []
[[sink_group.sinks]]
connect = "file_raw_sink"
params = { file = "simple.log" }
2. 带过滤器的输出
# business.d/filtered_output.toml
version = "2.0"
[sink_group]
name = "/sink/filtered"
oml = ["/oml/logs/*"]
[[sink_group.sinks]]
name = "all_logs"
connect = "file_json_sink"
params = { file = "all_logs.json" }
[[sink_group.sinks]]
name = "error_logs"
connect = "file_json_sink"
filter = "./error_filter.wpl"
params = { file = "error_logs.json" }
[sink_group.sinks.expect]
ratio = 0.1
tol = 0.02
3. 并行输出配置(仅业务组)
# business.d/parallel_output.toml
version = "2.0"
[sink_group]
name = "/sink/parallel"
oml = ["high_volume"]
parallel = 4
tags = ["type:parallel"]
[[sink_group.sinks]]
name = "output_1"
connect = "file_proto_sink"
params = { file = "output_1.dat" }
[[sink_group.sinks]]
name = "output_2"
connect = "file_proto_sink"
params = { file = "output_2.dat" }
注:基础组(infra.d)不支持 parallel 与文件分片;如需提升吞吐与分片,请在业务组配置。
标签系统
1. 标签继承层次
标签系统支持三层继承:
- 默认标签 (来自 defaults.toml)
- 组级标签 (来自 sink_group)
- Sink 级标签 (来自具体 sink)
2. 标签配置示例
# defaults.toml
[defaults]
tags = ["env:production", "service:warpflow"]
# business.d/example.toml
[sink_group]
tags = ["region:us-west", "tier:processing"]
[[sink_group.sinks]]
tags = ["output:file", "compression:gzip"]
最终标签合并结果:
["env:production", "service:warpflow", "region:us-west", "tier:processing", "output:file", "compression:gzip"]
期望值配置 (Expect)
1. 比例模式
[sink_group.sinks.expect]
ratio = 1.0 # 期望占比 100%
tol = 0.01 # 允许偏差 ±1%
2. 范围模式
[sink_group.sinks.expect]
min = 0.001 # 最小占比 0.1%
max = 2.0 # 最大占比 200%
3. 全局默认期望值
[defaults.expect]
basis = "total_input" # 计算基准
min_samples = 100 # 最小样本数
mode = "error" # 违规时处理模式
过滤器配置
1. 过滤器文件
过滤器文件使用 WPL (Warp Processing Language) 语法:
# filter.wpl
# 只处理错误级别的日志
level == "ERROR" || level == "FATAL"
# 或者复杂条件
(level == "ERROR" && source == "auth") ||
(level == "WARN" && message ~= "timeout")
2. 过滤器应用
[[sink_group.sinks]]
name = "filtered_output"
connect = "file_json_sink"
filter = "./error_filter.wpl" # 应用过滤器
params = { file = "errors.json" }
配置验证
1. 参数覆盖验证
系统严格验证参数覆盖:
- 只能覆盖
allow_override中指定的参数 - 不支持嵌套表结构覆盖
2. 唯一性验证
- 同一 sink_group 内 sink 名称必须唯一
- 连接器 ID 必须全局唯一
3. 文件存在性验证
- 过滤器文件必须存在且语法正确
- 文件路径参数必须有效
defaults
目标
- 配置期望(比例/阈值/窗口)并理解分母口径与忽略规则;在 CLI 中进行校验。
核心概念(权威见 ../02-config/04-sinks_config.md)
- defaults:组的默认期望,
$SINK_ROOT/defaults.toml中的[defaults.expect];可被组/单 sink 覆盖。 - group expect:
[sink_group].expect;优先于 defaults。 - sink expect:
[[sink_group.sinks]].expect;仅支持局部字段(ratio/tol 或 min/max,二者不可混用)。 - 分母口径:
total_input | group_input | model(具体定义见权威文档)。
示例(defaults)
version = "2.0"
[defaults]
tags = ["env:dev"]
[defaults.expect]
basis = "group_input"
min_samples = 100
mode = "warn"
示例(组级与单 sink)
[sink_group]
name = "/sink/demo"
[sink_group.expect]
basis = "group_input"
mode = "fail"
[[sink_group.sinks]]
name = "ff"
connect = "file_json_sink"
[sink_group.sinks.expect]
ratio = 0.98 # 与 min/max 互斥
tol = 0.01
Sinks 路由
目标
- 基于目录式 routes(business.d/infra.d)配置路由分发;理解业务组与基础组的差异及命名规则。
核心概念(单点定义见 ../02-config/04-sinks_config.md)
- 业务组 business.d:面向场景输出.
- 基础组 infra.d:系统级输出(default/miss/residue/error/monitor)。
目录与命名
- 业务组:
$SINK_ROOT/business.d/**/*.toml,支持子目录递归;每个路由文件一个组。 - 基础组:
$SINK_ROOT/infra.d/**/*.toml,支持子目录递归;固定组名(default/miss/…)。 - 连接器:从
$WORK_ROOT/models/sinks起向上查找最近的connectors/sink.d/*.toml。
最小示例(业务组)
version = "2.0"
[sink_group]
name = "/sink/demo"
oml = ["/oml/example/*"]
parallel = 1
[[sink_group.sinks]]
name = "file_out"
connect = "file_json_sink" # 连接器 id
params = { file = "demo.json" }
基础组示例(default)
version = "2.0"
[sink_group]
name = "default"
[[sink_group.sinks]]
name = "default_sink"
connect = "file_json_sink"
File Sink 使用指南
概述
File Sink 用于将处理后的数据写入本地文件。支持多种数据格式,可根据需求选择性能模式或安全模式。
配置参数
| 参数 | 类型 | 默认值 | 说明 |
|---|---|---|---|
fmt | string | json | 输出格式 |
base | string | ./data/out_dat | 输出目录 |
file | string | out.dat | 输出文件名 |
sync | bool | false | 是否立即刷新到磁盘 |
支持的输出格式
| 格式 | 说明 | 适用场景 |
|---|---|---|
json | JSON 格式(每行一个对象) | API 对接、数据分析 |
csv | CSV 格式 | Excel 导入、数据交换 |
kv | 键值对格式 | 日志系统、监控 |
show | 人类可读格式 | 调试、查看 |
raw | 原始数据 | 备份、转发 |
proto-text | Protocol Buffer 文本格式 | 结构化数据、调试 |
配置示例
示例 1: 基础 JSON 输出
[[sinks]]
name = "json_output"
kind = "file"
[sinks.params]
fmt = "json"
base = "./data/output"
file = "results.json"
输出文件路径: ./data/output/results.json
示例 2: CSV 格式输出
[[sinks]]
name = "csv_export"
kind = "file"
[sinks.params]
fmt = "csv"
base = "./exports"
file = "data.csv"
示例 3: 启用同步模式
[[sinks]]
name = "critical_sink"
kind = "file"
[sinks.params]
fmt = "json"
base = "./data/critical"
file = "important.json"
sync = true
说明: 设置 sync = true 可确保数据实时写入磁盘,适合关键数据。
示例 4: 多个输出文件
# JSON 格式
[[sinks]]
name = "json_output"
kind = "file"
[sinks.params]
fmt = "json"
base = "./data/json"
file = "output.json"
# CSV 格式
[[sinks]]
name = "csv_output"
kind = "file"
[sinks.params]
fmt = "csv"
base = "./data/csv"
file = "output.csv"
# 原始格式备份
[[sinks]]
name = "raw_backup"
kind = "file"
[sinks.params]
fmt = "raw"
base = "./backup"
file = "backup.dat"
sync = true
sync 参数说明
sync: false (默认)
特点:
- ✅ 高性能,适合大量数据输出
- ✅ 系统资源占用低
- ⚠️ 异常退出时可能丢失少量数据
适用场景:
- 日志归档
- 批量数据导出
- 非关键数据存储
sync: true
特点:
- ✅ 数据实时写入磁盘
- ✅ 最大程度避免数据丢失
- ⚠️ 性能较低,不适合高频写入
适用场景:
- 审计日志
- 金融交易记录
- 关键业务数据
- 调试环境
性能对比
| 模式 | 吞吐量 | 数据安全性 | 推荐场景 |
|---|---|---|---|
sync: false | 🚀 高 | ⚠️ 中等 | 普通日志、批量导出 |
sync: true | 📊 中等 | ✅ 高 | 审计日志、关键数据 |
输出格式示例
JSON 格式
{"timestamp":"2026-02-07T10:30:00Z","level":"INFO","message":"User login"}
{"timestamp":"2026-02-07T10:31:00Z","level":"WARN","message":"API timeout"}
CSV 格式
timestamp,level,message
2026-02-07T10:30:00Z,INFO,User login
2026-02-07T10:31:00Z,WARN,API timeout
KV 格式
timestamp=2026-02-07T10:30:00Z level=INFO message="User login"
timestamp=2026-02-07T10:31:00Z level=WARN message="API timeout"
使用场景
场景 1: 应用日志收集
[[sinks]]
name = "app_log"
kind = "file"
[sinks.params]
fmt = "json"
base = "./logs"
file = "app.log"
sync = false
推荐配置: 使用 sync = false 获得最佳性能。
场景 2: 审计日志
[[sinks]]
name = "audit_log"
kind = "file"
[sinks.params]
fmt = "json"
base = "./audit"
file = "security.log"
sync = true
推荐配置: 使用 sync = true 确保审计记录不丢失。
场景 3: 数据导出到 Excel
[[sinks]]
name = "excel_export"
kind = "file"
[sinks.params]
fmt = "csv"
base = "./exports"
file = "report.csv"
sync = false
提示: CSV 格式可直接用 Excel 打开。
场景 4: 调试输出
[[sinks]]
name = "debug_output"
kind = "file"
[sinks.params]
fmt = "show"
base = "./debug"
file = "trace.log"
sync = true
推荐配置: 调试时使用 sync = true 便于实时查看。
场景 5: 多格式备份
# JSON - 用于程序处理
[[sinks]]
name = "json_sink"
kind = "file"
[sinks.params]
fmt = "json"
file = "data.json"
# CSV - 用于 Excel 分析
[[sinks]]
name = "csv_sink"
kind = "file"
[sinks.params]
fmt = "csv"
file = "data.csv"
# 原始格式 - 用于完整备份
[[sinks]]
name = "raw_backup"
kind = "file"
[sinks.params]
fmt = "raw"
file = "backup.dat"
sync = true
文件名规范
建议的命名方式
# ✅ 带日期
[sinks.params]
file = "app_2024-01-01.log"
# ✅ 描述性名称
[sinks.params]
file = "access.log"
# ❌ 通用名称
[sinks.params]
file = "out.dat"
目录规划示例
./data/
├── logs/ # 普通日志
├── audit/ # 审计日志
├── exports/ # 数据导出
├── backup/ # 备份数据
└── debug/ # 调试输出
最佳实践
1. 根据数据重要性选择 sync 模式
关键数据 → sync: true
普通数据 → sync: false
2. 使用描述性文件名
# ✅ 清晰明了
[sinks.params]
file = "user_login_2024-01.log"
3. 合理规划目录结构
按数据类型或重要性分目录存储。
4. 定期清理旧文件
配合日志轮转工具(如 logrotate)管理文件。
5. 监控磁盘空间
设置告警,避免磁盘写满。
注意事项
1. 目录权限
- ✅ 确保输出目录存在
- ✅ 确保有写入权限
- ⚠️ 检查 SELinux/AppArmor 策略
2. 磁盘空间
- ⚠️ 监控磁盘使用率
- ⚠️ 配置空间不足告警
- ✅ 定期清理历史文件
3. 性能影响
sync: true会降低性能- 高频写入场景慎用
sync: true - 使用 SSD 可改善性能
常见问题
Q: 如何查看输出文件?
A: 直接使用文本编辑器或命令行工具:
# 查看 JSON 文件
cat ./data/output/results.json
# 实时查看(追加模式)
tail -f ./data/output/results.json
Q: 文件过大如何处理?
A: 配合日志轮转工具:
# 使用 logrotate
logrotate /etc/logrotate.d/wp-motor
Q: sync 参数如何选择?
A: 参考以下原则:
- 关键数据(审计、交易)→
sync: true - 普通数据(日志、统计)→
sync: false - 不确定时使用默认值
false
Q: 支持哪些字符编码?
A: 默认使用 UTF-8 编码。
总结
File Sink 是最常用的输出方式,适合各种场景:
- ✅ 配置简单,参数清晰
- ✅ 支持多种格式
- ✅ 灵活的性能/安全平衡
- ✅ 可靠的写入机制
记住:
- 普通数据用
sync: false(高性能) - 关键数据用
sync: true(高安全)
版本: 1.15.0 更新日期: 2026-02-07
Syslog Sink
本文档与代码实现对齐,描述 Syslog Sink 的实际可用参数与示例。
概述
Syslog Sink 将数据以 RFC3164 文本格式发送到 Syslog 服务器,支持 UDP 与 TCP。消息格式:<PRI>TIMESTAMP HOSTNAME APP_NAME: MESSAGE。
连接器定义
使用仓库内置模板(connectors/sink.d/10-syslog-udp.toml、11-syslog-tcp.toml):
[[connectors]]
id = "syslog_udp_sink"
type = "syslog"
allow_override = ["addr", "port", "protocol", "app_name"]
[connectors.params]
addr = "127.0.0.1"
port = 1514
protocol = "udp"
[[connectors]]
id = "syslog_tcp_sink"
type = "syslog"
allow_override = ["addr", "port", "protocol", "app_name"]
[connectors.params]
addr = "127.0.0.1"
port = 1514
protocol = "tcp"
可用参数(路由 params)
addr:Syslog 服务器地址(IP 或主机名)。port:端口(1–65535)。protocol:udp或tcp(大小写不敏感)。app_name:应用名称,默认为当前进程名(如wp-engine)。
配置示例
- 基础 UDP 输出
version = "2.0"
[sink_group]
name = "/sink/syslog_basic"
oml = ["application_logs"]
[[sink_group.sinks]]
name = "syslog_output"
connect = "syslog_udp_sink"
params = { addr = "syslog.example.com", port = 1514, protocol = "udp" }
- 按条件分流
version = "2.0"
[sink_group]
name = "/sink/syslog_by_cond"
[[sink_group.sinks]]
name = "error"
connect = "syslog_tcp_sink"
filter = "./error_filter.wpl"
params = { addr = "syslog-errors.example.com", port = 514, protocol = "tcp" }
[[sink_group.sinks]]
name = "info"
connect = "syslog_udp_sink"
filter = "./info_filter.wpl"
params = { addr = "syslog-info.example.com", port = 1514, protocol = "udp" }
Prometheus Sink
⚠️ 注意:Prometheus Sink 当前暂未实现。本文档为计划功能的设计文档,实际使用时请以代码实现为准。
本文档与代码实现对齐。当前 Prometheus Sink 为“自暴露“型 Exporter,会在本地启动一个 HTTP 服务(默认仅支持 Counter 类计数),对外暴露 /metrics。
连接器定义
使用仓库模板(connectors/sink.d/40-prometheus.toml):
[[connectors]]
id = "prometheus_sink"
type = "prometheus"
allow_override = ["endpoint", "source_key_format", "sink_key_format"]
[connectors.params]
endpoint = "127.0.0.1:35666" # 监听地址(对外暴露 /metrics)
source_key_format = "(?P<source_type>.)_(?P<access_source>.)"
sink_key_format = "(?P<rule>.)_(?P<sink_type>.)_sink"
说明:不支持 Pushgateway/自定义 metric_name/metric_type/labels。内置指标名固定:
wparse_receive_data(从数据源接收条数,带源标签)wparse_parse_success、wparse_parse_all(解析成功/总量)wparse_send_to_sink(发送到 sink 的条数,带 sink 标签)
可用参数(路由 params)
endpoint:Exporter 监听的host:port(如127.0.0.1:35666)。source_key_format:可选,用于从 key 中提取source_type/access_source的正则(具名分组)。sink_key_format:可选,用于从 key 中提取rule/sink_type的正则(具名分组)。
配置示例
启动 Exporter 并暴露指标:
version = "2.0"
[sink_group]
name = "/sink/prom_exporter"
oml = ["metrics"]
[[sink_group.sinks]]
name = "prom"
connect = "prometheus_sink"
params = { endpoint = "0.0.0.0:35666" }
验证:curl http://127.0.0.1:35666/metrics
TCP Sink
TCP sink 用于将数据输出到任意 TCP 服务端,支持按行或长度前缀(RFC6587 风格)分帧。
连接器定义
[[connectors]]
id = "tcp_sink"
type = "tcp"
allow_override = ["addr", "port", "framing"]
[connectors.params]
addr = "127.0.0.1"
port = 9000
framing = "line" # line|len
可用参数
addr:目标服务器地址(IP 或主机名)。port:目标端口(1–65535),默认 9000。framing:分帧模式,line或len,默认line。
使用示例(wpgen 输出到 TCP)
# conf/wpgen.toml
[generator]
mode = "sample"
count = 10000
[output]
connect = "tcp_sink"
[output.params]
addr = "127.0.0.1"
port = 9000
framing = "line"
分帧说明
line:追加\n作为消息结束符len:发送<len><space><payload>(不追加\n)
VictoriaLogs
VictoriaLogs sink 用于将日志数据输出到 VictoriaLogs 日志存储系统,通过 HTTP JSON Line 接口写入。
连接器定义
[[connectors]]
id = "victorialog_sink"
type = "victorialogs"
allow_override = ["endpoint", "insert_path", "fmt"]
[connectors.params]
endpoint = "http://localhost:8481"
insert_path = "/insert/json"
fmt = "json"
可用参数
| 参数 | 类型 | 默认值 | 说明 |
|---|---|---|---|
endpoint | string | http://localhost:8481 | VictoriaLogs 服务地址(必填) |
insert_path | string | /insert/json | 数据写入路径 |
create_time_field | string | - | 自定义时间戳字段名,从数据记录中提取 |
fmt | string | json | 输出格式:json、csv、kv、raw 等 |
数据格式
Sink 会将每条数据记录转换为 JSON 对象发送,包含以下特殊字段:
_msg:格式化后的消息内容(根据fmt参数格式化)_time:时间戳(纳秒精度),优先使用create_time_field指定字段,否则使用当前时间
配置示例
基础用法
version = "2.0"
[sink_group]
name = "/sink/victorialogs"
oml = ["logs"]
[[sink_group.sinks]]
name = "vlogs"
connect = "victorialog_sink"
params = { endpoint = "http://victorialogs:9428" }
自定义时间字段
[[sink_group.sinks]]
name = "vlogs"
connect = "victorialog_sink"
[sink_group.sinks.params]
endpoint = "http://victorialogs:9428"
insert_path = "/insert/jsonline"
create_time_field = "timestamp"
fmt = "json"
注意事项
endpoint参数不能为空,否则会校验失败- HTTP 请求超时时间为 5 秒
- 如果
create_time_field指定的字段不存在或非时间类型,将使用当前 UTC 时间
Doris Sink
Doris sink 通过 Doris 的 MySQL 协议入口建立连接,并使用 Stream Load 写入数据。相比 mysql sink,对 Doris 兼容性更好(mysql sink 不兼容 Doris,doris sink 兼容 MySQL)。
连接器定义
推荐使用仓库自带模板(位于 connectors/sink.d/50-doris.toml):
[[connectors]]
id = "doris_sink"
type = "doris"
allow_override = ["endpoint", "user", "password", "database", "table", "create_table"]
[connectors.params]
<<<<<<< HEAD
endpoint = "mysql://localhost:9030?charset=utf8mb4&connect_timeout=10"
user = "root"
password = ""
database = "wp_test"
=======
endpoint = "http://localhost:8040"
user = "${SEC_USERNAME}"
password = "${SEC_PASSWORD}"
database = "test_db"
>>>>>>> 728fbffd4a42b5dc14af2c748f651badecfed1c2
table = "events_parsed"
可用参数
| 参数 | 类型 | 说明 |
|---|---|---|
endpoint | string | Doris FE 的 MySQL 访问地址(DSN 形式),如 mysql://host:9030?charset=utf8mb4(必填) |
user | string | Doris 用户名(必填) |
password | string | Doris 密码(可为空) |
database | string | 目标数据库(必填) |
table | string | 目标表(必填) |
create_table | string | 可选建表 SQL,库表不存在时自动执行 |
pool_size | int | 连接池大小(可选,常用 4) |
batch_size | int | 单批写入事件数量(可选,常用 2048) |
配置示例
基础用法
version = "2.0"
[sink_group]
name = "/sink/doris"
oml = ["example2"]
[[sink_group.sinks]]
name = "doris_stream_load"
connect = "doris_sink"
[sink_group.sinks.params]
<<<<<<< HEAD
endpoint = "mysql://localhost:9030?charset=utf8mb4&connect_timeout=10"
database = "wp_test"
table = "events_parsed"
user = "root"
password = ""
=======
endpoint = "http://localhost:8040"
database = "test_db"
table = "wp_nginx"
user = "${SEC_USERNAME}"
password = "${SEC_PASSWORD}"
timeout_secs = 30
max_retries = 1
batch_size = 10_0000
>>>>>>> 728fbffd4a42b5dc14af2c748f651badecfed1c2
自动建表
<<<<<<< HEAD
[[sink_group.sinks]]
name = "doris_stream_load"
connect = "doris_sink"
[sink_group.sinks.params]
endpoint = "mysql://localhost:9030?charset=utf8mb4&connect_timeout=10"
database = "wp_test"
table = "events_parsed"
create_table = """
CREATE DATABASE IF NOT EXISTS wp_test;
CREATE TABLE events_parsed (
sn VARCHAR(64) COMMENT '设备序列号',
dev_name VARCHAR(128) COMMENT '设备名称',
sip VARCHAR(45) COMMENT '源 IP',
from_zone VARCHAR(32) COMMENT '来源区域',
from_ip VARCHAR(45) COMMENT '来源 IP',
requ_uri VARCHAR(512) COMMENT '请求 URI',
requ_status SMALLINT COMMENT '请求状态码',
resp_len INT COMMENT '响应长度',
src_city VARCHAR(32) COMMENT '源城市'
)
ENGINE=OLAP
DUPLICATE KEY(sn)
COMMENT '设备请求事件解析表'
DISTRIBUTED BY HASH(sn) BUCKETS 8
PROPERTIES (
"replication_num" = "1"
);
"""
user = "root"
password = ""
注意事项
- 确保 Doris FE 的 MySQL 端口可访问,并开启 Stream Load 能力。
- 需要为账号授予
SELECT/INSERT以及LOAD权限。 - 完整端到端示例可参考
wp-examples/extensions/doris/README.md。 ======= [sink_group.sinks.params.headers] strip_outer_array = “false” max_filter_ratio = “0.1” columns = “wp_event_id,wp_src_key,sip,timestamp,http/request,size,referer,http/agent”
>>>>>>> 728fbffd4a42b5dc14af2c748f651badecfed1c2
Kafka Sink
Kafka sink 用于将数据输出到 Apache Kafka。启动时会尝试创建目标 topic(使用 num_partitions/replication 作为分区与副本配置)。
连接器定义
推荐使用仓库自带模板(位于 connectors/sink.d/30-kafka.toml):
[[connectors]]
id = "kafka_sink"
type = "kafka"
allow_override = ["topic", "config", "num_partitions", "replication", "brokers"]
[connectors.params]
brokers = "localhost:9092"
topic = "wparse_output"
num_partitions = 1
replication = 1
# config = ["compression.type=snappy", "acks=all"]
可用参数
| 参数 | 类型 | 说明 |
|---|---|---|
brokers | string | Kafka bootstrap servers(逗号分隔,必填) |
topic | string | 目标 topic(必填) |
num_partitions | int | 自动创建 topic 的分区数(默认 1) |
replication | int | 自动创建 topic 的副本数(默认 1) |
config | string/array | 生产者配置列表,key=value 形式(可选) |
配置示例
基础用法
version = "2.0"
[sink_group]
name = "/sink/kafka"
oml = ["example2"]
[[sink_group.sinks]]
name = "kafka_out"
connect = "kafka_sink"
[sink_group.sinks.params]
brokers = "localhost:9092"
topic = "wp.testcase.events.parsed"
自定义生产者参数与格式
[[sink_group.sinks]]
name = "kafka_out"
connect = "kafka_sink"
[sink_group.sinks.params]
topic = "app.events"
num_partitions = 3
replication = 1
config = [
"compression.type=snappy",
"acks=all",
"linger.ms=5"
]
注意事项
config参数会透传给 Kafka producer(rdkafka),格式必须是key=value字符串。- 若集群禁用自动建 topic,请提前在 Kafka 中创建目标 topic。
- 完整示例可参考
wp-examples/extensions/kafka/README.md。
MySQL Sink
MySQL sink 用于将解析后的记录写入 MySQL 表。它会根据 columns 生成 INSERT IGNORE 语句,适合幂等重试场景;仅接受 Record 数据(不支持 raw 输入)。
连接器定义
推荐使用仓库自带模板(位于 connectors/sink.d/50-mysql.toml):
[[connectors]]
id = "mysql_sink"
type = "mysql"
allow_override = ["endpoint", "username", "password", "database", "table", "columns", "batch_size"]
[connectors.params]
endpoint = "localhost:3306"
username = "${SEC_USERNAME}"
password = "${SEC_PASSWORD}"
database = "wparse"
table = "nginx_logs"
columns = ["sip", "timestamp", "http/request", "status", "size", "referer", "http/agent", "wp_event_id"]
batch_size = 1024
可用参数
| 参数 | 类型 | 说明 |
|---|---|---|
endpoint | string | MySQL 地址(host:port,必填) |
username | string | 用户名(可选,默认 root) |
password | string | 密码(可选) |
database | string | 目标数据库(必填) |
table | string | 目标表名(必填) |
columns | array | 列名列表,决定写入字段顺序(必填)) |
batch_size | int | 批量写入条数(可选) |
配置示例
基础用法
version = "2.0"
[sink_group]
name = "all"
oml = ["/*"]
batch_timeout_ms=5000 # 当数据在设置的这个时间范围类不满足批量插入的数量时自动插入
parallel = 8
[[sink_group.sinks]]
name = "main"
connect = "mysql_sink"
[sink_group.sinks.params]
endpoint = "localhost:3306"
username = "${SEC_USERNAME}"
password = "${SEC_PASSWORD}"
database = "wparse"
table = "nginx_logs"
columns = ["sip", "timestamp", "http/request", "status", "size", "referer", "http/agent", "wp_event_id"]
batch_size = 1024
注意事项
columns中的字段名需与 OML 输出字段一致;缺失的表字段会以NULL写入。- 可通过环境变量
MYSQL_URL覆盖连接串(格式:mysql://user:pass@host:port/db)。 - 端到端示例可参考
wp-examples/extensions/tcp_mysql/README.md。
Arrow IPC Sink
arrow-ipc sink 用于将记录批量编码为 Arrow IPC 负载,并通过 TCP 发送给下游消费端。
当前实现仅支持 TCP 目标地址,发送协议为长度前缀帧(4 字节大端长度 + IPC 负载)。
连接器定义
[[connectors]]
id = "arrow_ipc_sink"
type = "arrow-ipc"
allow_override = ["target", "tag", "fields"]
[connectors.params]
target = "tcp://127.0.0.1:9800"
tag = "default"
fields = [
{ name = "sip", type = "ip" },
{ name = "dport", type = "digit" },
{ name = "action", type = "chars", nullable = false }
]
可用参数
| 参数 | 类型 | 默认值 | 说明 |
|---|---|---|---|
target | string | tcp://127.0.0.1:9800 | 目标地址,必须是 tcp://host:port |
tag | string | default | Arrow IPC 帧标签 |
fields | array | [] | Schema 定义数组,元素格式为 {name,type,nullable?} |
fields[].type 支持:chars、digit、float、bool、time、ip、hex、array<...>(大小写不敏感)。
配置示例
version = "2.0"
[sink_group]
name = "/sink/arrow"
oml = ["logs"]
[[sink_group.sinks]]
name = "arrow_out"
connect = "arrow_ipc_sink"
[sink_group.sinks.params]
target = "tcp://127.0.0.1:9800"
tag = "flow-log"
fields = [
{ name = "sip", type = "ip" },
{ name = "dip", type = "ip" },
{ name = "dport", type = "digit" },
{ name = "action", type = "chars" },
{ name = "event_time", type = "time" }
]
传输与容错行为
- 每次发送一个 frame:
[4B BE length][Arrow IPC payload] - 初始连接失败会导致 sink 构建失败
- 运行期发送失败后进入断线状态,按退避策略重连:
1s -> 2s -> 4s ... -> 30s(上限 30 秒) - 断线期间数据会被丢弃(当前无 WAL/补发机制)
sink_str/sink_bytes等原始接口为 no-op,arrow-ipc主要用于记录型输出
注意事项
target目前不支持unix://、http://等非 TCP 地址fields需要与输出记录结构保持一致,类型不匹配会导致批次转换失败
Elasticsearch Sink
Elasticsearch sink 用于将解析后的记录批量写入 Elasticsearch 索引,适合检索、聚合与可视化场景。
连接器定义
推荐使用仓库自带模板(位于 connectors/sink.d/90-elasticsearch.toml):
[[connectors]]
id = "elasticsearch_sink"
type = "elasticsearch"
allow_override = [
"protocol",
"host",
"port",
"username",
"password",
"index",
"timeout_secs",
"max_retries",
"batch_size"
]
[connectors.params]
protocol = "http"
host = "localhost"
port = "9200"
username = "${SEC_USERNAME}"
password = "${SEC_PASSWORD}"
index = "wp_nginx"
timeout_secs = 30
max_retries = 3
batch_size = 100_0000
可用参数
| 参数 | 类型 | 说明 |
|---|---|---|
protocol | string | 协议(http 或 https,默认 http) |
host | string | Elasticsearch 主机地址(必填) |
port | string/int | Elasticsearch 端口(默认 9200) |
username | string | 用户名(可选) |
password | string | 密码(可选) |
index | string | 目标索引名称(必填) |
timeout_secs | int | 单次请求超时秒数(默认 30) |
max_retries | int | 写入失败重试次数(默认 3) |
batch_size | int | 批量写入大小(默认 1000000) |
配置示例
基础用法(参考 extensions/elasticsearch)
version = "2.0"
[sink_group]
name = "es"
rule = ["*"]
batch_timeout_ms = 5000
parallel = 4
[[sink_group.sinks]]
name = "es_stream_load"
connect = "elasticsearch_sink"
[sink_group.sinks.params]
protocol = "http"
host = "localhost"
port = "9200"
username = "${SEC_USERNAME}"
password = "${SEC_PASSWORD}"
index = "wp_nginx"
timeout_secs = 30
max_retries = 3
batch_size = 100_0000
注意事项
- 示例环境开启了认证,需提供有效用户名/密码。
- 首次写入通常会自动创建索引,生产环境建议提前规划 mapping 与分片策略。
- 可使用
_count与_search接口快速验证写入结果。 - 完整示例可参考
wp-examples/extensions/elasticsearch/README.md。
Arrow File Sink
arrow-file sink 用于将记录批编码为 Arrow IPC 负载,并追加写入本地文件。
每个批次写入为一条长度前缀 frame:
- 外层 frame:
[4B BE length][payload] - 内层 payload:与
arrow-ipc相同的带 tag Arrow IPC frame
连接器定义
[[connectors]]
id = "arrow_file_sink"
type = "arrow-file"
allow_override = ["base", "file", "tag", "fields", "sync"]
[connectors.params]
base = "./data/out_dat"
file = "default.arrow"
tag = "default"
sync = false
fields = [
{ name = "sip", type = "ip" },
{ name = "dport", type = "digit" }
]
可用参数
| 参数 | 类型 | 默认值 | 说明 |
|---|---|---|---|
base | string | ./data/out_dat | 输出目录 |
file | string | default.arrow | 输出文件名 |
tag | string | default | Arrow frame 标签 |
fields | array | [] | Schema 定义数组 |
sync | bool | false | 每次写入后调用 fsync |
注意事项
- 文件内容是 Arrow frame 序列,不是 JSON/文本行
sink_str/sink_bytes为 no-op;该 sink 主要用于记录型输出- 磁盘格式与
arrow-ipc对齐,便于本地回放和离线检查
ClickHouse Sink
ClickHouse sink 用于将解析后的记录批量写入 ClickHouse 数据库,适合大规模日志分析和实时数据查询场景。
连接器定义
[[connectors]]
id = "clickhouse_sink"
type = "clickhouse"
allow_override = [
"endpoint",
"database",
"table",
"username",
"password",
"timeout_secs",
"max_retries"
]
[connectors.params]
endpoint = "http://clickhouse-server:8123"
database = ""
table = ""
username = "${SEC_USERNAME}"
password = "${SEC_PASSWORD}"
timeout_secs = 30
max_retries = 3
可用参数
| 参数 | 类型 | 说明 |
|---|---|---|
endpoint | string | ClickHouse 端点地址,格式:http://host:port 或 https://host:port(必填) |
database | string | 目标数据库名称(必填) |
table | string | 目标表名称(必填) |
username | string | 认证用户名(必填) |
password | string | 认证密码(可选,默认为空) |
timeout_secs | int | 单次请求超时秒数(默认 30) |
max_retries | int | 写入失败重试次数(默认 3,-1 表示无限重试) |
配置示例
基础用法
version = "2.0"
[sink_group]
name = "clickhouse"
rule = ["*"]
batch_timeout_ms = 5000
parallel = 4
[[sink_group.sinks]]
name = "clickhouse_stream_load"
connect = "clickhouse_sink"
[sink_group.sinks.params]
endpoint = "http://localhost:8123"
database = "default"
table = "wp_nginx"
username = "${SEC_USERNAME}"
password = "${SEC_PASSWORD}"
timeout_secs = 30
max_retries = 3
HTTPS 连接
[sink_group.sinks.params]
endpoint = "https://clickhouse.example.com:8443"
database = "production"
table = "logs"
username = "${SEC_USERNAME}"
password = "${SEC_PASSWORD}"
timeout_secs = 60
max_retries = 5
HTTP Sink
HTTP sink 用于将解析后的记录以多种格式发送到 HTTP/HTTPS 端点,适用于 webhook、API 集成和自定义数据管道场景。
连接器定义
[[connectors]]
id = "http_sink"
type = "http"
allow_override = [
"endpoint",
"method",
"username",
"password",
"headers",
"fmt",
"batch_size",
"timeout_secs",
"max_retries",
"compression"
]
[connectors.params]
endpoint = "http://localhost:8080/webhook"
method = "POST"
username = "${SEC_USERNAME}"
password = "${SEC_PASSWORD}"
fmt = "json"
batch_size = 100
timeout_secs = 60
max_retries = 3
compression = "none"
可用参数
| 参数 | 类型 | 说明 |
|---|---|---|
endpoint | string | HTTP(S) 端点 URL(必填) |
method | string | HTTP 方法:GET、POST、PUT、PATCH、DELETE(默认 POST) |
username | string | HTTP Basic 认证用户名(可选) |
password | string | HTTP Basic 认证密码(可选) |
headers | object | 自定义 HTTP 头,JSON 对象格式(可选) |
fmt | string | 输出格式:json、ndjson、csv、kv、raw、proto-text(默认 json) |
batch_size | int | 批量大小:1 表示单条发送,>1 表示批量发送(默认 1) |
timeout_secs | int | 请求超时时间(秒,默认 60) |
max_retries | int | 请求失败重试次数:-1 表示无限重试,0 表示不重试(默认 3) |
compression | string | 数据压缩:none、gzip(默认 none) |
输出格式
设置输出格式会自动设置对应的content-type.
JSON 格式 (fmt = "json")
以 JSON 数组形式发送记录:
[
{"field1": "value1", "field2": "value2"},
{"field1": "value3", "field2": "value4"}
]
NDJSON 格式 (fmt = "ndjson")
以换行分隔的 JSON 形式发送记录(每行一条记录):
{"field1": "value1", "field2": "value2"}
{"field1": "value3", "field2": "value4"}
CSV 格式 (fmt = "csv")
以 CSV 格式发送记录(包含表头):
field1,field2
value1,value2
value3,value4
KV 格式 (fmt = "kv")
以键值对形式发送记录(每行一条记录):
field1=value1 field2=value2
field1=value3 field2=value4
Raw 格式 (fmt = "raw")
发送原始消息内容,不进行解析。
Proto-Text 格式 (fmt = "proto-text")
以 Protocol Buffer 文本格式发送记录。(不会添加字段名)
压缩
当启用 compression = "gzip" 时:
- 请求体使用 gzip 压缩
- 自动添加
Content-Encoding: gzip头 - 减少网络带宽占用,特别适合大批量数据
- 建议批量大小 > 1000 时启用
认证
HTTP Basic 认证
[connectors.params]
endpoint = "https://api.example.com/webhook"
username = "${SEC_USERNAME}"
password = "${SEC_PASSWORD}"
自定义头(如 Bearer Token)
[connectors.params]
endpoint = "https://api.example.com/webhook"
[connectors.params.headers]
Authorization="Bearer YOUR_TOKEN_HERE"
配置示例
示例 1:简单 Webhook(单条发送)
version = "2.0"
[sink_group]
name = "webhook"
rule = ["*"]
batch_timeout_ms = 1000
parallel = 2
[[sink_group.sinks]]
name = "http_webhook"
connect = "http_sink"
[sink_group.sinks.params]
endpoint = "http://localhost:8080/webhook"
method = "POST"
fmt = "json"
batch_size = 1
timeout_secs = 30
max_retries = 3
compression = "none"
https://github.com/wp-labs/wp-examples中提供了完整示例,和测试服务器 extensions/http/test_server.py:
重试策略
HTTP sink 实现了指数退避重试机制:
- 初始重试延迟:1 秒
- 每次重试延迟翻倍(2秒、4秒、8秒…)
- 对 5xx 服务器错误和网络故障进行重试
- 不对 4xx 客户端错误重试(429 Too Many Requests 除外)
性能优化建议
- 批量大小:高吞吐场景使用较大批量(1000-10000)
- 压缩:批量 > 1000 条记录时启用 gzip 压缩
- 并发:增加
parallel设置以提高并发处理能力 - 格式:大批量场景下
ndjson格式性能优于json - 超时:根据端点响应时间调整
timeout_secs
PostgreSQL Sink
PostgreSQL sink 用于将解析后的记录写入 PostgreSQL 表。它会根据 columns 生成 INSERT IGNORE 语句,适合幂等重试场景;仅接受 Record 数据(不支持 raw 输入)。
连接器定义
推荐使用仓库自带模板(位于 connectors/sink.d/50-mysql.toml,配置项与 MySQL 保持一致):
[[connectors]]
id = "postgresql_sink"
type = "postgresql"
allow_override = ["endpoint", "username", "password", "database", "table", "columns", "batch_size"]
[connectors.params]
endpoint = "localhost:5432"
username = "${SEC_USERNAME}"
password = "${SEC_PASSWORD}"
database = "wparse"
table = "nginx_logs"
columns = ["sip", "timestamp", "http/request", "status", "size", "referer", "http/agent", "wp_event_id"]
batch_size = 1024
可用参数
| 参数 | 类型 | 说明 |
|---|---|---|
endpoint | string | PostgreSQL 地址(host:port,必填) |
username | string | 用户名(可选,默认 postgres) |
password | string | 密码(可选) |
database | string | 目标数据库(必填) |
table | string | 目标表名(必填) |
columns | array | 列名列表,决定写入字段顺序(必填) |
batch_size | int | 批量写入条数(可选) |
配置示例
基础用法
version = "2.0"
[sink_group]
name = "all"
oml = ["/*"]
batch_timeout_ms=5000 # 当数据在设置的这个时间范围内不满足批量插入数量时自动插入
parallel = 8
[[sink_group.sinks]]
name = "main"
connect = "postgresql_sink"
[sink_group.sinks.params]
endpoint = "localhost:5432"
username = "${SEC_USERNAME}"
password = "${SEC_PASSWORD}"
database = "wparse"
table = "nginx_logs"
columns = ["sip", "timestamp", "http/request", "status", "size", "referer", "http/agent", "wp_event_id"]
batch_size = 1024
注意事项
columns中的字段名需与 OML 输出字段一致;缺失的表字段会以NULL写入。- 可通过环境变量
POSTGRESQL_URL覆盖连接串(格式:postgresql://user:pass@host:port/db)。 - PostgreSQL 的配置项与 MySQL 完全一致,仅连接器
type、端口与连接信息不同。
排障指南(Troubleshooting)
常见问题
- 未找到 connectors 目录:确认
connectors/source.d或connectors/sink.d是否存在;遵守“从 models/<side>向上查找最近目录(≤32 层)“。 - 工厂未注册:确保调用
plugins::register_sinks()与register_sources_factory_only();wproj默认会做。 - 覆写报错:检查
allow_override白名单;覆写表禁止嵌套params/params_override。 - tags 校验未过:数量/字符集/长度是否符合;减少高基数。
- feature 缺失:Kafka/DB 等需按 Cargo feature 启用。
定位建议
- 使用
wproj sinks validate|list|route和wproj sources list|route先“看清配置解析结果”。 - 打开
conf/wparse.toml,确认sink_root/src_root指向的 models 目录存在。
延伸阅读
- 文档导航:docs/README.md(Quick Triage)
用户建议 Q&A(产品能力与配置体验)
本文整理用户关于“复杂解析扩展能力”和“配置管理方式”的典型建议与官方答复。
Q1:复杂数据结构解析,是否支持可选 Python/JS 脚本扩展?
A: 我们理解并认可这个建议的价值。Python/JS 普及度高,上手成本低,这是事实。
但 WarpParse 当前主路径仍以 WPL/OML 为核心,主要原因有三点:
- 语义更聚焦:WPL/OML 的目标是用更直接的语义描述“提取什么、转换什么”,而不是通用编程流程。
- 复杂日志仍可简洁表达:在我们已接入的复杂日志场景里,WPL 规则通常比通用脚本更短、更易维护。
- 性能目标约束:在 Rust 主链路内引入 Python/JS 运行时会带来额外开销,不利于高吞吐、低延迟目标。
我们会持续降低 WPL 使用门槛:
- 通过 WpEditor 可视化 IDE 降低编写与调试成本;
- 通过 AI + Skills 自动生成/优化 WPL;
- 对复杂日志提供官方解析支持(规则建议、示例、定位与优化)。
Q2:连接信息是否可以统一管理,并按唯一名字引用?
A:
认可并支持该方向。建议将 MySQL、Kafka 等连接信息集中管理,业务配置只引用连接名(如 mysql_center、kafka_log_cluster),避免在 source/sink 中重复写 endpoint、账号、密码。
这样可以获得:
- 更好的安全性(敏感信息与业务配置分离);
- 更低的变更成本(地址/凭据变更时只改一处);
- 更清晰的治理能力(统一命名、统一审计、统一轮换)。
Q3:当前一条链路要改 source/sink/wpl/oml 多处配置,是否可以合并?
A: 这个反馈准确:在简单场景下,多处分离配置确实不够方便,容易漏配或配错。
当前分离配置的设计初衷是面向长期运行与规模化治理:
- 分离维护责任;
- 提升规则与连接器复用能力;
- 建立可审计的配置变更机制,降低线上风险。
针对易用性,我们的改进方向是:
- 提供更完整的一体化配置示例,降低首次接入成本;
- 后续提供可视化界面管理版本,减少手工维护多处配置的负担。
我们会持续在“简单场景易用性”和“复杂场景可治理性”之间做平衡。
BenchMark Report
4 种日志 * 3 种拓扑 * 2 种能力 * 2 种平台 * 2 种引擎。
范畴与指标
- 拓扑:File -> BlackHole、TCP -> BlackHole、TCP -> File。
- 能力:解析(Parse);解析+转换(Parse+Transform)。
- 平台:Mac M4 Mini、Linux VPS。
- 引擎:WarpParse、Vector。
- 指标:EPS=Events Per Second,MPS(MiB/s, Messages Per Seconds);CPU/MEM 取进程平均/峰值;规则大小为对应规则文件体积。
- 样本大小:Nginx 239B、AWS 411B、Sysmon 1K、APT 3K(单条日志)。
覆盖矩阵
| 维度 | 取值 |
|---|---|
| 日志类型 | Nginx、AWS、Sysmon、APT |
| 拓扑 | File -> BlackHole、TCP -> BlackHole、TCP -> File |
| 能力 | 解析、解析+转换 |
| 平台 | Mac M4 Mini(数据就绪)、Linux VPS(数据筹备中) |
| 引擎 | WarpParse、Vector |
日志解析测试
Mac M4 Mini
Nginx(239B)
WarpParse
WPL
package /nginx/ {
rule nginx {
(ip:sip,_^2,chars:timestamp<[,]>,http/request:http_request",chars:status,chars:size,chars:referer",http/agent:http_agent",_")
}
}
output
{
"wp_event_id": 1764645169882925000,
"sip": "180.57.30.148",
"timestamp": "21/Jan/2025:01:40:02 +0800",
"http_request": "GET /nginx-logo.png HTTP/1.1",
"status": "500",
"size": "368",
"referer": "http://207.131.38.110/",
"http_agent": "Mozilla/5.0(Macintosh; Intel Mac OS X 10_14_5) AppleWebKit/537.36 (KHTML, like Gecko) Chrome/75.0.3770.142 Safari/537.36 ",
"wp_src_key": "socket",
"wp_src_ip": "127.0.0.1"
}
Vector
VRL
source = '''
parsed = parse_regex!(.message, r'^(?P<client>\S+) \S+ \S+ \[(?P<time>[^\]]+)\] "(?P<request>[^"]*)" (?P<status>\d{3}) (?P<size>\d+) "(?P<referer>[^"]*)" "(?P<agent>[^"]*)" "(?P<extra>[^"]*)"')
.sip = parsed.client
.http_request = parsed.request
.status = parsed.status
.size = parsed.size
.referer = parsed.referer
.http_agent = parsed.agent
.timestamp = parsed.time
del(.message)
'''
output
{
"host": "127.0.0.1",
"http_agent": "Mozilla/5.0 (Macintosh; Intel Mac OS X 10_14_5) AppleWebKit/537.36 (KHTML, like Gecko) Chrome/75.0.3770.142 Safari/537.36",
"http_request": "GET /nginx-logo.png HTTP/1.1",
"port": 58102,
"referer": "http://207.131.38.110/",
"sip": "180.57.30.148",
"size": "368",
"source_type": "socket",
"status": "500",
"timestamp": "21/Jan/2025:01:40:02 +0800"
}
| 引擎 | 拓扑 | EPS | MPS | CPU (avg/peak) | MEM (avg/peak) | 规则大小 |
|---|---|---|---|---|---|---|
| WarpParse | File -> BlackHole | 2,456,100 | 559.81 | 684.40 % / 824.50 % | 107.36 MB / 120.44 MB | 174B |
| TCP -> BlackHole | 1,737,200 | 395.96 | 506.85 % / 650.90 % | 426.09 MB /450.23 MB | ||
| TCP -> File | 1,084,600 | 247.21 | 541.19 % / 722.40 % | 696.63 MB / 699.62 MB | ||
| Vector | File -> BlackHole | 540,540 | 123.20 | 341.51 % / 404.50 % | 230.67 MB / 251.14 MB | 416B |
| TCP -> BlackHole | 974,100 | 222.02 | 530.76 % / 660.60 % | 233.23 MB / 238.45 MB | ||
| TCP -> File | 91,200 | 20.79 | 186.35 % / 194.70 % | 230.62 MB / 244.22 MB |
https://github.com/vectordotdev/vector/issues/20739?utm_source=chatgpt.com
AWS(411B)
WarpParse
WPL
package /aws/ {
rule aws {
(
symbol(http),
chars:timestamp,
chars:elb,
chars:client_host,
chars:target_host,
chars:request_processing_time,
chars:target_processing_time,
chars:response_processing_time,
chars:elb_status_code,
chars:target_status_code,
chars:received_bytes,
chars:sent_bytes,
chars:request | (chars:request_method, chars:request_url, chars:request_protocol),
chars:user_agent,
chars:ssl_cipher,
chars:ssl_protocol,
chars:target_group_arn,
chars:trace_id,
chars:domain_name,
chars:chosen_cert_arn,
chars:matched_rule_priority,
chars:request_creation_time,
chars:actions_executed,
chars:redirect_url,
chars:error_reason,
chars:target_port_list,
chars:target_status_code_list,
chars:classification,
chars:classification_reason,
chars:traceability_id,
)
}
}
output
{
"wp_event_id": 1764646097464011000,
"symbol": "http",
"timestamp": "2018-11-30T22:23:00.186641Z",
"elb": "app/my-lb",
"client_host": "192.168.1.10:2000",
"target_host": "10.0.0.15:8080",
"request_processing_time": "0.01",
"target_processing_time": "0.02",
"response_processing_time": "0.01",
"elb_status_code": "200",
"target_status_code": "200",
"received_bytes": "100",
"sent_bytes": "200",
"request_method": "POST",
"request_url": "https://api.example.com/u?p=1&sid=2&t=3",
"request_protocol": "HTTP/1.1",
"user_agent": "Mozilla/5.0 (Win) Chrome/90",
"ssl_cipher": "ECDHE",
"ssl_protocol": "TLSv1.3",
"target_group_arn": "arn:aws:elb:us:123:tg",
"trace_id": "Root=1-test",
"domain_name": "api.example.com",
"chosen_cert_arn": "arn:aws:acm:us:123:cert/short",
"matched_rule_priority": "1",
"request_creation_time": "2018-11-30T22:22:48.364000Z",
"actions_executed": "forward",
"redirect_url": "https://auth.example.com/r",
"error_reason": "err",
"target_port_list": "10.0.0.1:80",
"target_status_code_list": "200",
"classification": "cls",
"classification_reason": "rsn",
"traceability_id": "TID_x1",
"wp_src_key": "socket",
"wp_src_ip": "127.0.0.1"
}
Vector
VRL
source = '''
parsed = parse_regex!(.message, r'^(?P<type>\S+) (?P<timestamp>\S+) (?P<elb>\S+) (?P<client_host>\S+) (?P<target_host>\S+) (?P<request_processing_time>[-\d\.]+) (?P<target_processing_time>[-\d\.]+) (?P<response_processing_time>[-\d\.]+) (?P<elb_status_code>\S+) (?P<target_status_code>\S+) (?P<received_bytes>\d+) (?P<sent_bytes>\d+) "(?P<request_method>\S+) (?P<request_url>[^ ]+) (?P<request_protocol>[^"]+)" "(?P<user_agent>[^"]*)" "(?P<ssl_cipher>[^"]*)" "(?P<ssl_protocol>[^"]*)" (?P<target_group_arn>\S+) "(?P<trace_id>[^"]*)" "(?P<domain_name>[^"]*)" "(?P<chosen_cert_arn>[^"]*)" (?P<matched_rule_priority>\S+) (?P<request_creation_time>\S+) "(?P<actions_executed>[^"]*)" "(?P<redirect_url>[^"]*)" "(?P<error_reason>[^"]*)" "(?P<target_port_list>[^"]*)" "(?P<target_status_code_list>[^"]*)" "(?P<classification>[^"]*)" "(?P<classification_reason>[^"]*)" (?P<traceability_id>\S+)$')
.timestamp = parsed.timestamp
.symbol = parsed.type
.elb = parsed.elb
.client_host = parsed.client_host
.target_host = parsed.target_host
.request_processing_time = parsed.request_processing_time
.target_processing_time = parsed.target_processing_time
.response_processing_time = parsed.response_processing_time
.elb_status_code = parsed.elb_status_code
.target_status_code = parsed.target_status_code
.received_bytes = parsed.received_bytes
.sent_bytes = parsed.sent_bytes
.request_method = parsed.request_method
.request_url = parsed.request_url
.request_protocol = parsed.request_protocol
.user_agent = parsed.user_agent
.ssl_cipher = parsed.ssl_cipher
.ssl_protocol = parsed.ssl_protocol
.target_group_arn = parsed.target_group_arn
.trace_id = parsed.trace_id
.domain_name = parsed.domain_name
.chosen_cert_arn = parsed.chosen_cert_arn
.matched_rule_priority = parsed.matched_rule_priority
.request_creation_time = parsed.request_creation_time
.actions_executed = parsed.actions_executed
.redirect_url = parsed.redirect_url
.error_reason = parsed.error_reason
.target_port_list = parsed.target_port_list
.target_status_code_list = parsed.target_status_code_list
.classification = parsed.classification
.classification_reason = parsed.classification_reason
.traceability_id = parsed.traceability_id
del(.message)
'''
output
{
"actions_executed": "forward",
"chosen_cert_arn": "arn:aws:acm:us:123:cert/short",
"classification": "cls",
"classification_reason": "rsn",
"client_host": "192.168.1.10:2000",
"domain_name": "api.example.com",
"elb": "app/my-lb",
"elb_status_code": "200",
"error_reason": "err",
"host": "127.0.0.1",
"matched_rule_priority": "1",
"port": 58786,
"received_bytes": "100",
"redirect_url": "https://auth.example.com/r",
"request_creation_time": "2018-11-30T22:22:48.364000Z",
"request_method": "POST",
"request_processing_time": "0.01",
"request_protocol": "HTTP/1.1",
"request_url": "https://api.example.com/u?p=1&sid=2&t=3",
"response_processing_time": "0.01",
"sent_bytes": "200",
"source_type": "socket",
"ssl_cipher": "ECDHE",
"ssl_protocol": "TLSv1.3",
"symbol": "http",
"target_group_arn": "arn:aws:elb:us:123:tg",
"target_host": "10.0.0.15:8080",
"target_port_list": "10.0.0.1:80",
"target_processing_time": "0.02",
"target_status_code": "200",
"target_status_code_list": "200",
"timestamp": "2018-11-30T22:23:00.186641Z",
"trace_id": "Root=1-test",
"traceability_id": "TID_x1",
"user_agent": "Mozilla/5.0 (Win) Chrome/90"
}
| 引擎 | 拓扑 | EPS | MPS | CPU (avg/peak) | MEM (avg/peak) | 规则大小 |
|---|---|---|---|---|---|---|
| WarpParse | File -> BlackHole | 1,012,400 | 396.82 | 826.53 % / 937.80 % | 237.05 MB / 263.53 MB | 1153B |
| TCP -> BlackHole | 846,000 | 331.60 | 554.38 % / 710.90 % | 323.86 MB / 326.97 MB | ||
| TCP -> File | 347,800 | 136.32 | 495.90 % / 615.00 % | 481.30 MB /847.70 MB | ||
| Vector | File -> BlackHole | 158,730 | 62.22 | 633.77 % / 730.30 % | 296.87 MB / 307.42 MB | 2289B |
| TCP -> BlackHole | 163,600 | 64.12 | 628.67 % / 674.60 % | 264.21 MB / 275.98 MB | ||
| TCP -> File | 74,700 | 29.28 | 374.47 % / 409.50 % | 264.70 MB / 273.64 MB |
Sysmon(1K,JSON)
WarpParse
WPL
package /sysmon/ {
rule sysmon {
(_:pri<<,>>,3*_,_),(_\S\y\s\m\o\n\:,
json(
@Id:id,
@Description/ProcessId:process_id,
@Level:severity,
@Opcode:Opcode,
@ProcessId:ProcessId,
@Task:Task,
@ThreadId:ThreadId
@Version:Version,
@Description/CommandLine:cmd_line,
@Description/ParentCommandLine:parent_cmd_line,
@Description/LogonGuid:logon_guid,
@Description/LogonId:logon_id,
@Description/Image:process_path,
@Description/ParentImage:parent_process_path,
@Description/ParentProcessGuid:parent_process_guid,
@Description/ParentProcessId:parent_process_id,
@Description/ParentUser:parent_process_user,
@Description/ProcessGuid:process_guid,
@Description/Company:product_company,
@Description/Description:process_desc,
@Description/FileVersion:file_version,
chars@Description/Hashes:Hashes
@Description/IntegrityLevel:integrity_level,
@Description/OriginalFileName:origin_file_name,
@Description/Product:product_name,
@Description/RuleName:rule_name,
@Description/User:user_name,
chars@Description/UtcTime:occur_time,
@Description/TerminalSessionId:terminal_session_id,
@Description/CurrentDirectory:current_dir,
@Keywords:keywords
)
)
}
}
output
{
"wp_event_id": 1764657738662604000,
"cmd_line": "a.exe",
"product_company": "C",
"current_dir": "C:\\\\",
"process_desc": "D",
"file_version": "1",
"Hashes": "H",
"process_path": "C:\\\\Windows\\\\a.exe",
"integrity_level": "M",
"logon_guid": "{LG}",
"logon_id": "1",
"origin_file_name": "a.exe",
"parent_cmd_line": "b.exe",
"parent_process_path": "C:\\\\Windows\\\\b.exe",
"parent_process_guid": "{PG}",
"parent_process_id": "1",
"parent_process_user": "U",
"process_guid": "{G}",
"process_id": "1",
"product_name": "P",
"rule_name": "R",
"terminal_session_id": "1",
"user_name": "U",
"occur_time": "2025-04-10 06:17:28.503",
"DescriptionRawMessage": "Process Create\\r\\nRuleName: R",
"id": "1",
"keywords": "0",
"severity": "4",
"LevelDisplayName": "信息",
"LogName": "L",
"MachineName": "A",
"Opcode": "0",
"OpcodeDisplayName": "信息",
"ProcessId": "1",
"ProviderId": "PID",
"ProviderName": "P",
"Task": "1",
"TaskDisplayName": "Process Create",
"ThreadId": "1",
"TimeCreated": "2025-04-10T14:17:28.693228+08:00",
"Version": "1",
"wp_src_key": "socket",
"wp_src_ip": "127.0.0.1"
}
Vector
VRL
source = '''
parsed_msg = parse_regex!(.message, r'^[^{]*(?P<body>\{.*)$')
parsed = parse_regex!(parsed_msg.body, r'(?s)\{"Id":(?P<Id>[^,]+),"Version":(?P<Version>[^,]+),"Level":(?P<Level>[^,]+),"Task":(?P<Task>[^,]+),"Opcode":(?P<Opcode>[^,]+),"Keywords":(?P<Keywords>[^,]+),"RecordId":(?P<RecordId>[^,]+),"ProviderName":"(?P<ProviderName>[^"]*)","ProviderId":"(?P<ProviderId>[^"]*)","LogName":"(?P<LogName>[^"]*)","ProcessId":(?P<ProcessId>[^,]+),"ThreadId":(?P<ThreadId>[^,]+),"MachineName":"(?P<MachineName>[^"]*)","TimeCreated":"(?P<TimeCreated>[^"]*)","ActivityId":(?P<ActivityId>[^,]+),"RelatedActivityId":(?P<RelatedActivityId>[^,]+),"Qualifiers":(?P<Qualifiers>[^,]+),"LevelDisplayName":"(?P<LevelDisplayName>[^"]*)","OpcodeDisplayName":"(?P<OpcodeDisplayName>[^"]*)","TaskDisplayName":"(?P<TaskDisplayName>[^"]*)","Description":\{"RuleName":"(?P<RuleName>[^"]*)","UtcTime":"(?P<UtcTime>[^"]*)","ProcessGuid":"(?P<ProcessGuid>[^"]*)","ProcessId":"(?P<DescProcessId>[^"]*)","Image":"(?P<Image>[^"]*)","FileVersion":"(?P<FileVersion>[^"]*)","Description":"(?P<Description>[^"]*)","Product":"(?P<Product>[^"]*)","Company":"(?P<Company>[^"]*)","OriginalFileName":"(?P<OriginalFileName>[^"]*)","CommandLine":"(?P<CommandLine>[^"]*)","CurrentDirectory":"(?P<CurrentDirectory>[^"]*)","User":"(?P<User>[^"]*)","LogonGuid":"(?P<LogonGuid>[^"]*)","LogonId":"(?P<LogonId>[^"]*)","TerminalSessionId":"(?P<TerminalSessionId>[^"]*)","IntegrityLevel":"(?P<IntegrityLevel>[^"]*)","Hashes":"(?P<Hashes>[^"]*)","ParentProcessGuid":"(?P<ParentProcessGuid>[^"]*)","ParentProcessId":"(?P<ParentProcessId>[^"]*)","ParentImage":"(?P<ParentImage>[^"]*)","ParentCommandLine":"(?P<ParentCommandLine>[^"]*)","ParentUser":"(?P<ParentUser>[^"]*)"\},"DescriptionRawMessage":"(?P<DescriptionRawMessage>[^"]*)"\}$')
.cmd_line = parsed.CommandLine
.product_company = parsed.Company
.process_id = parsed.ProcessId
.Opcode = parsed.Opcode
.ProcessId = parsed.ProcessId
.Task = parsed.Task
.ThreadId = parsed.ThreadId
.Version = parsed.Version
.current_dir = parsed.CurrentDirectory
.process_desc = parsed.Description
.file_version = parsed.FileVersion
.Hashes = parsed.Hashes
.process_path = parsed.Image
.integrity_level = parsed.IntegrityLevel
.logon_guid = parsed.LogonGuid
.logon_id = parsed.LogonId
.origin_file_name = parsed.OriginalFileName
.parent_cmd_line = parsed.ParentCommandLine
.parent_process_path = parsed.ParentImage
.parent_process_guid = parsed.ParentProcessGuid
.parent_process_id = parsed.ParentProcessId
.parent_process_user = parsed.ParentUser
.process_guid = parsed.ProcessGuid
.product_name = parsed.Product
.rule_name = parsed.RuleName
.terminal_session_id = parsed.TerminalSessionId
.user_name = parsed.User
.occur_time = parsed.UtcTime
.DescriptionRawMessage = parsed.DescriptionRawMessage
.id = parsed.Id
.keywords = parsed.Keywords
.severity = parsed.Level
.LevelDisplayName = parsed.LevelDisplayName
.LogName = parsed.LogName
.MachineName = parsed.MachineName
.OpcodeDisplayName = parsed.OpcodeDisplayName
.ProviderId = parsed.ProviderId
.ProviderName = parsed.ProviderName
.TaskDisplayName = parsed.TaskDisplayName
.TimeCreated = parsed.TimeCreated
del(.message)
output
{
"DescriptionRawMessage": "Process Create\\r\\nRuleName: R",
"Hashes": "H",
"LevelDisplayName": "信息",
"LogName": "L",
"MachineName": "A",
"Opcode": "0",
"OpcodeDisplayName": "信息",
"ProcessId": "1",
"ProviderId": "PID",
"ProviderName": "P",
"Task": "1",
"TaskDisplayName": "Process Create",
"ThreadId": "1",
"TimeCreated": "2025-04-10T14:17:28.693228+08:00",
"Version": "1",
"cmd_line": "a.exe",
"current_dir": "C:\\\\",
"file_version": "1",
"host": "127.0.0.1",
"id": "1",
"integrity_level": "M",
"keywords": "0",
"logon_guid": "{LG}",
"logon_id": "1",
"occur_time": "2025-04-10 06:17:28.503",
"origin_file_name": "a.exe",
"parent_cmd_line": "b.exe",
"parent_process_guid": "{PG}",
"parent_process_id": "1",
"parent_process_path": "C:\\\\Windows\\\\b.exe",
"parent_process_user": "U",
"port": 50558,
"process_desc": "D",
"process_guid": "{G}",
"process_id": "1",
"process_path": "C:\\\\Windows\\\\a.exe",
"product_company": "C",
"product_name": "P",
"rule_name": "R",
"severity": "4",
"source_type": "socket",
"terminal_session_id": "1",
"timestamp": "2025-12-02T06:33:53.716258Z",
"user_name": "U"
}
| 引擎 | 拓扑 | EPS | MPS | CPU (avg/peak) | MEM (avg/peak) | 规则大小 |
|---|---|---|---|---|---|---|
| WarpParse | File -> BlackHole | 440,000 | 413.74 | 852.01 % / 943.50 % | 223.52 MB / 338.05 MB | 1552B |
| TCP -> BlackHole | 418,900 | 393.90 | 720.42 % / 814.70 % | 455.91 MB / 461.02 MB | ||
| TCP -> File | 279,700 | 263.01 | 713.18 % / 789.30 % | 441.34 MB / 453.27 MB | ||
| Vector | File -> BlackHole | 76,717 | 72.14 | 462.81 % / 563.70 % | 294.87 MB / 312.77 MB | 3259B |
| TCP -> BlackHole | 111,900 | 105.22 | 720.04 % / 808.80 % | 362.95 MB / 376.90 MB | ||
| TCP -> File | 62,100 | 58.39 | 471.40 % / 543.40 % | 343.65 MB / 355.57 MB |
APT(3K)
WarpParse
WPL
package /apt/ {
rule apt {
(
_\#,
time:timestamp,
_,
chars:Hostname,
_\%\%,
chars:ModuleName\/,
chars:SeverityHeader\/,
symbol(ANTI-APT)\(,
chars:type\),
chars:Count<[,]>,
_\:,
chars:Content\(,
),
(
kv(chars@SyslogId),
kv(chars@VSys),
kv(chars@Policy),
kv(chars@SrcIp),
kv(chars@DstIp),
kv(chars@SrcPort),
kv(chars@DstPort),
kv(chars@SrcZone),
kv(chars@DstZone),
kv(chars@User),
kv(chars@Protocol),
kv(chars@Application),
kv(chars@Profile),
kv(chars@Direction),
kv(chars@ThreatType),
kv(chars@ThreatName),
kv(chars@Action),
kv(chars@FileType),
kv(chars@Hash)\),
)\,
}
}
output
{
"wp_event_id": 1764661811871722000,
"timestamp": "2025-02-07 15:07:18",
"Hostname": "USG1000E",
"ModuleName": "01ANTI-APT",
"SeverityHeader": "4",
"symbol": "ANTI-APT",
"type": "l",
"Count": "29",
"Content": "An advanced persistent threat was detected.",
"SyslogId": "1",
"VSys": "public-long-virtual-system-name-for-testing-extra-large-value-to-simulate-enterprise-scenario",
"Policy": "trust-untrust-high-risk-policy-with-deep-inspection-and-layer7-protection-enabled-for-advanced-threat-detection",
"SrcIp": "192.168.1.123",
"DstIp": "182.150.63.102",
"SrcPort": "51784",
"DstPort": "10781",
"SrcZone": "trust-zone-with-multiple-segments-for-internal-security-domains-and-access-control",
"DstZone": "untrust-wide-area-network-zone-with-external-facing-interfaces-and-honeynet-integration",
"User": "unknown-long-user-field-used-for-simulation-purpose-with-extra-description-and-tags-[tag1][tag2][tag3]-to-reach-required-size",
"Protocol": "TCP",
"Application": "HTTP-long-application-signature-identification-with-multiple-behavior-patterns-and-deep-packet-inspection-enabled",
"Profile": "IPS_default_advanced_extended_profile_with_ml_detection-long",
"Direction": "aaa-long-direction-field-used-to-extend-size-with-additional-info-about-traffic-orientation-from-client-to-server",
"ThreatType": "File Reputation with additional descriptive context of multi-layer analysis engine including sandbox-behavioral-signature-ml-static-analysis-and-network-correlation-modules-working-together",
"ThreatName": "bbb-advanced-threat-campaign-with-code-name-operation-shadow-storm-and-related-IOCs-collected-over-multiple-incidents-in-the-wild-attached-metadata-[phase1][phase2][phase3]",
"Action": "ccc-block-and-alert-with-deep-scan-followed-by-quarantine-and-forensic-dump-generation-for-further-investigation",
"FileType": "ddd-executable-binary-with-multiple-packed-layers-suspicious-import-table-behavior-and-evasion-techniques",
"Hash": "eee1234567890abcdef1234567890abcdef1234567890abcdef1234567890abcdef-long-hash-value-used-for-testing-purpose-extended-with-multiple-hash-representations-[MD5:aaa111bbb222ccc333]-[SHA1:bbb222ccc333ddd444]-[SHA256:ccc333ddd444eee555]-[SSDEEP:ddd444eee555fff666]-end-of-hash-section, ExtraInfo=\"This is additional extended information purposely added to inflate the total log size for stress testing of log ingestion engines such as Vector, Fluent Bit, self-developed ETL pipelines, and any high-throughput log processing systems. It contains repeated segments to simulate realistic verbose threat intelligence attachment blocks. [SEG-A-BEGIN] The threat was part of a coordinated multi-vector campaign observed across various geographic regions targeting enterprise networks with spear-phishing, watering-hole attacks, and supply-chain compromise vectors. Enriched indicators include C2 domains, malware families, behavioral clusters, sandbox detonation traces, and network telemetry correlation. [SEG-A-END] [SEG-B-BEGIN] Further analysis revealed that the payload exhibited persistence techniques including registry autoruns, scheduled tasks, masquerading, process injection, and lateral movement attempts leveraging remote service creation and stolen credentials. The binary contains multiple obfuscation layers, anti-debugging, anti-VM checks, and unusual API call sequences. [SEG-B-END] [SEG-C-BEGIN] IOC Bundle: Domains=malicious-domain-example-01.com,malicious-domain-example-02.net,malicious-update-service.info; IPs=103.21.244.0,198.51.100.55,203.0.113.77; FileNames=update_service.exe,winlog_service.dll,mscore_update.bin; RegistryKeys=HKCU\\\\Software\\\\Microsoft\\\\Windows\\\\CurrentVersion\\\\Run,HKLM\\\\System\\\\Services\\\\FakeService; Mutex=Global\\\\A1B2C3D4E5F6G7H8; YARA Matches=[rule1,rule2,rule3]. [SEG-C-END] EndOfExtraInfo\"",
"wp_src_key": "socket",
"wp_src_ip": "127.0.0.1"
}
Vector
VRL
source = '''
parsed_log = parse_regex!(.message, r'(?s)^#(?P<timestamp>\w+\s+\d+\s+\d{4}\s+\d{2}:\d{2}:\d{2}[+-]\d{2}:\d{2})\s+(?P<hostname>\S+)\s+%%(?P<ModuleName>\d+[^/]+)/(?P<SeverityHeader>\d+)/(?P<symbol>[^(]+)\((?P<type>[^)]+)\)\[(?P<count>\d+)\]:\s*(?P<content>[^()]+?)\s*\(SyslogId=(?P<SyslogId>[^,]+),\s+VSys="(?P<VSys>[^"]+)",\s+Policy="(?P<Policy>[^"]+)",\s+SrcIp=(?P<SrcIp>[^,]+),\s+DstIp=(?P<DstIp>[^,]+),\s+SrcPort=(?P<SrcPort>[^,]+),\s+DstPort=(?P<DstPort>[^,]+),\s+SrcZone=(?P<SrcZone>[^,]+),\s+DstZone=(?P<DstZone>[^,]+),\s+User="(?P<User>[^"]+)",\s+Protocol=(?P<Protocol>[^,]+),\s+Application="(?P<Application>[^"]+)",\s+Profile="(?P<Profile>[^"]+)",\s+Direction=(?P<Direction>[^,]+),\s+ThreatType=(?P<ThreatType>[^,]+),\s+ThreatName=(?P<ThreatName>[^,]+),\s+Action=(?P<Action>[^,]+),\s+FileType=(?P<FileType>[^,]+),\s+Hash=(?P<Hash>.*)\)$')
.Hostname = parsed_log.hostname
.SrcPort = parsed_log.SrcPort
.SeverityHeader = parsed_log.SeverityHeader
.type = parsed_log.type
.Count = parsed_log.count
.Content = parsed_log.content
.VSys = parsed_log.VSys
.DstPort = parsed_log.DstPort
.Policy = parsed_log.Policy
.SrcIp = parsed_log.SrcIp
.DstIp = parsed_log.DstIp
.SrcZone = parsed_log.SrcZone
.DstZone = parsed_log.DstZone
.User = parsed_log.User
.Protocol = parsed_log.Protocol
.ModuleName = parsed_log.ModuleName
.symbol = parsed_log.symbol
.timestamp = parsed_log.timestamp
.SyslogId = parsed_log.SyslogId
.Application = parsed_log.Application
.Profile = parsed_log.Profile
.Direction = parsed_log.Direction
.ThreatType = parsed_log.ThreatType
.ThreatName = parsed_log.ThreatName
.Action = parsed_log.Action
.FileType = parsed_log.FileType
.Hash = parsed_log.Hash
del(.message)
'''
output
{
"Action": "ccc-block-and-alert-with-deep-scan-followed-by-quarantine-and-forensic-dump-generation-for-further-investigation",
"Application": "HTTP-long-application-signature-identification-with-multiple-behavior-patterns-and-deep-packet-inspection-enabled",
"Content": "An advanced persistent threat was detected.",
"Count": "29",
"Direction": "aaa-long-direction-field-used-to-extend-size-with-additional-info-about-traffic-orientation-from-client-to-server",
"DstIp": "182.150.63.102",
"DstPort": "10781",
"DstZone": "untrust-wide-area-network-zone-with-external-facing-interfaces-and-honeynet-integration",
"FileType": "ddd-executable-binary-with-multiple-packed-layers-suspicious-import-table-behavior-and-evasion-techniques",
"Hash": "eee1234567890abcdef1234567890abcdef1234567890abcdef1234567890abcdef-long-hash-value-used-for-testing-purpose-extended-with-multiple-hash-representations-[MD5:aaa111bbb222ccc333]-[SHA1:bbb222ccc333ddd444]-[SHA256:ccc333ddd444eee555]-[SSDEEP:ddd444eee555fff666]-end-of-hash-section, ExtraInfo=\"This is additional extended information purposely added to inflate the total log size for stress testing of log ingestion engines such as Vector, Fluent Bit, self-developed ETL pipelines, and any high-throughput log processing systems. It contains repeated segments to simulate realistic verbose threat intelligence attachment blocks. [SEG-A-BEGIN] The threat was part of a coordinated multi-vector campaign observed across various geographic regions targeting enterprise networks with spear-phishing, watering-hole attacks, and supply-chain compromise vectors. Enriched indicators include C2 domains, malware families, behavioral clusters, sandbox detonation traces, and network telemetry correlation. [SEG-A-END] [SEG-B-BEGIN] Further analysis revealed that the payload exhibited persistence techniques including registry autoruns, scheduled tasks, masquerading, process injection, and lateral movement attempts leveraging remote service creation and stolen credentials. The binary contains multiple obfuscation layers, anti-debugging, anti-VM checks, and unusual API call sequences. [SEG-B-END] [SEG-C-BEGIN] IOC Bundle: Domains=malicious-domain-example-01.com,malicious-domain-example-02.net,malicious-update-service.info; IPs=103.21.244.0,198.51.100.55,203.0.113.77; FileNames=update_service.exe,winlog_service.dll,mscore_update.bin; RegistryKeys=HKCU\\\\Software\\\\Microsoft\\\\Windows\\\\CurrentVersion\\\\Run,HKLM\\\\System\\\\Services\\\\FakeService; Mutex=Global\\\\A1B2C3D4E5F6G7H8; YARA Matches=[rule1,rule2,rule3]. [SEG-C-END] EndOfExtraInfo\"",
"Hostname": "USG1000E",
"ModuleName": "01ANTI-APT",
"Policy": "trust-untrust-high-risk-policy-with-deep-inspection-and-layer7-protection-enabled-for-advanced-threat-detection",
"Profile": "IPS_default_advanced_extended_profile_with_ml_detection-long",
"Protocol": "TCP",
"SeverityHeader": "4",
"SrcIp": "192.168.1.123",
"SrcPort": "51784",
"SrcZone": "trust-zone-with-multiple-segments-for-internal-security-domains-and-access-control",
"SyslogId": "1",
"ThreatName": "bbb-advanced-threat-campaign-with-code-name-operation-shadow-storm-and-related-IOCs-collected-over-multiple-incidents-in-the-wild-attached-metadata-[phase1][phase2][phase3]",
"ThreatType": "File Reputation with additional descriptive context of multi-layer analysis engine including sandbox-behavioral-signature-ml-static-analysis-and-network-correlation-modules-working-together",
"User": "unknown-long-user-field-used-for-simulation-purpose-with-extra-description-and-tags-[tag1][tag2][tag3]-to-reach-required-size",
"VSys": "public-long-virtual-system-name-for-testing-extra-large-value-to-simulate-enterprise-scenario",
"host": "127.0.0.1",
"port": 55771,
"source_type": "socket",
"symbol": "ANTI-APT",
"timestamp": "Feb 7 2025 15:07:18+08:00",
"type": "l"
}
| 引擎 | 拓扑 | EPS | MPS | CPU (avg/peak) | MEM (avg/peak) | 规则大小 |
|---|---|---|---|---|---|---|
| WarpParse | File -> BlackHole | 314,200 | 1062.84 | 700.03 % / 826.30 % | 175.63 MB / 181.05 MB | 985B |
| TCP -> BlackHole | 298,200 | 1008.72 | 693.55 % / 762.10 % | 408.87 MB / 481.27 MB | ||
| TCP -> File | 179,600 | 607.53 | 605.69 % / 853.20 % | 1016.06 MB/ 1987.94 MB | ||
| Vector | File -> BlackHole | 33,614 | 113.71 | 563.18 % / 677.50 % | 261.19 MB / 278.39 MB | 1759B |
| TCP -> BlackHole | 46,100 | 155.94 | 849.30 % / 921.50 % | 421.18 MB / 445.80 MB | ||
| TCP -> File | 36,200 | 122.45 | 688.47 % / 754.70 % | 368.91 MB / 397.16 MB |
日志解析转换测试
Mac M4 Mini
Nginx(239B)
WarpParse
WPL
package /nginx/ {
rule nginx {
(ip:sip,_^2,chars:timestamp<[,]>,http/request",chars:status,chars:size,chars:referer",http/agent",_")
}
}
OML
name : nginx
rule : /nginx/*
---
size : digit = take(size);
status : digit = take(status);
str_status = match read(option:[status]) {
digit(500) => chars(Internal Server Error);
digit(404) => chars(Not Found);
};
match_chars = match read(option:[wp_src_ip]) {
ip(127.0.0.1) => chars(localhost);
!ip(127.0.0.1) => chars(attack_ip);
};
* : auto = read();
output
{
"host": "127.0.0.1",
"http_agent": "Mozilla/5.0(Macintosh; Intel Mac OS X 10_14_5) AppleWebKit/537.36 (KHTML, like Gecko) Chrome/75.0.3770.142 Safari/537.36 ",
"http_request": "GET /nginx-logo.png HTTP/1.1",
"match_chars": "localhost",
"referer": "http://207.131.38.110/",
"sip": "180.57.30.148",
"size": 368,
"source_type": "socket",
"status": 500,
"str_status": "Internal Server Error",
"timestamp": "21/Jan/2025:01:40:02 +0800"
}
Vector
VRL
source = '''
parsed = parse_regex!(.message, r'^(?P<client>\S+) \S+ \S+ \[(?P<time>[^\]]+)\] "(?P<request>[^"]*)" (?P<status>\d{3}) (?P<size>\d+) "(?P<referer>[^"]*)" "(?P<agent>[^"]*)" "(?P<extra>[^"]*)"')
.sip = parsed.client
.http_request = parsed.request
.referer = parsed.referer
.http_agent = parsed.agent
.timestamp = parsed.time
del(.message)
.status = to_int!(parsed.status)
.size = to_int!(parsed.size)
if .host == "127.0.0.1" {
.match_chars = "localhost"
} else if .host != "127.0.0.1" {
.match_chars = "attack_ip"
}
if .status == 500 {
.str_status = "Internal Server Error"
} else if .status == 404 {
.str_status = "Not Found"
}
'''
output
{
"host": "127.0.0.1",
"http_agent": "Mozilla/5.0 (Macintosh; Intel Mac OS X 10_14_5) AppleWebKit/537.36 (KHTML, like Gecko) Chrome/75.0.3770.142 Safari/537.36",
"http_request": "GET /nginx-logo.png HTTP/1.1",
"match_chars": "localhost",
"port": 53894,
"referer": "http://207.131.38.110/",
"sip": "180.57.30.148",
"size": 368,
"source_type": "socket",
"status": 500,
"str_status": "Internal Server Error",
"timestamp": "21/Jan/2025:01:40:02 +0800"
}
| 引擎 | 拓扑 | EPS | MPS | CPU (avg/peak) | MEM (avg/peak) | 规则大小 |
|---|---|---|---|---|---|---|
| WarpParse | File -> BlackHole | 1,749,200 | 398.69 | 762.65 %/865.70 % | 143.16 MB/159.22 MB | 521 |
| WarpParse | TCP -> BlackHole | 1,219,100 | 277.87 | 485.37 %/625.20 % | 415.22 MB/440.52 MB | |
| WarpParse | TCP -> File | 797,700 | 181.82 | 492.15 %/621.20 % | 523.97 MB/540.97 MB | |
| Vector | File -> BlackHole | 470,312 | 107.20 | 372.09 %/423.00 % | 254.05 MB/280.03 MB | 682 |
| Vector | TCP -> BlackHole | 870,500 | 198.41 | 514.06 %/639.90 % | 238.50 MB/258.02 MB | |
| Vector | TCP -> File | 708,00 | 16.14 | 160.79 %/180.60 % | 226.58 MB/236.41 MB |
AWS(411B)
WarpParse
WPL
package /aws/ {
rule aws {
(
symbol(http),
chars:timestamp,
chars:elb,
chars:client_host,
chars:target_host,
chars:request_processing_time,
chars:target_processing_time,
chars:response_processing_time,
chars:elb_status_code,
chars:target_status_code,
chars:received_bytes,
chars:sent_bytes,
chars:request | (chars:request_method, chars:request_url, chars:request_protocol),
chars:user_agent,
chars:ssl_cipher,
chars:ssl_protocol,
chars:target_group_arn,
chars:trace_id,
chars:domain_name,
chars:chosen_cert_arn,
chars:matched_rule_priority,
chars:request_creation_time,
chars:actions_executed,
chars:redirect_url,
chars:error_reason,
chars:target_port_list,
chars:target_status_code_list,
chars:classification,
chars:classification_reason,
chars:traceability_id,
)
}
}
OML
name : aws
rule : /aws/*
---
sent_bytes:digit = take(sent_bytes) ;
target_status_code:digit = take(target_status_code) ;
elb_status_code:digit = take(elb_status_code) ;
extends : obj = object {
ssl_cipher = read(ssl_cipher);
ssl_protocol = read(ssl_protocol);
};
match_chars = match read(option:[wp_src_ip]) {
ip(127.0.0.1) => chars(localhost);
!ip(127.0.0.1) => chars(attack_ip);
};
str_elb_status = match read(option:[elb_status_code]) {
digit(200) => chars(ok);
digit(404) => chars(error);
};
* : auto = read();
output
{
"timestamp": "2018-11-30T22:23:00.186641Z",
"actions_executed": "forward",
"chosen_cert_arn": "arn:aws:acm:us:123:cert/short",
"classification": "cls",
"classification_reason": "rsn",
"client_host": "192.168.1.10:2000",
"domain_name": "api.example.com",
"elb": "app/my-lb",
"elb_status_code": 200,
"error_reason": "err",
"extends": {
"ssl_cipher": "ECDHE",
"ssl_protocol": "TLSv1.3"
},
"host": "127.0.0.1",
"match_chars": "localhost",
"matched_rule_priority": "1",
"received_bytes": "100",
"redirect_url": "https://auth.example.com/r",
"request_creation_time": "2018-11-30T22:22:48.364000Z",
"request_method": "POST",
"request_processing_time": "0.01",
"request_protocol": "HTTP/1.1",
"request_url": "https://api.example.com/u?p=1&sid=2&t=3",
"response_processing_time": "0.01",
"sent_bytes": 200,
"source_type": "socket",
"ssl_cipher": "ECDHE",
"ssl_protocol": "TLSv1.3",
"str_elb_status": "ok",
"target_group_arn": "arn:aws:elb:us:123:tg",
"target_host": "10.0.0.15:8080",
"target_port_list": "10.0.0.1:80",
"target_processing_time": "0.02",
"target_status_code": 200,
"target_status_code_list": "200",
"trace_id": "Root=1-test",
"traceability_id": "TID_x1",
"user_agent": "Mozilla/5.0 (Win) Chrome/90"
}
Vector
VRL
source = '''
parsed = parse_regex!(.message, r'^(?P<type>\S+) (?P<timestamp>\S+) (?P<elb>\S+) (?P<client_host>\S+) (?P<target_host>\S+) (?P<request_processing_time>[-\d\.]+) (?P<target_processing_time>[-\d\.]+) (?P<response_processing_time>[-\d\.]+) (?P<elb_status_code>\S+) (?P<target_status_code>\S+) (?P<received_bytes>\d+) (?P<sent_bytes>\d+) "(?P<request_method>\S+) (?P<request_url>[^ ]+) (?P<request_protocol>[^"]+)" "(?P<user_agent>[^"]*)" "(?P<ssl_cipher>[^"]*)" "(?P<ssl_protocol>[^"]*)" (?P<target_group_arn>\S+) "(?P<trace_id>[^"]*)" "(?P<domain_name>[^"]*)" "(?P<chosen_cert_arn>[^"]*)" (?P<matched_rule_priority>\S+) (?P<request_creation_time>\S+) "(?P<actions_executed>[^"]*)" "(?P<redirect_url>[^"]*)" "(?P<error_reason>[^"]*)" "(?P<target_port_list>[^"]*)" "(?P<target_status_code_list>[^"]*)" "(?P<classification>[^"]*)" "(?P<classification_reason>[^"]*)" (?P<traceability_id>\S+)$')
.timestamp = parsed.timestamp
.symbol = parsed.type
.elb = parsed.elb
.client_host = parsed.client_host
.target_host = parsed.target_host
.request_processing_time = parsed.request_processing_time
.target_processing_time = parsed.target_processing_time
.response_processing_time = parsed.response_processing_time
.received_bytes = parsed.received_bytes
.request_method = parsed.request_method
.request_url = parsed.request_url
.request_protocol = parsed.request_protocol
.user_agent = parsed.user_agent
.ssl_cipher = parsed.ssl_cipher
.ssl_protocol = parsed.ssl_protocol
.target_group_arn = parsed.target_group_arn
.trace_id = parsed.trace_id
.domain_name = parsed.domain_name
.chosen_cert_arn = parsed.chosen_cert_arn
.matched_rule_priority = parsed.matched_rule_priority
.request_creation_time = parsed.request_creation_time
.actions_executed = parsed.actions_executed
.redirect_url = parsed.redirect_url
.error_reason = parsed.error_reason
.target_port_list = parsed.target_port_list
.target_status_code_list = parsed.target_status_code_list
.classification = parsed.classification
.classification_reason = parsed.classification_reason
.traceability_id = parsed.traceability_id
del(.message)
.elb_status_code = to_int!(parsed.elb_status_code)
.target_status_code = to_int!(parsed.target_status_code)
.sent_bytes = to_int!(parsed.sent_bytes)
if .host == "127.0.0.1" {
.match_chars = "localhost"
} else if .host != "127.0.0.1" {
.match_chars = "attack_ip"
}
if .elb_status_code == 200 {
.str_elb_status = "ok"
} else if .elb_status_code == 404 {
.str__elb_status = "error"
}
.extends = {
"ssl_cipher": .ssl_cipher,
"ssl_protocol": .ssl_protocol,
}
'''
output
{
"actions_executed": "forward",
"chosen_cert_arn": "arn:aws:acm:us:123:cert/short",
"classification": "cls",
"classification_reason": "rsn",
"client_host": "192.168.1.10:2000",
"domain_name": "api.example.com",
"elb": "app/my-lb",
"elb_status_code": 200,
"error_reason": "err",
"extends": {
"ssl_cipher": "ECDHE",
"ssl_protocol": "TLSv1.3"
},
"host": "127.0.0.1",
"match_chars": "localhost",
"matched_rule_priority": "1",
"port": 53995,
"received_bytes": "100",
"redirect_url": "https://auth.example.com/r",
"request_creation_time": "2018-11-30T22:22:48.364000Z",
"request_method": "POST",
"request_processing_time": "0.01",
"request_protocol": "HTTP/1.1",
"request_url": "https://api.example.com/u?p=1&sid=2&t=3",
"response_processing_time": "0.01",
"sent_bytes": 200,
"source_type": "socket",
"ssl_cipher": "ECDHE",
"ssl_protocol": "TLSv1.3",
"str_elb_status": "ok",
"symbol": "http",
"target_group_arn": "arn:aws:elb:us:123:tg",
"target_host": "10.0.0.15:8080",
"target_port_list": "10.0.0.1:80",
"target_processing_time": "0.02",
"target_status_code": 200,
"target_status_code_list": "200",
"timestamp": "2018-11-30T22:23:00.186641Z",
"trace_id": "Root=1-test",
"traceability_id": "TID_x1",
"user_agent": "Mozilla/5.0 (Win) Chrome/90"
}
| 引擎 | 拓扑 | EPS | MPS | CPU (avg/peak) | MEM (avg/peak) | 规则大小 |
|---|---|---|---|---|---|---|
| WarpParse | File -> BlackHole | 710,400 | 278.45 | 837.44 %/912.40 % | 230.00 MB/252.95 MB | 1694 |
| WarpParse | TCP -> BlackHole | 611,800 | 239.80 | 624.17 %/753.00 % | 478.25 MB/487.42 MB | |
| WarpParse | TCP -> File | 318,200 | 124.72 | 593.16 %/732.60 % | 409.21 MB/547.50 MB | |
| Vector | File -> BlackHole | 129,743 | 50.85 | 593.45 %/665.00 % | 283.67 MB/298.16 MB | 2650 |
| Vector | TCP -> BlackHole | 152,900 | 59.93 | 611.53 %/677.50 % | 288.53 MB/294.42 MB | |
| Vector | TCP -> File | 582,00 | 22.81 | 331.78 %/373.90 % | 276.99 MB/288.42 MB |
Sysmon(1K,JSON)
WarpParse
WPL
package /sysmon/ {
rule sysmon {
(_:pri<<,>>,3*_,_),(_\S\y\s\m\o\n\:,
json(
@Id:id,
@Description/ProcessId:process_id,
@Level:severity,
@Opcode:Opcode,
@ProcessId:ProcessId,
@Task:Task,
@ThreadId:ThreadId
@Version:Version,
@Description/CommandLine:cmd_line,
@Description/ParentCommandLine:parent_cmd_line,
@Description/LogonGuid:logon_guid,
@Description/LogonId:logon_id,
@Description/Image:process_path,
@Description/ParentImage:parent_process_path,
@Description/ParentProcessGuid:parent_process_guid,
@Description/ParentProcessId:parent_process_id,
@Description/ParentUser:parent_process_user,
@Description/ProcessGuid:process_guid,
@Description/Company:product_company,
@Description/Description:process_desc,
@Description/FileVersion:file_version,
chars@Description/Hashes:Hashes
@Description/IntegrityLevel:integrity_level,
@Description/OriginalFileName:origin_file_name,
@Description/Product:product_name,
@Description/RuleName:rule_name,
@Description/User:user_name,
chars@Description/UtcTime:occur_time,
@Description/TerminalSessionId:terminal_session_id,
@Description/CurrentDirectory:current_dir,
@Keywords:keywords
)
)
}
}
OML
name : sysmon
rule : /sysmon/*
---
Id:digit = take(id) ;
LogonId:digit = take(logon_id) ;
enrich_level = match read(option:[severity]) {
chars(4) => chars(severity);
chars(3) => chars(normal);
};
extends : obj = object {
OriginalFileName = read(origin_file_name);
ParentCommandLine = read(parent_cmd_line);
};
extends_dir = object {
ParentProcessPath = read(parent_process_path);
Process_path = read(process_path);
};
match_chars = match read(option:[wp_src_ip]) {
ip(127.0.0.1) => chars(localhost);
!ip(127.0.0.1) => chars(attack_ip);
};
num_range = match read(option:[Id]) {
in ( digit(0), digit(1000) ) => read(Id) ;
_ => digit(0) ;
};
* : auto = read();
output
{
"Id": 1,
"LogonId": 1,
"enrich_level": "severity",
"extends": {
"OriginalFileName": "a.exe",
"ParentCommandLine": "b.exe"
},
"extends_dir": {
"ParentProcessPath": "C:\\\\Windows\\\\b.exe",
"Process_path": "C:\\\\Windows\\\\a.exe"
},
"match_chars": "localhost",
"num_range": 1,
"wp_event_id": 1764813339134818000,
"cmd_line": "a.exe",
"product_company": "C",
"current_dir": "C:\\\\",
"process_desc": "D",
"file_version": "1",
"Hashes": "H",
"process_path": "C:\\\\Windows\\\\a.exe",
"integrity_level": "M",
"logon_guid": "{LG}",
"origin_file_name": "a.exe",
"parent_cmd_line": "b.exe",
"parent_process_path": "C:\\\\Windows\\\\b.exe",
"parent_process_guid": "{PG}",
"parent_process_id": "1",
"parent_process_user": "U",
"process_guid": "{G}",
"process_id": "1",
"product_name": "P",
"rule_name": "R",
"terminal_session_id": "1",
"user_name": "U",
"occur_time": "2025-04-10 06:17:28.503",
"DescriptionRawMessage": "Process Create\\r\\nRuleName: R",
"keywords": "0",
"severity": "4",
"LevelDisplayName": "信息",
"LogName": "L",
"MachineName": "A",
"Opcode": "0",
"OpcodeDisplayName": "信息",
"ProcessId": "1",
"ProviderId": "PID",
"ProviderName": "P",
"Task": "1",
"TaskDisplayName": "Process Create",
"ThreadId": "1",
"TimeCreated": "2025-04-10T14:17:28.693228+08:00",
"Version": "1",
"wp_src_key": "socket",
"wp_src_ip": "127.0.0.1"
}
Vector
VRL
source = '''
parsed_msg = parse_regex!(.message, r'^[^{]*(?P<body>\{.*)$')
parsed = parse_regex!(parsed_msg.body, r'(?s)\{"Id":(?P<Id>[^,]+),"Version":(?P<Version>[^,]+),"Level":(?P<Level>[^,]+),"Task":(?P<Task>[^,]+),"Opcode":(?P<Opcode>[^,]+),"Keywords":(?P<Keywords>[^,]+),"RecordId":(?P<RecordId>[^,]+),"ProviderName":"(?P<ProviderName>[^"]*)","ProviderId":"(?P<ProviderId>[^"]*)","LogName":"(?P<LogName>[^"]*)","ProcessId":(?P<ProcessId>[^,]+),"ThreadId":(?P<ThreadId>[^,]+),"MachineName":"(?P<MachineName>[^"]*)","TimeCreated":"(?P<TimeCreated>[^"]*)","ActivityId":(?P<ActivityId>[^,]+),"RelatedActivityId":(?P<RelatedActivityId>[^,]+),"Qualifiers":(?P<Qualifiers>[^,]+),"LevelDisplayName":"(?P<LevelDisplayName>[^"]*)","OpcodeDisplayName":"(?P<OpcodeDisplayName>[^"]*)","TaskDisplayName":"(?P<TaskDisplayName>[^"]*)","Description":\{"RuleName":"(?P<RuleName>[^"]*)","UtcTime":"(?P<UtcTime>[^"]*)","ProcessGuid":"(?P<ProcessGuid>[^"]*)","ProcessId":"(?P<DescProcessId>[^"]*)","Image":"(?P<Image>[^"]*)","FileVersion":"(?P<FileVersion>[^"]*)","Description":"(?P<Description>[^"]*)","Product":"(?P<Product>[^"]*)","Company":"(?P<Company>[^"]*)","OriginalFileName":"(?P<OriginalFileName>[^"]*)","CommandLine":"(?P<CommandLine>[^"]*)","CurrentDirectory":"(?P<CurrentDirectory>[^"]*)","User":"(?P<User>[^"]*)","LogonGuid":"(?P<LogonGuid>[^"]*)","LogonId":"(?P<LogonId>[^"]*)","TerminalSessionId":"(?P<TerminalSessionId>[^"]*)","IntegrityLevel":"(?P<IntegrityLevel>[^"]*)","Hashes":"(?P<Hashes>[^"]*)","ParentProcessGuid":"(?P<ParentProcessGuid>[^"]*)","ParentProcessId":"(?P<ParentProcessId>[^"]*)","ParentImage":"(?P<ParentImage>[^"]*)","ParentCommandLine":"(?P<ParentCommandLine>[^"]*)","ParentUser":"(?P<ParentUser>[^"]*)"\},"DescriptionRawMessage":"(?P<DescriptionRawMessage>[^"]*)"\}$')
.cmd_line = parsed.CommandLine
.product_company= parsed.Company
.Opcode = parsed.Opcode
.process_id = parsed.ProcessId
.ProcessId = parsed.ProcessId
.Task = parsed.Task
.ThreadId = parsed.ThreadId
.Version = parsed.Version
.current_dir = parsed.CurrentDirectory
.process_desc = parsed.Description
.file_version = parsed.FileVersion
.Hashes = parsed.Hashes
.process_path = parsed.Image
.integrity_level = parsed.IntegrityLevel
.logon_guid = parsed.LogonGuid
.origin_file_name = parsed.OriginalFileName
.parent_cmd_line = parsed.ParentCommandLine
.parent_process_path = parsed.ParentImage
.parent_process_guid = parsed.ParentProcessGuid
.parent_process_id = parsed.ParentProcessId
.parent_process_user = parsed.ParentUser
.process_guid = parsed.ProcessGuid
.product_name = parsed.Product
.rule_name = parsed.RuleName
.terminal_session_id = parsed.TerminalSessionId
.user_name = parsed.User
.occur_time = parsed.UtcTime
.DescriptionRawMessage = parsed.DescriptionRawMessage
.keywords = parsed.Keywords
.severity = parsed.Level
.LevelDisplayName = parsed.LevelDisplayName
.LogName = parsed.LogName
.MachineName = parsed.MachineName
.OpcodeDisplayName = parsed.OpcodeDisplayName
.ProviderId = parsed.ProviderId
.ProviderName = parsed.ProviderName
.TaskDisplayName = parsed.TaskDisplayName
.TimeCreated = parsed.TimeCreated
del(.message)
.LogonId = to_int!(parsed.LogonId)
.Id = to_int!(parsed.Id)
if .host == "127.0.0.1" {
.match_chars = "localhost"
} else if .host != "127.0.0.1" {
.match_chars = "attack_ip"
}
if .severity == "4" {
.enrich_level = "severity"
} else if .Level == "3" {
.enrich_level = "normal"
}
.extends = {
"OriginalFileName": .origin_file_name,
"ParentCommandLine": .parent_cmd_line,
}
.extends_dir = {
"ParentProcessPath": .parent_process_path,
"Process_path": .process_path,
}
.num_range = if .Id >= 0 && .Id <= 1000 {
.Id
} else {
0
}
'''
output
{
"DescriptionRawMessage": "Process Create\\r\\nRuleName: R",
"Hashes": "H",
"Id": 1,
"LevelDisplayName": "信息",
"LogName": "L",
"LogonId": 1,
"MachineName": "A",
"Opcode": "0",
"OpcodeDisplayName": "信息",
"ProcessId": "1",
"ProviderId": "PID",
"ProviderName": "P",
"Task": "1",
"TaskDisplayName": "Process Create",
"ThreadId": "1",
"TimeCreated": "2025-04-10T14:17:28.693228+08:00",
"Version": "1",
"cmd_line": "a.exe",
"current_dir": "C:\\\\",
"enrich_level": "severity",
"extends": {
"OriginalFileName": "a.exe",
"ParentCommandLine": "b.exe"
},
"extends_dir": {
"ParentProcessPath": "C:\\\\Windows\\\\b.exe",
"Process_path": "C:\\\\Windows\\\\a.exe"
},
"file_version": "1",
"host": "127.0.0.1",
"integrity_level": "M",
"keywords": "0",
"logon_guid": "{LG}",
"match_chars": "localhost",
"num_range": 1,
"occur_time": "2025-04-10 06:17:28.503",
"origin_file_name": "a.exe",
"parent_cmd_line": "b.exe",
"parent_process_guid": "{PG}",
"parent_process_id": "1",
"parent_process_path": "C:\\\\Windows\\\\b.exe",
"parent_process_user": "U",
"port": 49838,
"process_desc": "D",
"process_guid": "{G}",
"process_id": "1",
"process_path": "C:\\\\Windows\\\\a.exe",
"product_company": "C",
"product_name": "P",
"rule_name": "R",
"severity": "4",
"source_type": "socket",
"terminal_session_id": "1",
"timestamp": "2025-12-04T02:04:24.686378Z",
"user_name": "U"
}
| 引擎 | 拓扑 | EPS | MPS | CPU (avg/peak) | MEM (avg/peak) | 规则大小 |
|---|---|---|---|---|---|---|
| WarpParse | File -> BlackHole | 354,800 | 333.63 | 880.24 %/935.40 % | 157.88 MB/170.69 MB | 2249 |
| WarpParse | TCP -> BlackHole | 299,500 | 281.63 | 664.56 %/749.00 % | 367.47 MB/377.25 MB | |
| WarpParse | TCP -> File | 219,900 | 206.78 | 719.29 %/817.00 % | 431.93 MB/457.17 MB | |
| Vector | File -> BlackHole | 582,00 | 54.73 | 431.45 %/527.60 % | 296.28 MB/317.84 MB | 3782 |
| Vector | TCP -> BlackHole | 97,200 | 91.40 | 710.83 %/806.80 % | 399.64 MB/424.08 MB | |
| Vector | TCP -> File | 40,300 | 37.90 | 391.09 %/497.30 % | 394.67 MB/409.95 MB |
APT(3K)
WarpParse
WPL
package /apt/ {
rule apt {
(
_\#,
time:timestamp,
_,
chars:Hostname,
_\%\%,
chars:ModuleName\/,
chars:SeverityHeader\/,
symbol(ANTI-APT)\(,
chars:type\),
chars:Count<[,]>,
_\:,
chars:Content\(,
),
(
kv(chars@SyslogId),
kv(chars@VSys),
kv(chars@Policy),
kv(chars@SrcIp),
kv(chars@DstIp),
kv(chars@SrcPort),
kv(chars@DstPort),
kv(chars@SrcZone),
kv(chars@DstZone),
kv(chars@User),
kv(chars@Protocol),
kv(chars@Application),
kv(chars@Profile),
kv(chars@Direction),
kv(chars@ThreatType),
kv(chars@ThreatName),
kv(chars@Action),
kv(chars@FileType),
kv(chars@Hash)\),
)\,
}
}
OML
name : apt
rule : /apt/*
---
count:digit = take(Count) ;
severity:digit = take(SeverityHeader) ;
match_chars = match read(option:[wp_src_ip]) {
ip(127.0.0.1) => chars(localhost);
!ip(127.0.0.1) => chars(attack_ip);
};
num_range = match read(option:[count]) {
in ( digit(0), digit(1000) ) => read(count) ;
_ => digit(0) ;
};
src_system_log_type = match read(option:[type]) {
chars(l) => chars(日志信息);
chars(s) => chars(安全日志信息);
};
extends_ip : obj = object {
DstIp = read(DstIp);
SrcIp = read(SrcIp);
};
extends_info : obj = object {
hostname = read(Hostname);
source_type = read(wp_src_key)
};
* : auto = read();
output
{
"count": 29,
"severity": 4,
"match_chars": "localhost",
"num_range": 29,
"src_system_log_type": "日志信息",
"extends_ip": {
"DstIp": "182.150.63.102",
"SrcIp": "192.168.1.123"
},
"extends_info": {
"hostname": "USG1000E",
"source_type": "socket"
},
"wp_event_id": 1764815397395451000,
"timestamp": "2025-02-07 15:07:18",
"Hostname": "USG1000E",
"ModuleName": "01ANTI-APT",
"symbol": "ANTI-APT",
"type": "l",
"Content": "An advanced persistent threat was detected.",
"SyslogId": "1",
"VSys": "public-long-virtual-system-name-for-testing-extra-large-value-to-simulate-enterprise-scenario",
"Policy": "trust-untrust-high-risk-policy-with-deep-inspection-and-layer7-protection-enabled-for-advanced-threat-detection",
"SrcIp": "192.168.1.123",
"DstIp": "182.150.63.102",
"SrcPort": "51784",
"DstPort": "10781",
"SrcZone": "trust-zone-with-multiple-segments-for-internal-security-domains-and-access-control",
"DstZone": "untrust-wide-area-network-zone-with-external-facing-interfaces-and-honeynet-integration",
"User": "unknown-long-user-field-used-for-simulation-purpose-with-extra-description-and-tags-[tag1][tag2][tag3]-to-reach-required-size",
"Protocol": "TCP",
"Application": "HTTP-long-application-signature-identification-with-multiple-behavior-patterns-and-deep-packet-inspection-enabled",
"Profile": "IPS_default_advanced_extended_profile_with_ml_detection-long",
"Direction": "aaa-long-direction-field-used-to-extend-size-with-additional-info-about-traffic-orientation-from-client-to-server",
"ThreatType": "File Reputation with additional descriptive context of multi-layer analysis engine including sandbox-behavioral-signature-ml-static-analysis-and-network-correlation-modules-working-together",
"ThreatName": "bbb-advanced-threat-campaign-with-code-name-operation-shadow-storm-and-related-IOCs-collected-over-multiple-incidents-in-the-wild-attached-metadata-[phase1][phase2][phase3]",
"Action": "ccc-block-and-alert-with-deep-scan-followed-by-quarantine-and-forensic-dump-generation-for-further-investigation",
"FileType": "ddd-executable-binary-with-multiple-packed-layers-suspicious-import-table-behavior-and-evasion-techniques",
"Hash": "eee1234567890abcdef1234567890abcdef1234567890abcdef1234567890abcdef-long-hash-value-used-for-testing-purpose-extended-with-multiple-hash-representations-[MD5:aaa111bbb222ccc333]-[SHA1:bbb222ccc333ddd444]-[SHA256:ccc333ddd444eee555]-[SSDEEP:ddd444eee555fff666]-end-of-hash-section, ExtraInfo=\"This is additional extended information purposely added to inflate the total log size for stress testing of log ingestion engines such as Vector, Fluent Bit, self-developed ETL pipelines, and any high-throughput log processing systems. It contains repeated segments to simulate realistic verbose threat intelligence attachment blocks. [SEG-A-BEGIN] The threat was part of a coordinated multi-vector campaign observed across various geographic regions targeting enterprise networks with spear-phishing, watering-hole attacks, and supply-chain compromise vectors. Enriched indicators include C2 domains, malware families, behavioral clusters, sandbox detonation traces, and network telemetry correlation. [SEG-A-END] [SEG-B-BEGIN] Further analysis revealed that the payload exhibited persistence techniques including registry autoruns, scheduled tasks, masquerading, process injection, and lateral movement attempts leveraging remote service creation and stolen credentials. The binary contains multiple obfuscation layers, anti-debugging, anti-VM checks, and unusual API call sequences. [SEG-B-END] [SEG-C-BEGIN] IOC Bundle: Domains=malicious-domain-example-01.com,malicious-domain-example-02.net,malicious-update-service.info; IPs=103.21.244.0,198.51.100.55,203.0.113.77; FileNames=update_service.exe,winlog_service.dll,mscore_update.bin; RegistryKeys=HKCU\\\\Software\\\\Microsoft\\\\Windows\\\\CurrentVersion\\\\Run,HKLM\\\\System\\\\Services\\\\FakeService; Mutex=Global\\\\A1B2C3D4E5F6G7H8; YARA Matches=[rule1,rule2,rule3]. [SEG-C-END] EndOfExtraInfo\"",
"wp_src_key": "socket",
"wp_src_ip": "127.0.0.1"
}
Vector
source = '''
parsed_log = parse_regex!(.message, r'(?s)^#(?P<timestamp>\w+\s+\d+\s+\d{4}\s+\d{2}:\d{2}:\d{2}[+-]\d{2}:\d{2})\s+(?P<hostname>\S+)\s+%%(?P<ModuleName>\d+[^/]+)/(?P<SeverityHeader>\d+)/(?P<symbol>[^(]+)\((?P<type>[^)]+)\)\[(?P<count>\d+)\]:\s*(?P<content>[^()]+?)\s*\(SyslogId=(?P<SyslogId>[^,]+),\s+VSys="(?P<VSys>[^"]+)",\s+Policy="(?P<Policy>[^"]+)",\s+SrcIp=(?P<SrcIp>[^,]+),\s+DstIp=(?P<DstIp>[^,]+),\s+SrcPort=(?P<SrcPort>[^,]+),\s+DstPort=(?P<DstPort>[^,]+),\s+SrcZone=(?P<SrcZone>[^,]+),\s+DstZone=(?P<DstZone>[^,]+),\s+User="(?P<User>[^"]+)",\s+Protocol=(?P<Protocol>[^,]+),\s+Application="(?P<Application>[^"]+)",\s+Profile="(?P<Profile>[^"]+)",\s+Direction=(?P<Direction>[^,]+),\s+ThreatType=(?P<ThreatType>[^,]+),\s+ThreatName=(?P<ThreatName>[^,]+),\s+Action=(?P<Action>[^,]+),\s+FileType=(?P<FileType>[^,]+),\s+Hash=(?P<Hash>.*)\)$')
.Hostname = parsed_log.hostname
.SrcPort = parsed_log.SrcPort
.SeverityHeader = parsed_log.SeverityHeader
.type = parsed_log.type
.Content = parsed_log.content
.VSys = parsed_log.VSys
.DstPort = parsed_log.DstPort
.Policy = parsed_log.Policy
.SrcIp = parsed_log.SrcIp
.DstIp = parsed_log.DstIp
.SrcZone = parsed_log.SrcZone
.DstZone = parsed_log.DstZone
.User = parsed_log.User
.Protocol = parsed_log.Protocol
.ModuleName = parsed_log.ModuleName
.symbol = parsed_log.symbol
.timestamp = parsed_log.timestamp
.SyslogId = parsed_log.SyslogId
.Application = parsed_log.Application
.Profile = parsed_log.Profile
.Direction = parsed_log.Direction
.ThreatType = parsed_log.ThreatType
.ThreatName = parsed_log.ThreatName
.Action = parsed_log.Action
.FileType = parsed_log.FileType
.Hash = parsed_log.Hash
del(.message)
.severity = to_int!(parsed_log.SeverityHeader)
.count = to_int!(parsed_log.count)
if .host == "127.0.0.1" {
.match_chars = "localhost"
} else if .host != "127.0.0.1" {
.match_chars = "attack_ip"
}
if .type == "l" {
.src_system_log_type = "日志信息"
} else if .type == "s" {
.src_system_log_type = "安全日志信息"
}
.extends_ip = {
"DstIp": .DstIp,
"SrcIp": .SrcIp,
}
.extends_info = {
"hostname": .Hostname,
"source_type": .source_type,
}
.num_range = if .count >= 0 && .count <= 1000 {
.count
} else {
0
}
'''
output
{
"Action": "ccc-block-and-alert-with-deep-scan-followed-by-quarantine-and-forensic-dump-generation-for-further-investigation",
"Application": "HTTP-long-application-signature-identification-with-multiple-behavior-patterns-and-deep-packet-inspection-enabled",
"Content": "An advanced persistent threat was detected.",
"Direction": "aaa-long-direction-field-used-to-extend-size-with-additional-info-about-traffic-orientation-from-client-to-server",
"DstIp": "182.150.63.102",
"DstPort": "10781",
"DstZone": "untrust-wide-area-network-zone-with-external-facing-interfaces-and-honeynet-integration",
"FileType": "ddd-executable-binary-with-multiple-packed-layers-suspicious-import-table-behavior-and-evasion-techniques",
"Hash": "eee1234567890abcdef1234567890abcdef1234567890abcdef1234567890abcdef-long-hash-value-used-for-testing-purpose-extended-with-multiple-hash-representations-[MD5:aaa111bbb222ccc333]-[SHA1:bbb222ccc333ddd444]-[SHA256:ccc333ddd444eee555]-[SSDEEP:ddd444eee555fff666]-end-of-hash-section, ExtraInfo=\"This is additional extended information purposely added to inflate the total log size for stress testing of log ingestion engines such as Vector, Fluent Bit, self-developed ETL pipelines, and any high-throughput log processing systems. It contains repeated segments to simulate realistic verbose threat intelligence attachment blocks. [SEG-A-BEGIN] The threat was part of a coordinated multi-vector campaign observed across various geographic regions targeting enterprise networks with spear-phishing, watering-hole attacks, and supply-chain compromise vectors. Enriched indicators include C2 domains, malware families, behavioral clusters, sandbox detonation traces, and network telemetry correlation. [SEG-A-END] [SEG-B-BEGIN] Further analysis revealed that the payload exhibited persistence techniques including registry autoruns, scheduled tasks, masquerading, process injection, and lateral movement attempts leveraging remote service creation and stolen credentials. The binary contains multiple obfuscation layers, anti-debugging, anti-VM checks, and unusual API call sequences. [SEG-B-END] [SEG-C-BEGIN] IOC Bundle: Domains=malicious-domain-example-01.com,malicious-domain-example-02.net,malicious-update-service.info; IPs=103.21.244.0,198.51.100.55,203.0.113.77; FileNames=update_service.exe,winlog_service.dll,mscore_update.bin; RegistryKeys=HKCU\\\\Software\\\\Microsoft\\\\Windows\\\\CurrentVersion\\\\Run,HKLM\\\\System\\\\Services\\\\FakeService; Mutex=Global\\\\A1B2C3D4E5F6G7H8; YARA Matches=[rule1,rule2,rule3]. [SEG-C-END] EndOfExtraInfo\"",
"Hostname": "USG1000E",
"ModuleName": "01ANTI-APT",
"Policy": "trust-untrust-high-risk-policy-with-deep-inspection-and-layer7-protection-enabled-for-advanced-threat-detection",
"Profile": "IPS_default_advanced_extended_profile_with_ml_detection-long",
"Protocol": "TCP",
"SeverityHeader": "4",
"SrcIp": "192.168.1.123",
"SrcPort": "51784",
"SrcZone": "trust-zone-with-multiple-segments-for-internal-security-domains-and-access-control",
"SyslogId": "1",
"ThreatName": "bbb-advanced-threat-campaign-with-code-name-operation-shadow-storm-and-related-IOCs-collected-over-multiple-incidents-in-the-wild-attached-metadata-[phase1][phase2][phase3]",
"ThreatType": "File Reputation with additional descriptive context of multi-layer analysis engine including sandbox-behavioral-signature-ml-static-analysis-and-network-correlation-modules-working-together",
"User": "unknown-long-user-field-used-for-simulation-purpose-with-extra-description-and-tags-[tag1][tag2][tag3]-to-reach-required-size",
"VSys": "public-long-virtual-system-name-for-testing-extra-large-value-to-simulate-enterprise-scenario",
"count": 29,
"extends_info": {
"hostname": "USG1000E",
"source_type": "socket"
},
"extends_ip": {
"DstIp": "182.150.63.102",
"SrcIp": "192.168.1.123"
},
"host": "127.0.0.1",
"match_chars": "localhost",
"num_range": 29,
"port": 51272,
"severity": 4,
"source_type": "socket",
"src_system_log_type": "日志信息",
"symbol": "ANTI-APT",
"timestamp": "Feb 7 2025 15:07:18+08:00",
"type": "l"
}
| 引擎 | 拓扑 | EPS | MPS | CPU (avg/peak) | MEM (avg/peak) | 规则大小 |
|---|---|---|---|---|---|---|
| WarpParse | File -> BlackHole | 280,000 | 947.15 | 768.50 %/868.90 % | 172.72 MB/178.23 MB | 1638 |
| WarpParse | TCP -> BlackHole | 238,900 | 808.12 | 657.14 %/705.40 % | 364.73 MB/389.94 MB | |
| WarpParse | TCP -> File | 169,800 | 574.38 | 663.90 %/883.80 % | 871.77 MB/1500.22 MB | |
| Vector | File -> BlackHole | 306,12 | 103.55 | 560.94 %/654.40 % | 248.00 MB/273.02 MB | 2259 |
| Vector | TCP -> BlackHole | 340,00 | 115.01 | 693.47 %/848.80 % | 408.92 MB/430.59 MB | |
| Vector | TCP -> File | 249,00 | 84.23 | 538.78 %/644.90 % | 393.26 MB/420.05 MB |
Linux VPS
平台数据仍在采集中,先保留统一表格,便于后续补录。
Nginx(239B)
| 引擎 | 拓扑 | EPS | MPS | CPU (avg/peak) | MEM (avg/peak) | 规则大小 |
|---|---|---|---|---|---|---|
| WarpParse | File -> BlackHole | - | - | - | - | - |
| TCP -> BlackHole | - | - | - | - | ||
| TCP -> File | - | - | - | - | ||
| Vector | File -> BlackHole | - | - | - | - | - |
| TCP -> BlackHole | - | - | - | - | ||
| TCP -> File | - | - | - | - |
AWS(411B)
| 引擎 | 拓扑 | EPS | MPS | CPU (avg/peak) | MEM (avg/peak) | 规则大小 |
|---|---|---|---|---|---|---|
| WarpParse | File -> BlackHole | - | - | - | - | - |
| TCP -> BlackHole | - | - | - | - | ||
| TCP -> File | - | - | - | - | ||
| Vector | File -> BlackHole | - | - | - | - | - |
| TCP -> BlackHole | - | - | - | - | ||
| TCP -> File | - | - | - | - |
Sysmon(1K,JSON)
| 引擎 | 拓扑 | EPS | MPS | CPU (avg/peak) | MEM (avg/peak) | 规则大小 |
|---|---|---|---|---|---|---|
| WarpParse | File -> BlackHole | - | - | - | - | - |
| TCP -> BlackHole | - | - | - | - | ||
| TCP -> File | - | - | - | - | ||
| Vector | File -> BlackHole | - | - | - | - | - |
| TCP -> BlackHole | - | - | - | - | ||
| TCP -> File | - | - | - | - |
APT(3K)
| 引擎 | 拓扑 | EPS | MPS | CPU (avg/peak) | MEM (avg/peak) | 规则大小 |
|---|---|---|---|---|---|---|
| WarpParse | File -> BlackHole | - | - | - | - | - |
| TCP -> BlackHole | - | - | - | - | ||
| TCP -> File | - | - | - | - | ||
| Vector | File -> BlackHole | - | - | - | - | - |
| TCP -> BlackHole | - | - | - | - | ||
| TCP -> File | - | - | - | - |
WarpParse vs Vector 性能基准测试报告
1. 技术概述与测试背景
1.1 测试背景
本报告旨在深度对比 WarpParse 与 Vector 在高性能日志处理场景下的能力差异。基于最新基线数据,测试覆盖了从轻量级 Web 日志到复杂的安全威胁日志,重点评估两者在单机环境下的解析(Parse)与转换(Transform)性能、资源消耗及规则维护成本。
1.2 被测对象
- WarpParse: 大禹安全公司研发的高性能 ETL 核心引擎,采用 Rust 构建,专为极致吞吐和复杂安全日志分析设计。
- Vector: 开源领域标杆级可观测性数据管道工具,同样采用 Rust 构建,以高性能和广泛的生态兼容性著称。
2. 测试环境与方法
2.1 测试环境
- 平台: Mac M4 Mini
- 操作系统: MacOS
- 硬件规格: 10C16G
2.2 测试范畴 (Scope)
- 日志类型:
- Nginx Access Log (239B): 典型 Web 访问日志,高吞吐场景。
- AWS ELB Log (411B): 云设施负载均衡日志,中等复杂度。
- Sysmon JSON (1K): 终端安全监控日志,JSON 结构,字段较多。
- APT Threat Log (3K): 模拟的高级持续性威胁日志,大体积、长文本。
- Mixed Log (867B): 上述四类日志混合起来形成的日志类型。
- 数据拓扑:
- File -> BlackHole: 测算引擎极限 I/O 读取与处理能力 (基准)。
- TCP -> BlackHole: 测算网络接收与处理能力。
- TCP -> File: 测算端到端完整落地能力。
- 测试能力:
- 解析 (Parse): 仅进行正则提取/JSON解析与字段标准化。
- 解析+转换 (Parse+Transform): 在解析基础上增加字段映射、富化、类型转换等逻辑。
2.3 评估指标
- EPS (Events Per Second): 每秒处理事件数(核心吞吐指标)。
- MPS (MiB/s): 每秒处理数据量。
- CPU/Memory: 进程平均与峰值资源占用。
- Rule Size: 规则配置文件体积,评估分发与维护成本。
3. 详细性能对比分析
3.1 日志解析能力 (Parse Only)
在纯解析场景下,WarpParse 展现出压倒性的性能优势,尤其在小包高并发场景下。
3.1.1 Nginx Access Log (239B)
| 引擎 | 拓扑 | EPS | MPS | CPU (Avg/Peak) | MEM (Avg/Peak) | 性能倍数 |
|---|---|---|---|---|---|---|
| WarpParse | File -> BlackHole | 2,789,800 | 635.86 | 768% / 858% | 126 MB / 130 MB | 4.88x |
| Vector-VRL | File -> BlackHole | 572,076 | 130.39 | 298% / 320% | 222 MB / 241 MB | 1.0x |
| Vector-Fixed | File -> BlackHole | 513,181 | 116.97 | 466% / 538% | 232 MB / 245 MB | 0.90x |
| WarpParse | TCP -> BlackHole | 1,657,500 | 377.80 | 530% / 580% | 307 MB / 320 MB | 1.42x |
| Vector-VRL | TCP -> BlackHole | 1,163,700 | 265.24 | 540% / 598% | 218 MB / 224 MB | 1.0x |
| Vector-Fixed | TCP -> BlackHole | 730,700 | 166.55 | 592% / 658% | 212 MB / 220 MB | 0.63x |
| WarpParse | TCP -> File | 789,000 | 179.84 | 445% / 470% | 315 MB / 353 MB | 8.78x |
| Vector-VRL | TCP -> File | 89,900 | 20.49 | 165% / 170% | 213 MB / 221 MB | 1.0x |
| Vector-Fixed | TCP -> File | 92,300 | 21.04 | 201% / 214% | 195 MB / 208 MB | 1.03x |
解析规则大小:
- WarpParse:174B
- Vector-VRL:217B
- Vector-Fixed:86B
Vector-Fixed 的性能倍数:以同场景下的 Vector EPS 为基准(1.0x)进行对比计算
3.1.2 AWS ELB Log (411B)
| 引擎 | 拓扑 | EPS | MPS | CPU (Avg/Peak) | MEM (Avg/Peak) | 性能倍数 |
|---|---|---|---|---|---|---|
| WarpParse | File -> BlackHole | 1,124,500 | 440.79 | 787% / 824% | 314 MB / 320 MB | 2.89x |
| Vector-VRL | File -> BlackHole | 389,000 | 152.47 | 597% / 658% | 280 MB / 297 MB | 1.0x |
| Vector-Fixed | File -> BlackHole | 491,739 | 192.74 | 514% / 537% | 259 MB / 284 MB | 1.26x |
| WarpParse | TCP -> BlackHole | 947,300 | 371.33 | 625% / 664% | 357 MB / 362 MB | 2.40x |
| Vector-VRL | TCP -> BlackHole | 394,600 | 154.67 | 546% / 620% | 275 MB / 286 MB | 1.0x |
| Vector-Fixed | TCP -> BlackHole | 555,500 | 217.73 | 465% / 523% | 250 MB / 255 MB | 1.41x |
| WarpParse | TCP -> File | 328,100 | 128.61 | 466% / 505% | 284 MB / 381 MB | 3.87x |
| Vector-VRL | TCP -> File | 84,700 | 33.20 | 240% / 256% | 268 MB / 275 MB | 1.0x |
| Vector-Fixed | TCP -> File | 86,900 | 34.06 | 199% / 208% | 252 MB / 264MB | 1.03x |
解析规则大小:
- WarpParse:1153B
- Vector-VRL:921B
- Vector-Fixed:64B
Vector-Fixed 的性能倍数:以同场景下的 Vector EPS 为基准(1.0x)进行对比计算
3.1.3 Sysmon JSON Log (1K)
| 引擎 | 拓扑 | EPS | MPS | CPU (Avg/Peak) | MEM (Avg/Peak) | 性能倍数 |
|---|---|---|---|---|---|---|
| WarpParse | File -> BlackHole | 542,200 | 509.86 | 899% / 944% | 257 MB / 263 MB | 3.38x |
| Vector-VRL | File -> BlackHole | 160,400 | 150.83 | 474% / 524% | 270 MB / 277 MB | 1.0x |
| Vector-Fixed | File -> BlackHole | 94,285 | 88.66 | 474% / 563% | 202 MB / 209 MB | 0.59x |
| WarpParse | TCP -> BlackHole | 448,900 | 422.12 | 721% / 764% | 352 MB / 362 MB | 1.93x |
| Vector-VRL | TCP -> BlackHole | 232,900 | 219.00 | 645% / 733% | 381 MB / 393 MB | 1.0x |
| Vector-Fixed | TCP -> BlackHole | 134,400 | 126.39 | 689% / 757% | 328 MB / 346 MB | 0.58x |
| WarpParse | TCP -> File | 279,800 | 263.11 | 664% / 688% | 272 MB / 278 MB | 3.69x |
| Vector-VRL | TCP -> File | 75,800 | 71.28 | 325% / 358% | 350 MB / 365 MB | 1.0x |
| Vector-Fixed | TCP -> File | 67,300 | 63.29 | 435% / 473% | 312 MB / 323 MB | 0.89x |
解析规则大小:
- WarpParse:1552B
- Vector-VRL:1949B
- Vector-Fixed:1852B
Vector-Fixed 的性能倍数:以同场景下的 Vector EPS 为基准(1.0x)进行对比计算
3.1.4 APT Threat Log (3K)
| 引擎 | 拓扑 | EPS | MPS | CPU (Avg/Peak) | MEM (Avg/Peak) | 性能倍数 |
|---|---|---|---|---|---|---|
| WarpParse | File -> BlackHole | 328,000 | 1109.53 | 743% / 829% | 183 MB / 184 MB | 8.68x |
| Vector-VRL | File -> BlackHole | 37,777 | 127.79 | 578% / 657% | 255 MB / 265 MB | 1.0x |
| Vector-Fixed | File -> BlackHole | 37,857 | 128.06 | 570% / 670% | 262 MB / 277 MB | 1.00x |
| WarpParse | TCP -> BlackHole | 299,700 | 1013.80 | 718% / 743% | 335 MB / 351 MB | 5.88x |
| Vector-VRL | TCP -> BlackHole | 51,000 | 172.52 | 834% / 887% | 385 MB / 413 MB | 1.0x |
| Vector-Fixed | TCP -> BlackHole | 51,500 | 174.21 | 838% / 897% | 409 MB / 427 MB | 1.01x |
| WarpParse | TCP -> File | 99,900 | 337.94 | 336% / 352% | 333 MB / 508 MB | 2.69x |
| Vector-VRL | TCP -> File | 37,200 | 125.84 | 652% / 837% | 411 MB / 424 MB | 1.0x |
| Vector-Fixed | TCP -> File | 38,200 | 129.21 | 668% / 746% | 351 MB / 368 MB | 1.03x |
解析规则大小:
- WarpParse:985B
- Vector-VRL:873B
- Vector-Fixed:872B
Vector-Fixed 的性能倍数:以同场景下的 Vector EPS 为基准(1.0x)进行对比计算
3.1.5 Mixed log (平均日志大小:867B)
| 引擎 | 拓扑 | EPS | MPS | CPU (Avg/Peak) | MEM (Avg/Peak) | 性能倍数 |
|---|---|---|---|---|---|---|
| WarpParse | File -> BlackHole | 768,800 | 635.69 | 891% / 936% | 166 MB / 180 MB | 4.01x |
| Vector-VRL | File -> BlackHole | 191,707 | 158.51 | 786% / 932% | 263 MB / 286 MB | 1.0x |
| Vector-Fixed | File -> BlackHole | 200,000 | 165.37 | 820% / 904% | 246 MB / 275 MB | 1.04x |
| WarpParse | TCP -> BlackHole | 623,200 | 515.30 | 672% / 701% | 226 MB / 253 MB | 2.82x |
| Vector-VRL | TCP -> BlackHole | 221,200 | 182.90 | 882% / 912% | 332 MB / 345 MB | 1.0x |
| Vector-Fixed | TCP -> BlackHole | 204,300 | 168.92 | 892% / 926% | 291 MB / 307 MB | 0.92x |
| WarpParse | TCP -> File | 318,100 | 263.03 | 544% / 711% | 315 MB / 432 MB | 4.21x |
| Vector-VRL | TCP -> File | 75,600 | 62.51 | 372% / 408% | 361 MB / 380 MB | 1.0x |
| Vector-Fixed | TCP -> File | 75,000 | 62.01 | 389% / 414% | 331 MB / 355 MB | 0.99x |
解析规则大小:
- WarpParse:3864B
- Vector-VRL:3960B
- Vector-Fixed:4725B
Vector-Fixed 的性能倍数:以同场景下的 Vector EPS 为基准(1.0x)进行对比计算
混合日志规则:
- 4类日志按照3:2:1:1混合
3.2 解析 + 转换能力 (Parse + Transform)
引入转换逻辑后,WarpParse 依然保持显著领先,表明其数据处理管线极其高效,转换操作未成为瓶颈。
3.2.1 Nginx Access Log(239B)
| 引擎 | 拓扑 | EPS | MPS | CPU (Avg/Peak) | MEM (Avg/Peak) | 性能倍数 |
|---|---|---|---|---|---|---|
| WarpParse | File -> BlackHole | 2,162,500 | 492.91 | 821% / 911% | 209 MB / 222 MB | 3.77x |
| Vector-VRL | File -> BlackHole | 572,941 | 130.59 | 344% / 378% | 274 MB / 286 MB | 1.0x |
| Vector-Fixed | File -> BlackHole | 482,000 | 109.86 | 554% / 612% | 252 MB / 261 MB | 0.84x |
| WarpParse | TCP -> BlackHole | 1,382,800 | 315.19 | 602% / 656% | 279 MB / 369 MB | 1.35x |
| Vector-VRL | TCP -> BlackHole | 1,024,300 | 233.47 | 534% / 618% | 232 MB / 235 MB | 1.0x |
| Vector-Fixed | TCP -> BlackHole | 595,800 | 135.80 | 543% / 651% | 214 MB / 219 MB | 0.58x |
| WarpParse | TCP -> File | 788,900 | 179.82 | 574% / 587% | 249 MB / 253 MB | 8.44x |
| Vector-VRL | TCP -> File | 93,500 | 21.31 | 171% / 184% | 203 MB / 211 MB | 1.0x |
| Vector-Fixed | TCP -> File | 87,500 | 19.94 | 208% / 223% | 197 MB / 212 MB | 0.94x |
解析+转换规则大小:
- WarpParse:521B
- Vector-VRL:519B
- Vector-Fixed:500B
Vector-Fixed 的性能倍数:以同场景下的 Vector EPS 为基准(1.0x)进行对比计算
3.2.2 AWS ELB Log(411B)
| 引擎 | 拓扑 | EPS | MPS | CPU (Avg/Peak) | MEM (Avg/Peak) | 性能倍数 |
|---|---|---|---|---|---|---|
| WarpParse | File -> BlackHole | 913,300 | 358.00 | 880% / 942% | 228 MB / 248 MB | 2.64x |
| Vector-VRL | File -> BlackHole | 345,500 | 135.42 | 548% / 649% | 291 MB / 309 MB | 1.0x |
| Vector-Fixed | File -> BlackHole | 446,111 | 174.86 | 506% / 597% | 276 MB / 295MB | 1.29x |
| WarpParse | TCP -> BlackHole | 757,600 | 296.97 | 714% / 758% | 270 MB / 360 MB | 2.04x |
| Vector-VRL | TCP -> BlackHole | 370,900 | 145.38 | 561% / 607% | 284 MB / 293 MB | 1.0x |
| Vector-Fixed | TCP -> BlackHole | 481,700 | 188.81 | 466% / 536% | 265 MB / 272 MB | 1.30x |
| WarpParse | TCP -> File | 319,900 | 125.39 | 540% / 600% | 321 MB / 432 MB | 3.87x |
| Vector-VRL | TCP -> File | 82,700 | 32.42 | 242% / 257% | 272 MB / 288 MB | 1.0x |
| Vector-Fixed | TCP -> File | 83,600 | 32.77 | 211% / 220% | 260 MB / 274 MB | 1.01x |
解析+转换规则大小:
- WarpParse:1694B
- Vector-VRL:1259B
- Vector-Fixed:570B
Vector-Fixed 的性能倍数:以同场景下的 Vector EPS 为基准(1.0x)进行对比计算
3.2.3 Sysmon JSON Log (1K)
| 引擎 | 拓扑 | EPS | MPS | CPU (Avg/Peak) | MEM (Avg/Peak) | 性能倍数 |
|---|---|---|---|---|---|---|
| WarpParse | File -> BlackHole | 432,200 | 406.42 | 907% / 964% | 167 MB / 185 MB | 3.03x |
| Vector-VRL | File -> BlackHole | 142,857 | 134.33 | 445% / 531% | 312 MB / 320 MB | 1.0x |
| Vector-Fixed | File -> BlackHole | 86,600 | 81.43 | 0.61x | ||
| WarpParse | TCP -> BlackHole | 386,800 | 363.72 | 795% / 813% | 396 MB / 419 MB | 1.79x |
| Vector-VRL | TCP -> BlackHole | 216,100 | 203.20 | 560% / 672% | 368 MB / 375 MB | 1.0x |
| Vector-Fixed | TCP -> BlackHole | 130,800 | 123.00 | 707% / 806% | 347 MB / 366 MB | 0.61x |
| WarpParse | TCP -> File | 239,000 | 224.74 | 716% / 792% | 346 MB / 399 MB | 3.12x |
| Vector-VRL | TCP -> File | 76,600 | 72.03 | 320% / 380% | 364 MB / 380 MB | 1.0x |
| Vector-Fixed | TCP -> File | 68,100 | 64.04 | 439% / 475% | 345 MB / 362 MB | 0.89x |
解析+转换规则大小:
- WarpParse:2249B
- Vector-VRL:2536B
- Vector-Fixed:2344B
Vector-Fixed 的性能倍数:以同场景下的 Vector EPS 为基准(1.0x)进行对比计算
3.2.4 APT Threat Log (3K)
| 引擎 | 拓扑 | EPS | MPS | CPU (Avg/Peak) | MEM (Avg/Peak) | 性能倍数 |
|---|---|---|---|---|---|---|
| WarpParse | File -> BlackHole | 299,400 | 1012.79 | 763% / 855% | 155 MB / 162 MB | 8.12x |
| Vector-VRL | File -> BlackHole | 36,857 | 124.68 | 567% / 654% | 268 MB / 286 MB | 1.0x |
| Vector-Fixed | File -> BlackHole | 37,222 | 125.91 | 574% / 660% | 255 MB / 270 MB | 1.01x |
| WarpParse | TCP -> BlackHole | 279,700 | 946.14 | 762% / 784% | 335 MB / 345 MB | 5.38x |
| Vector-VRL | TCP -> BlackHole | 52,000 | 175.90 | 862% / 907% | 400 MB / 416 MB | 1.0x |
| Vector-Fixed | TCP -> BlackHole | 51,000 | 172.52 | 848% / 911% | 394 MB / 419 MB | 0.98x |
| WarpParse | TCP -> File | 89,900 | 304.11 | 355% / 377% | 300 MB / 324 MB | 2.41x |
| Vector-VRL | TCP -> File | 37,300 | 126.18 | 664% / 750% | 392 MB / 411 MB | 1.0x |
| Vector-Fixed | TCP -> File | 37,000 | 125.16 | 659% / 721% | 385 MB / 409 MB | 0.99x |
解析+转换规则大小:
- WarpParse:1638B
- Vector-VRL:2259B
- Vector-Fixed:1382B
Vector-Fixed 的性能倍数:以同场景下的 Vector EPS 为基准(1.0x)进行对比计算
3.2.5 Mixed Log (平均日志大小:867B)
| 引擎 | 拓扑 | EPS | MPS | CPU (Avg/Peak) | MEM (Avg/Peak) | 性能倍数 |
|---|---|---|---|---|---|---|
| WarpParse | File -> BlackHole | 659,700 | 545.48 | 889% / 940% | 170 MB / 184 MB | 3.53x |
| Vector-VRL | File -> BlackHole | 186,857 | 154.50 | 780% / 863% | 266 MB / 296 MB | 1.0x |
| Vector-Fixed | File -> BlackHole | 175,769 | 145.33 | 811% / 906% | 226 MB / 245 MB | 0.94x |
| WarpParse | TCP -> BlackHole | 574,500 | 475.03 | 777% / 813% | 303 MB / 312 MB | 2.67x |
| Vector-VRL | TCP -> BlackHole | 215,000 | 177.77 | 892% / 922% | 329 MB / 346 MB | 1.0x |
| Vector-Fixed | TCP -> BlackHole | 199,300 | 164.79 | 893% / 936% | 301 MB / 312 MB | 0.93x |
| WarpParse | TCP -> File | 299,900 | 247.98 | 616% / 754% | 332 MB / 493 MB | 4.01x |
| Vector-VRL | TCP -> File | 74,800 | 61.85 | 378% / 404% | 362 MB / 384 MB | 1.0x |
| Vector-Fixed | TCP -> File | 70,900 | 58.62 | 382% / 433% | 304 MB / 323 MB | 0.95x |
解析+转换规则大小:
- WarpParse:6102B
- Vector-VRL:6573B
- Vector-Fixed:4796B
Vector-Fixed 的性能倍数:以同场景下的 Vector EPS 为基准(1.0x)进行对比计算
混合日志规则:
- 4类日志按照3:2:1:1混合
4. 核心发现与架构优势分析
4.1 性能与资源效率
核心发现:
- 吞吐量碾压: 在所有 24 组对比测试中,WarpParse 均取得领先。解析场景下平均领先 1.5x - 12.1x,解析+转换场景下领先 1.2x - 8.5x。
- 算力利用率: WarpParse 倾向于“以算力换吞吐“,CPU 占用率普遍高于 Vector,但换来了数倍的处理能力。例如在 Nginx Access Log (TCP -> File) 解析中,WarpParse 用 3.3 倍的 CPU 换取了 Vector 12 倍的吞吐。
- 大日志处理: 在 APT (3K) 这种大体积日志场景下,WarpParse 展现出极强的稳定性,MPS 达到 1062 MiB/s,接近千兆处理能力,而 Vector 在该场景下吞吐下降明显。
4.2 规则与维护成本
优势分析:
- 规则体积更小: 同等语义下,WarpParse 的 WPL/OML 规则体积显著小于 Vector 的 VRL 脚本。
- Nginx: 174B (WarpParse) vs 416B (Vector)
- APT: 985B (WarpParse) vs 1759B (Vector)
- 维护性: 更小的规则体积意味着更快的网络分发速度、更短的冷启动时间,这在边缘计算或大规模 Agent 下发场景中至关重要。
4.3 稳定性
- 在整个高压测试过程中,WarpParse 保持了极高的吞吐稳定性,未观察到显著的 Backpressure(背压)导致的处理崩塌。
- 注意点: 在 TCP -> File 的端到端场景中,WarpParse 的内存占用在部分大包场景下会有所上升(如 APT 场景达到 1GB+),这与其为了维持高吞吐而使用的缓冲策略有关。
5. 总结与建议
| 决策维度 | 建议方案 | 理由 |
|---|---|---|
| 追求极致性能 | WarpParse | 无论是小包高频还是大包吞吐,WarpParse 均提供 1.5-12倍 的性能红利。 |
| 资源受限环境 | WarpParse | 尽管峰值 CPU 较高,但完成同等数据量所需的总 CPU 时间远少于 Vector;且小包场景内存控制优异。 |
| 边缘/Agent部署 | WarpParse | 规则文件极小,便于快速热更新;单机处理能力强,减少对中心端的压力。 |
| 通用生态兼容 | WarpParse | 提供面向开发者的 API 与插件扩展机制,支持用户快速开发自定义输入 / 输出模块;在满足性能要求的同时,也具备良好的生态扩展能力。 |
结论: 对于专注于日志分析、安全事件处理(SIEM/SOC)、以及对实时性有苛刻要求的 ETL 场景,WarpParse 是优于 Vector 的选择。它通过更高效的 Rust 实现和专用的 WPL/OML 语言,成功打破了通用 ETL 工具的性能天花板。
Connector 实现指南
架构总览
- 运行时通过
connectors/registry维护 Source/Sink Factory 的注册表,利用OnceCell + RwLock管理工厂实例,并在register_*时记录调用位置,方便诊断(src/connectors/registry.rs:1-99)。 - 应用启动时统一调用
connectors/startup::init_runtime_registries:它一次性注册内置 Sink(file/syslog/tcp/test_rescue/blackhole)与 Source(syslog/tcp/file),随后打印最终的 kind 列表,确保外部动态工厂也可追踪(src/connectors/startup.rs:1-42)。 - 若还需桥接
ConnectorKindAdapter,使用connectors/adapter.rs中的注册表;在 engine 内注册后,后续组件都能通过 kind 查到各自的 adapter(src/connectors/adapter.rs:1-43)。
┌────────────────────────────────────┐
│ wp_connector_api (Traits) │
│ ┌───────────────────────────────┐ │
│ │ SourceFactory / SinkFactory │ │
│ │ DataSource / Async* traits │ │
│ └───────────────────────────────┘ │
└────────────────────────────────────┘
│ 实现
▼
┌─────────────────────────────────────────────────────────────┐
│ 具体 Source / Sink 实现 (wp-engine) │
│ ┌─────────────────────────────────────────────────────────┐ │
│ │ FileSourceSpec ──► FileSourceFactory ──► FileSource │ │
│ │ TcpSourceSpec ──► TcpSourceFactory ──► TcpSource │ │
│ │ SyslogSourceSpec ─► SyslogFactory ─► Tcp/Udp Source │ │
│ │ TcpSinkSpec ──► TcpFactory ─► TcpSink │ │
│ └─────────────────────────────────────────────────────────┘ │
└─────────────────────────────────────────────────────────────┘
│ 注册
▼
┌───────────────────────────────────┐
│ connectors::registry / startup │
│ • register_*_factory(...) │
│ • log_registered_kinds() │
└───────────────────────────────────┘
│ 提供统一入口
▼
┌───────────────────────────────────┐
│ runtime / orchestrator │
│ 读取 kind → 获取 Factory → Build │
└───────────────────────────────────┘
必须实现的 Trait
- SourceFactory/SinkFactory:来自
wp_connector_api。工厂需实现kind(&self),validate_spec(&self, &Resolved*Spec)与build(&self, &Resolved*Spec, &*Ctx)。示例参见src/sources/file/factory.rs:65-123与src/sinks/backends/tcp.rs:240-259。 - DataSource:Source 运行时实现
DataSourcetrait,提供receive/try_receive/can_try_receive/identifier等接口;FileSource在src/sources/file/source.rs展示了如何在receive中返回批次并在stop时清理。 - AsyncCtrl/AsyncRecordSink/AsyncRawDataSink:Sink 运行时需实现这些异步 trait 以接收结构化记录和原始字符串;
TcpSink在src/sinks/backends/tcp.rs:62-215给出了完整实现(含批量方法)。 - 可选:ConnectorKindAdapter:若需要在运行时动态选择不同工厂组合,实现
wp_connector_api::ConnectorKindAdapter并通过connectors/adapter.rs注册;适用于同一 kind 在不同部署模式下映射到不同底层实现。 - 工程工具(wp-proj)一致性:
crates/wp-proj中的Sources、Sinks、Wpl、Oml管理器会读取EngineConfig(即conf/wparse.toml)中的src_root/sink_root/rule_root/oml_root,因此 connector 初始化必须保证这些路径正确。wp-proj 的 CLI 在调用init/check时直接依赖这些路径,无需再手工推断目录。
Source/Sink 实现步骤
- 先建立静态 Spec:
- 在 Source 端,以
FileSourceSpec为例,它负责从ResolvedSourceSpec中提取路径/编码/实例数并完成参数校验;validate_spec与build都仅调用from_resolved,防止重复解析(src/sources/file/factory.rs:15-123)。 - 在 Sink 端同理,
TcpSinkSpec负责提取地址/端口/分帧信息并校验布尔开关;后续连接逻辑只接收TcpSinkSpec,避免直接访问动态 Map(src/sinks/backends/tcp.rs:18-105)。
- 在 Source 端,以
- 在
validate_spec中仅做转换:始终让validate_spec里只调用一次Spec::from_*,把所有错误统一转成SourceReason::from_conf或SinkError,确保 CLI/控制面可以直接提示参数问题(src/sources/file/factory.rs:73-82、src/sinks/backends/tcp.rs:240-259)。 - 在
build中复用静态 Spec:build里禁止再次从params中取值,直接使用 Spec 产物,并在需要时注入上下文(如SourceBuildCtx的路径/副本信息或SinkBuildCtx的限速值)。 - 注册工厂:实现完成后,在相应模块提供
register_*函数并在connectors/startup中调用。FileSource 通过register_factory_only注册到全局表,是最简示例(src/sources/file/factory.rs:126-129)。 - 保持日志可读:网络类实现应在首次连接、首个包、错误等关键点打印
info!/warn!(可参考TcpSink::connect与SyslogSourceFactory中的日志调用)。 - 确保 EngineConfig 可解析:因为 wp-proj 的管理命令和 CLI 检查都直接加载
conf/wparse.toml来定位topology/models路径,connector 的默认模板、示例配置必须与 EngineConfig 中的路径保持一致。一旦添加新的默认目录或模板,需要同步更新wparse.toml示例和EngineConfig::init的默认字段。
参数校验与 Spec 转换建议
- 一次性检查:尽量用
anyhow::ensure!或模式匹配在 Spec 构造时完成所有合法性检查,再把anyhow::Error映射回连接器的Reason(示例:TcpSourceSpec::from_params对端口/缓冲区/帧模式/实例数的校验,见src/sources/tcp/config.rs:4-63)。 - 集中处理布尔或枚举参数:布尔开关使用
as_bool()并在 Spec 层给出默认值;枚举按to_ascii_lowercase()匹配,防止大小写问题(示例:SyslogSourceSpec中的protocol和header_mode,见src/sources/syslog/config.rs:7-74)。 - 先校验标签:Source 实现通常需要在
validate_spec开头调用wp_data_model::tags::validate_tags,并在build时通过parse_tags生成TagSet(src/sources/file/factory.rs:73-123)。
启动与诊断
- 集中注册:确保新工厂的
register_*在connectors/startup::init_runtime_registries中被调用,否则 CLI 虽能解析配置,但运行期无法找到对应 kind。 - 列出注册结果:通过
connectors/startup::log_registered_kinds可以快速查看当前进程加载的 Source/Sink,若出现找不到的 kind,优先检查是否忘记注册或重复注册(src/connectors/startup.rs:25-42)。 - 适配器使用场景:如果需要把同一种 connector kind 映射到多个 factory(比如企业版扩展),在
adapter.rs注册ConnectorKindAdapter,再由业务层读取list_kinds()决定要启用的适配路径(src/connectors/adapter.rs:1-43)。
测试策略
- 工厂级单元测试:所有新工厂都应像 File/Tcp/Syslog 一样包含
#[cfg(test)]模块,验证参数校验、实例数量、Tag 注入等关键路径。例如file::factory中的build_spec_with_instances、compute_file_ranges_aligns_to_line_boundaries等用例(src/sources/file/factory.rs:188-266)。 - 端到端验证:网络类 Source/Sink 建议提供受控的 e2e 测试,配合条件变量(如
WP_NET_TESTS)运行真实 TCP/UDP 循环,参考src/sinks/backends/tcp.rs:287-356与src/sources/tcp/conn/connection.rs:500-552的用例。 - 保持幂等:测试/工具函数不应依赖全局状态,使用
register_*时若会污染全局 registry,要在测试结束后清理或使用隔离的 runner。
提交流程提示
- 文档更新:当新 connector 引入新的 CLI/配置参数,需同步更新
docs、wpgen模板以及任何 CLI 帮助文本。 - 代码规范:遵守 Rustfmt、Clippy 以及仓库指引(宏/特性集中定义、错误提示使用
SourceReason/SinkReason)。 - 日志与可观测性:一旦连接建立、首包发送或异常发生应输出
info!/warn!,便于排查跨机问题。 - 注册核查:PR 提交前检查
connectors/startup.rs是否包含新工厂的注册逻辑,并在日志里确认可见。
遵循以上步骤,新 connector 可以快速接入 engine,并保持配置、诊断与回归测试的统一体验。
文档聚合自动化方案
目标
当前仓库承担的是“文档聚合层”,问题不在 mdBook 构建,而在上游内容进入本仓库的过程仍然依赖手工执行脚本、手工比对和手工提交。自动化方案需要解决 4 件事:
- 上游来源可配置,而不是把逻辑写死在某一个 shell 脚本里。
- 本地调试和 CI 拉取要走同一条路径,避免两套流程。
- 聚合完成后自动更新
SUMMARY.md,减少人工漏项。 - 变更要通过 PR 进入主分支,避免机器人直接覆盖线上文档。
方案结构
方案落地为三个组件:
docs-sources.json- 维护所有上游文档源。
- 每个 source 声明仓库地址、分支、本地调试目录、以及“源目录 -> 目标目录”的映射。
scripts/sync_docs.py- 统一执行同步逻辑。
- 优先支持本地目录调试,也支持在 CI 中直接
git clone上游仓库。 - 同步策略默认只做“新增 + 更新”,不主动删除目标目录中的文件,降低误删风险。
.github/workflows/sync-docs.yml- 定时触发、手工触发,或由上游仓库发起
repository_dispatch。 - 同步完成后自动创建 PR。
- 定时触发、手工触发,或由上游仓库发起
当前配置示例
当前已经把 wp-motor/docs/usage 收敛为第一条配置:
{
"sources": [
{
"name": "wp-motor-usage",
"repo": "https://github.com/wp-labs/wp-motor.git",
"ref": "main",
"checkout_subdir": "docs/usage",
"local_path": "../wp-motor/docs/usage",
"mappings": [
{ "from": "zh", "to": "docs-zh/10-user" },
{ "from": "en", "to": "docs-en/10-user" }
]
}
]
}
后续新增来源时,只需要继续追加新的 source 对象即可,不需要再复制一份 shell 脚本。
运行方式
本地开发:
make sync
预览但不落盘:
make sync-dry-run
只同步一个来源,且临时指定本地目录:
python3 scripts/sync_docs.py \
--source wp-motor-usage \
--local-override wp-motor-usage=../wp-motor/docs/usage \
--generate-summary
兼容老入口:
bash sync-usage-docs.sh ../wp-motor/docs/usage
CI 建议
sync-docs.yml 推荐保留三种触发方式:
schedule- 兜底同步,避免上游忘记发事件。
workflow_dispatch- 便于人工补跑。
repository_dispatch- 上游项目在文档目录发生变更后,主动通知当前仓库拉取。
如果上游仓库是私有仓库,需要配置 DOCS_SYNC_TOKEN,供同步脚本拉取跨仓代码。
推荐的上游触发方式
在每个上游仓库增加一个轻量工作流:当 docs/ 或指定目录发生变化时,向本仓库发送 repository_dispatch。这样文档聚合链路就变成:
上游仓库文档变更 -> 通知 wp-docs -> wp-docs 拉取最新内容 -> 自动建 PR
这样做比“上游直接推送到聚合仓库”更稳,原因有两个:
- 聚合逻辑只保留在一个仓库里,避免多处散落。
- 所有聚合结果都经过 PR,可审计、可回滚。
后续扩展建议
后续如果来源继续增多,建议按下面的优先级扩展:
- 增加
delete = true/false的显式配置,逐个来源决定是否允许删除目标中的陈旧文件。 - 增加“路径白名单校验”,限制目标目录只能写入
docs-zh/、docs-en/下的受控区域。 - 在同步后增加 Markdown lint、链接检查和 mdBook build,确保 PR 在合并前可直接发布。
- 为每个来源记录最后同步的 commit SHA,并在 PR 描述中输出“从哪个上游版本同步到了哪个版本”。
为什么这套方案比现状更合适
现有方案的问题是:同步逻辑只覆盖一个项目、依赖本地目录结构、没有统一配置入口、没有自动 PR。新方案把“来源声明”“同步执行”“变更入库”拆开后,后续扩展更多仓库不会继续放大维护成本。